Parasol AI Developer Workflow - 60 minutes
1. Goals of this lab
Parasol is standardizing on an internal developer portal (IDP) for its developers to use to build, deploy, and manage cloud native applications, including those with AI capabilities. In this exercise, you will learn how to harness the power of the Parasol internal developer portal to streamline and enhance your development workflow for AI apps. This exercise will guide you through creating a new application using a software template, observing the automatic CI/CD processes powered by Tekton and Argo, and using your web-based IDE, Red Hat Dev Spaces. You’ll create a new branch to develop and add an AI feature, in this case an email generator. After merging your pull request, you’ll monitor the deployment process via OpenShift GitOps in the Red Hat Dev Hub dashboard. Finally, you’ll verify the functionality of your new application by accessing its frontend page. This hands-on experience will empower you to efficiently utilize the Parasol developer portal for seamless application development and deployment.
2. Deploy the existing Parasol application in Red Hat Developer Hub
Red Hat Developer Hub (RHDH) is an enterprise-grade, self-managed, and customizable developer portal built on top of Backstage.io. It’s designed to streamline the development process for organizations, specifically those using Red Hat products and services. Here’s a breakdown of its key benefits:
-
Increased Developer Productivity: Reduces time spent searching for resources and setting up environments.
-
Improved Collaboration: Provides a central platform for developers to share knowledge and best practices.
-
Reduced Cognitive Load: Minimizes the need for developers to juggle multiple tools and resources.
-
Enterprise-Grade Support: Backed by Red Hat’s support infrastructure, ensuring stability and reliability.
Red Hat Developer Hub has already been installed and configured in the workshop environment.
2.1. Access Red Hat Developer Hub
Red Hat Developer Hub integrates with Red Hat Single Sign On (RH-SSO) to enhance security and user experience for developers within an organization. By integrating with RH-SSO, developers only need to log in once to access both RHDH and other applications secured by RH-SSO. This eliminates the need to manage multiple login credentials for different developer tools and services. RH-SSO centralizes user authentication and authorization to strengthen security by ensuring only authorized users can access RHDH and other protected resources. In addition, The platform engineering team can manage user access and permissions centrally through RH-SSO, simplifying administration and reducing the risk of unauthorized access.
To get started, access Red Hat Developer Hub Dashboard to authenticate by GitLab.
Choose the GitLab option.
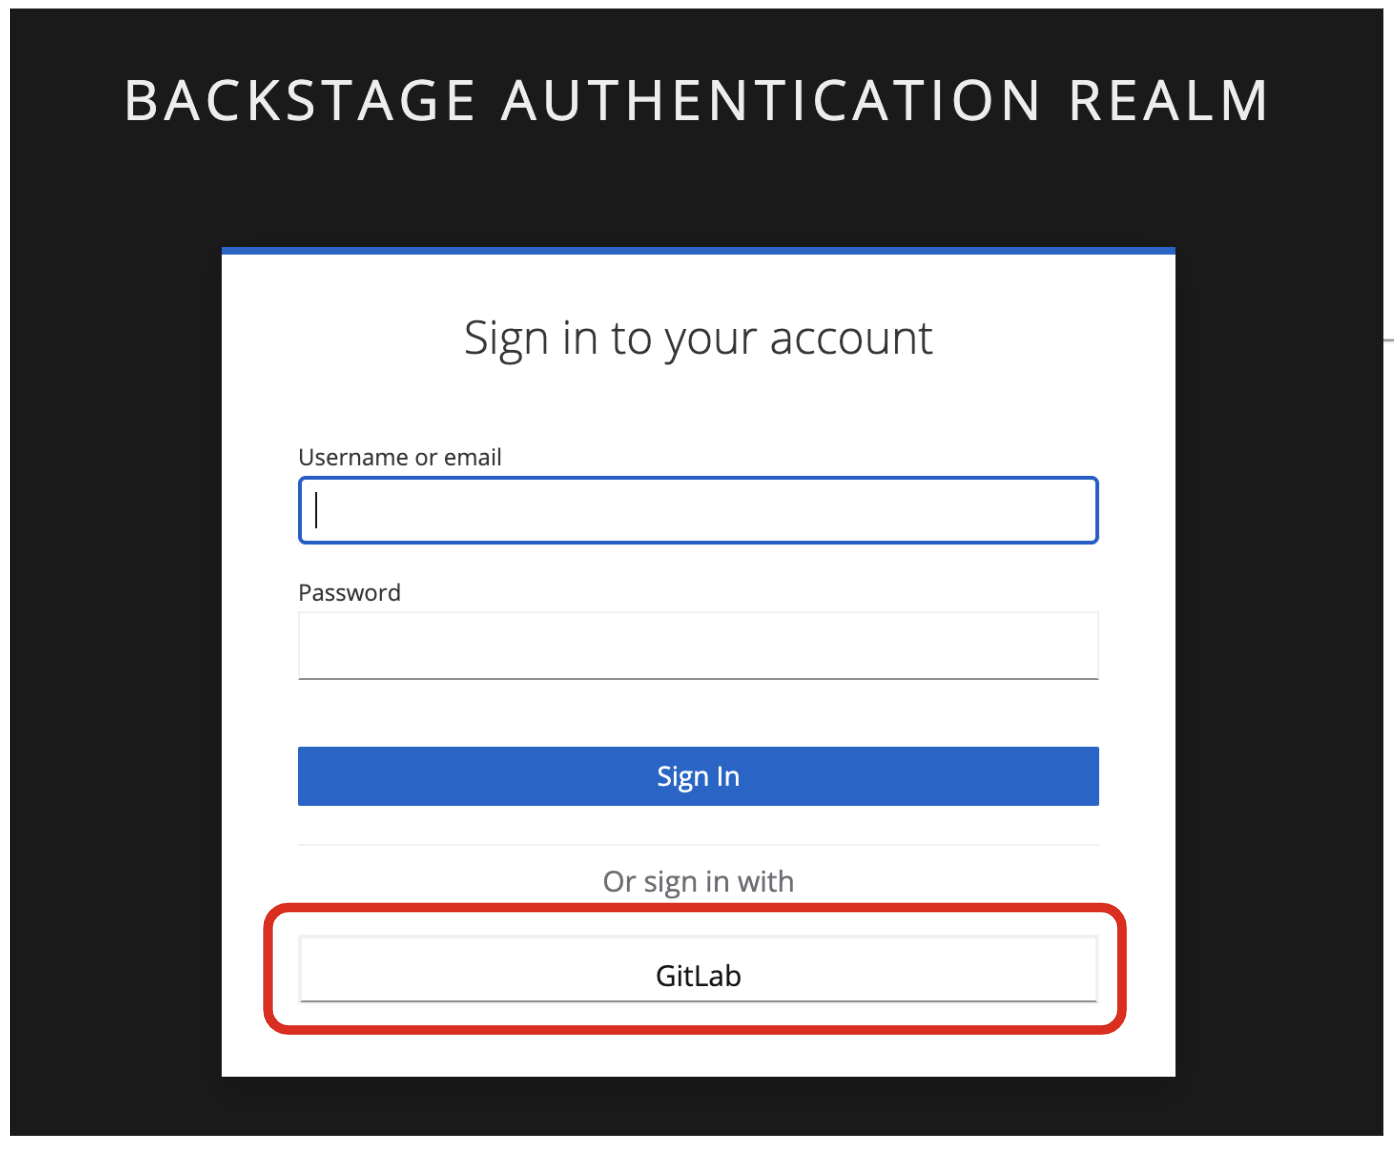
Enter the following credential in the Gitlab login page.
-
Username:
user1-
Password:
openshift
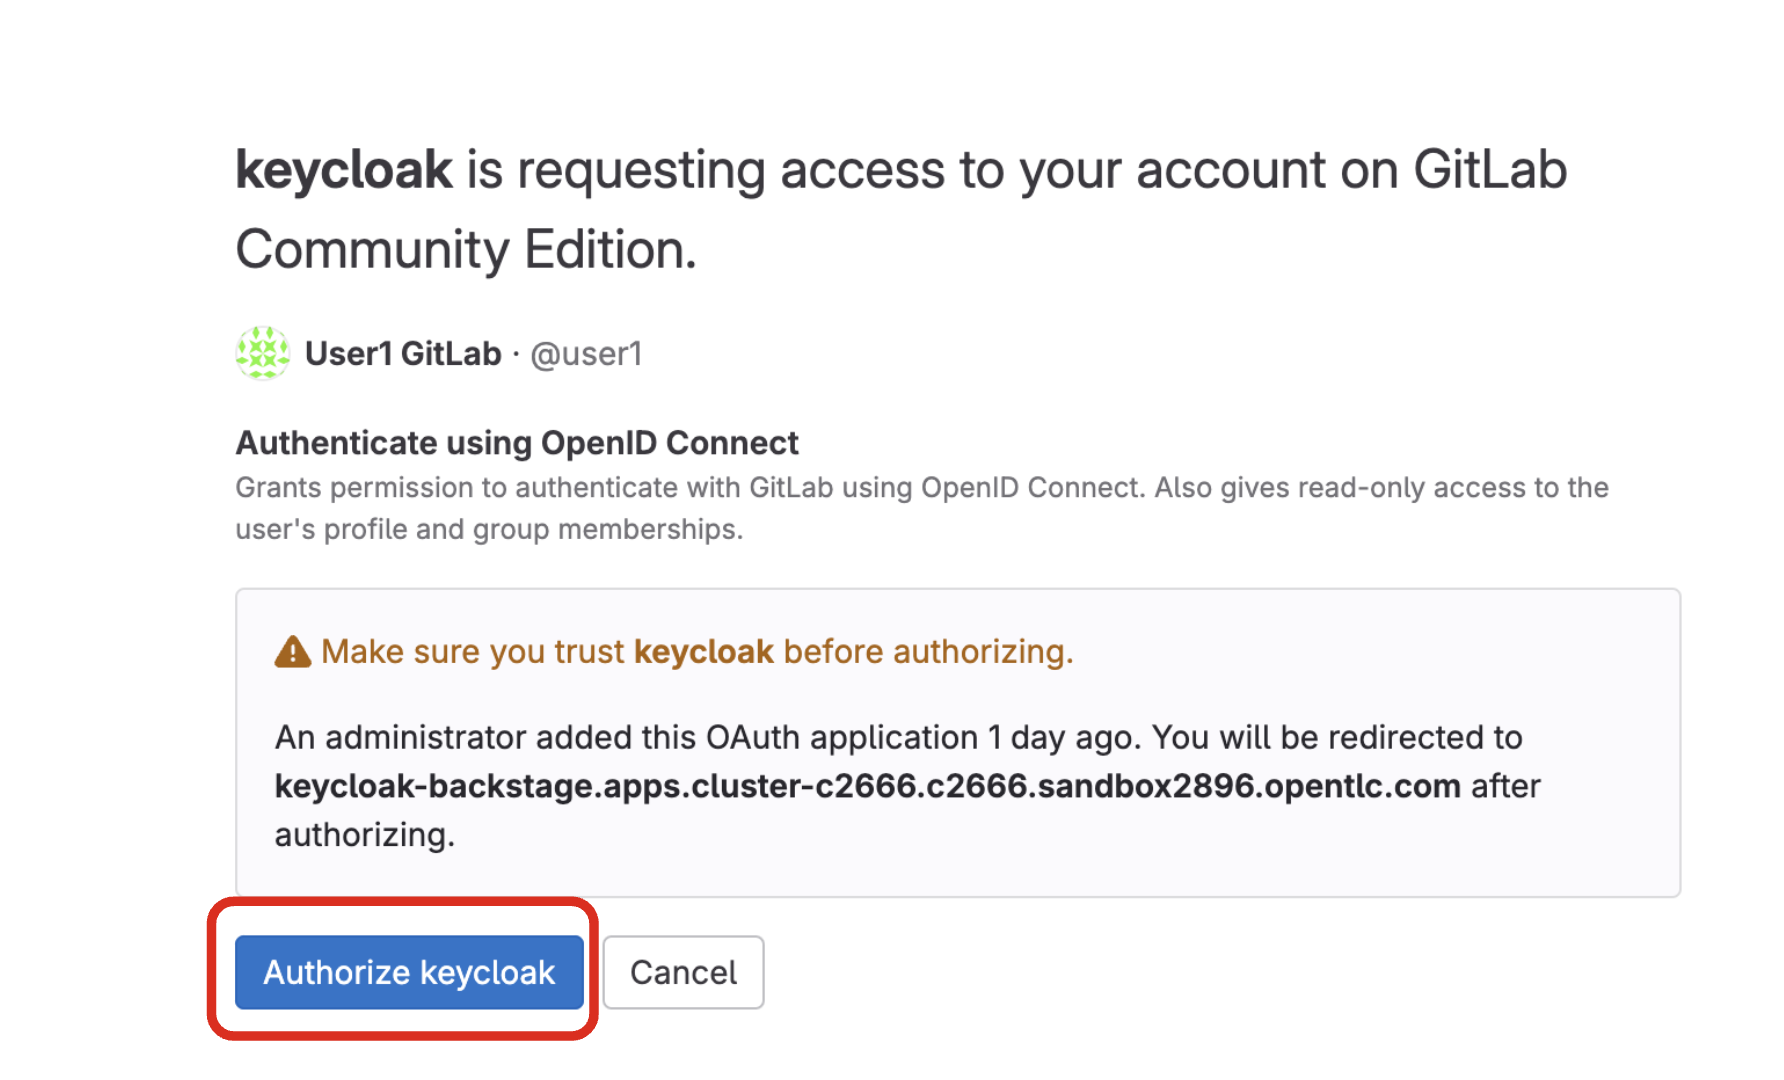
Click Authorize Keycloak to allow the authentication to proceed.
Find more information about the Red Hat Developer Hub here.
2.2. Use software templates to deploy the Parasol Customer Service App
In Red Hat Developer Hub, a software template serves as a pre-configured blueprint for creating development environments and infrastructure. Software templates streamline the process of setting up development environments by encapsulating pre-defined configurations. This saves developers time and effort compared to manually configuring everything from scratch.
Click on Create… on the left menu. Then, type Parasol in the search bar. Then, Choose the Parasol Insurance for Red Hat AI App Development (RAD) Workshop template.
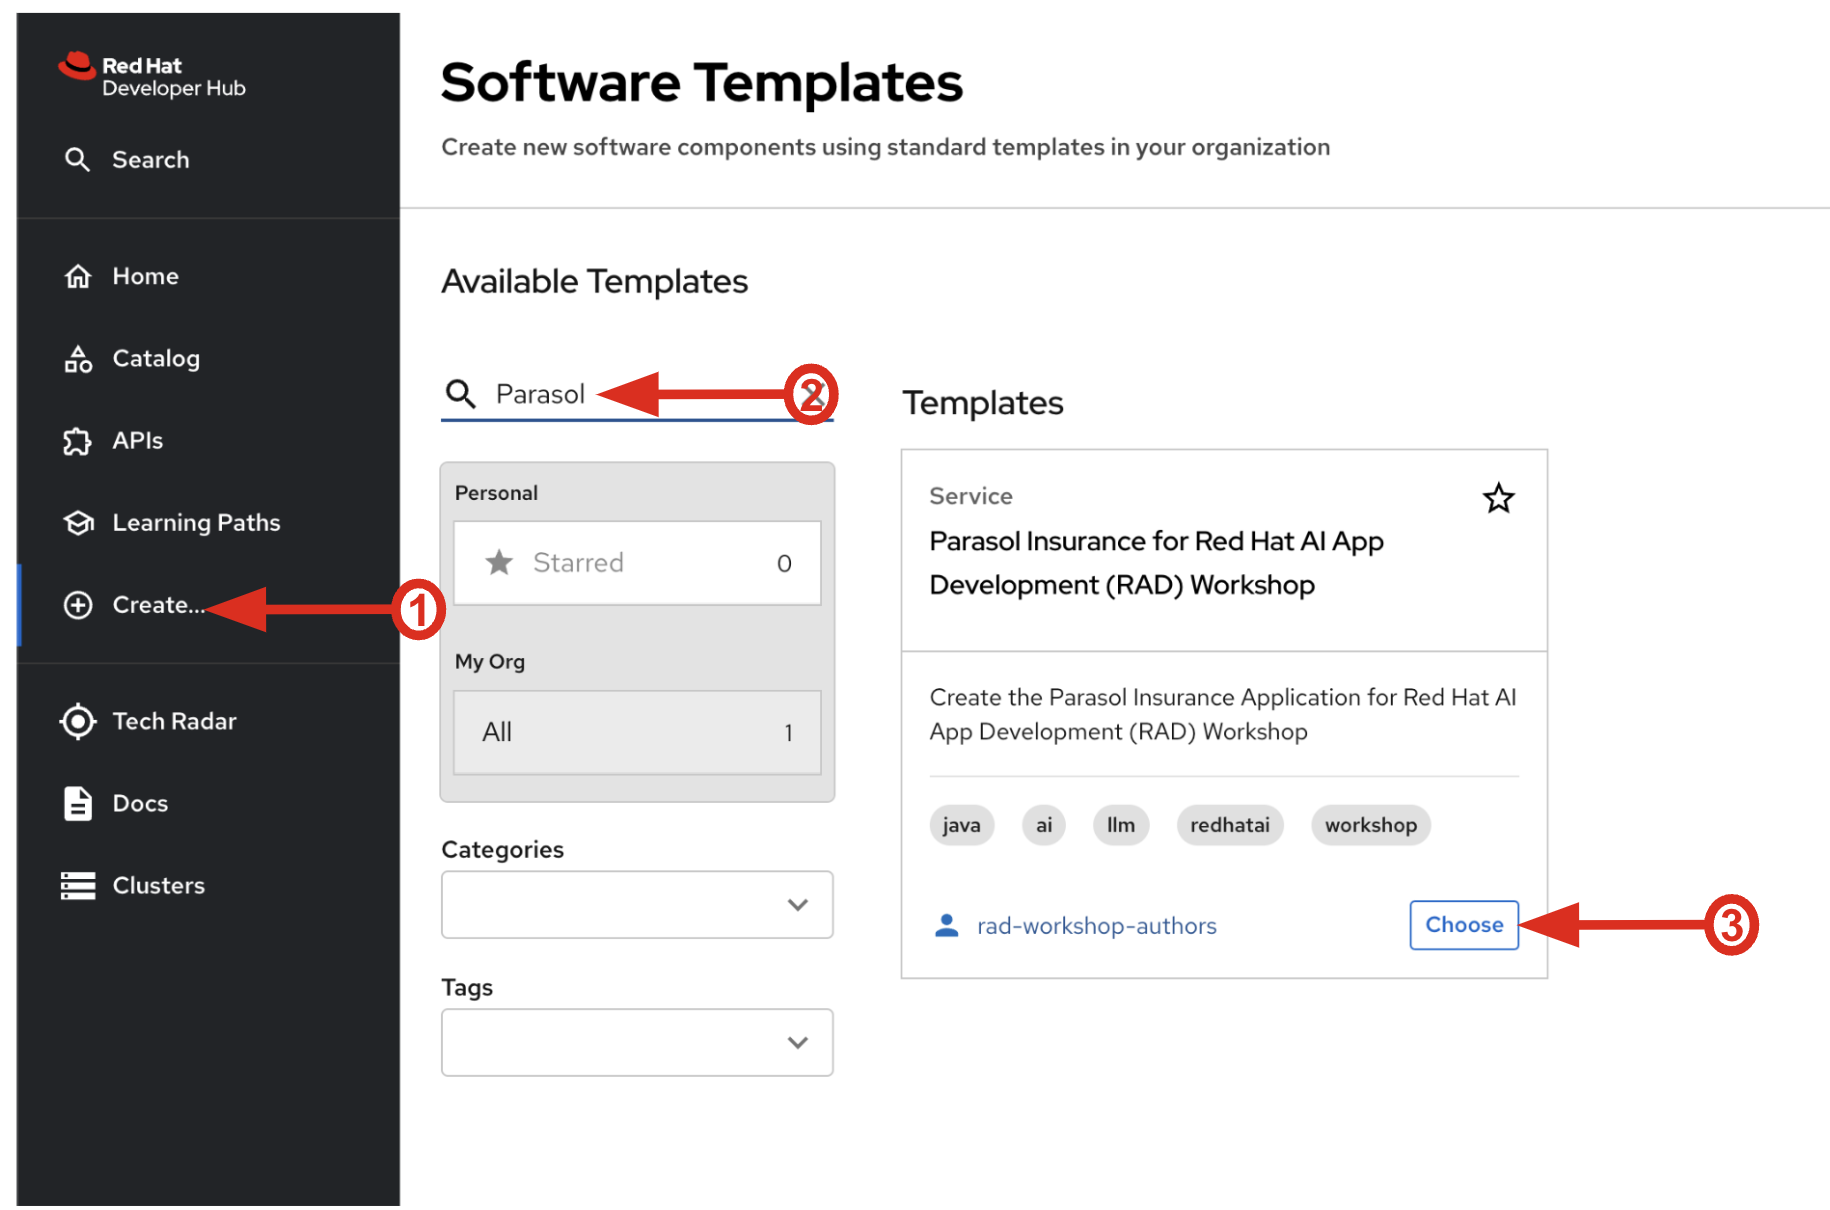
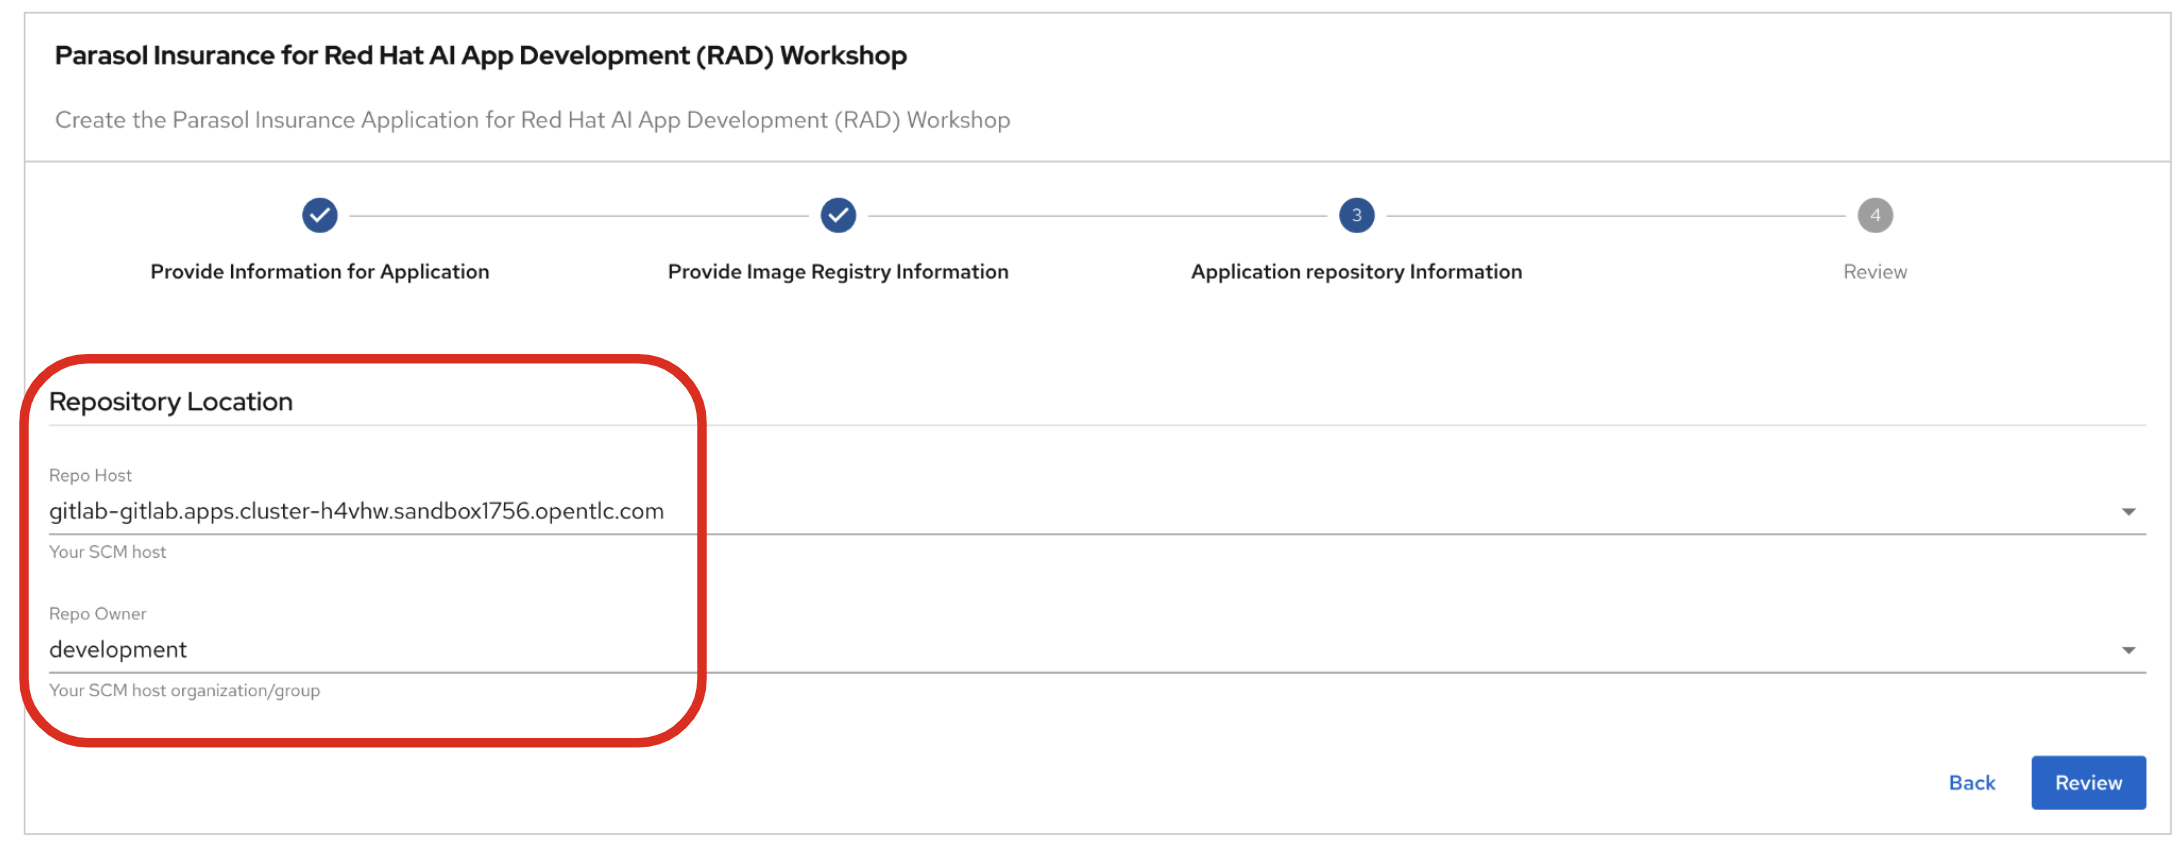
Follow the next steps to create a component based on the pre-defined Software Templates:
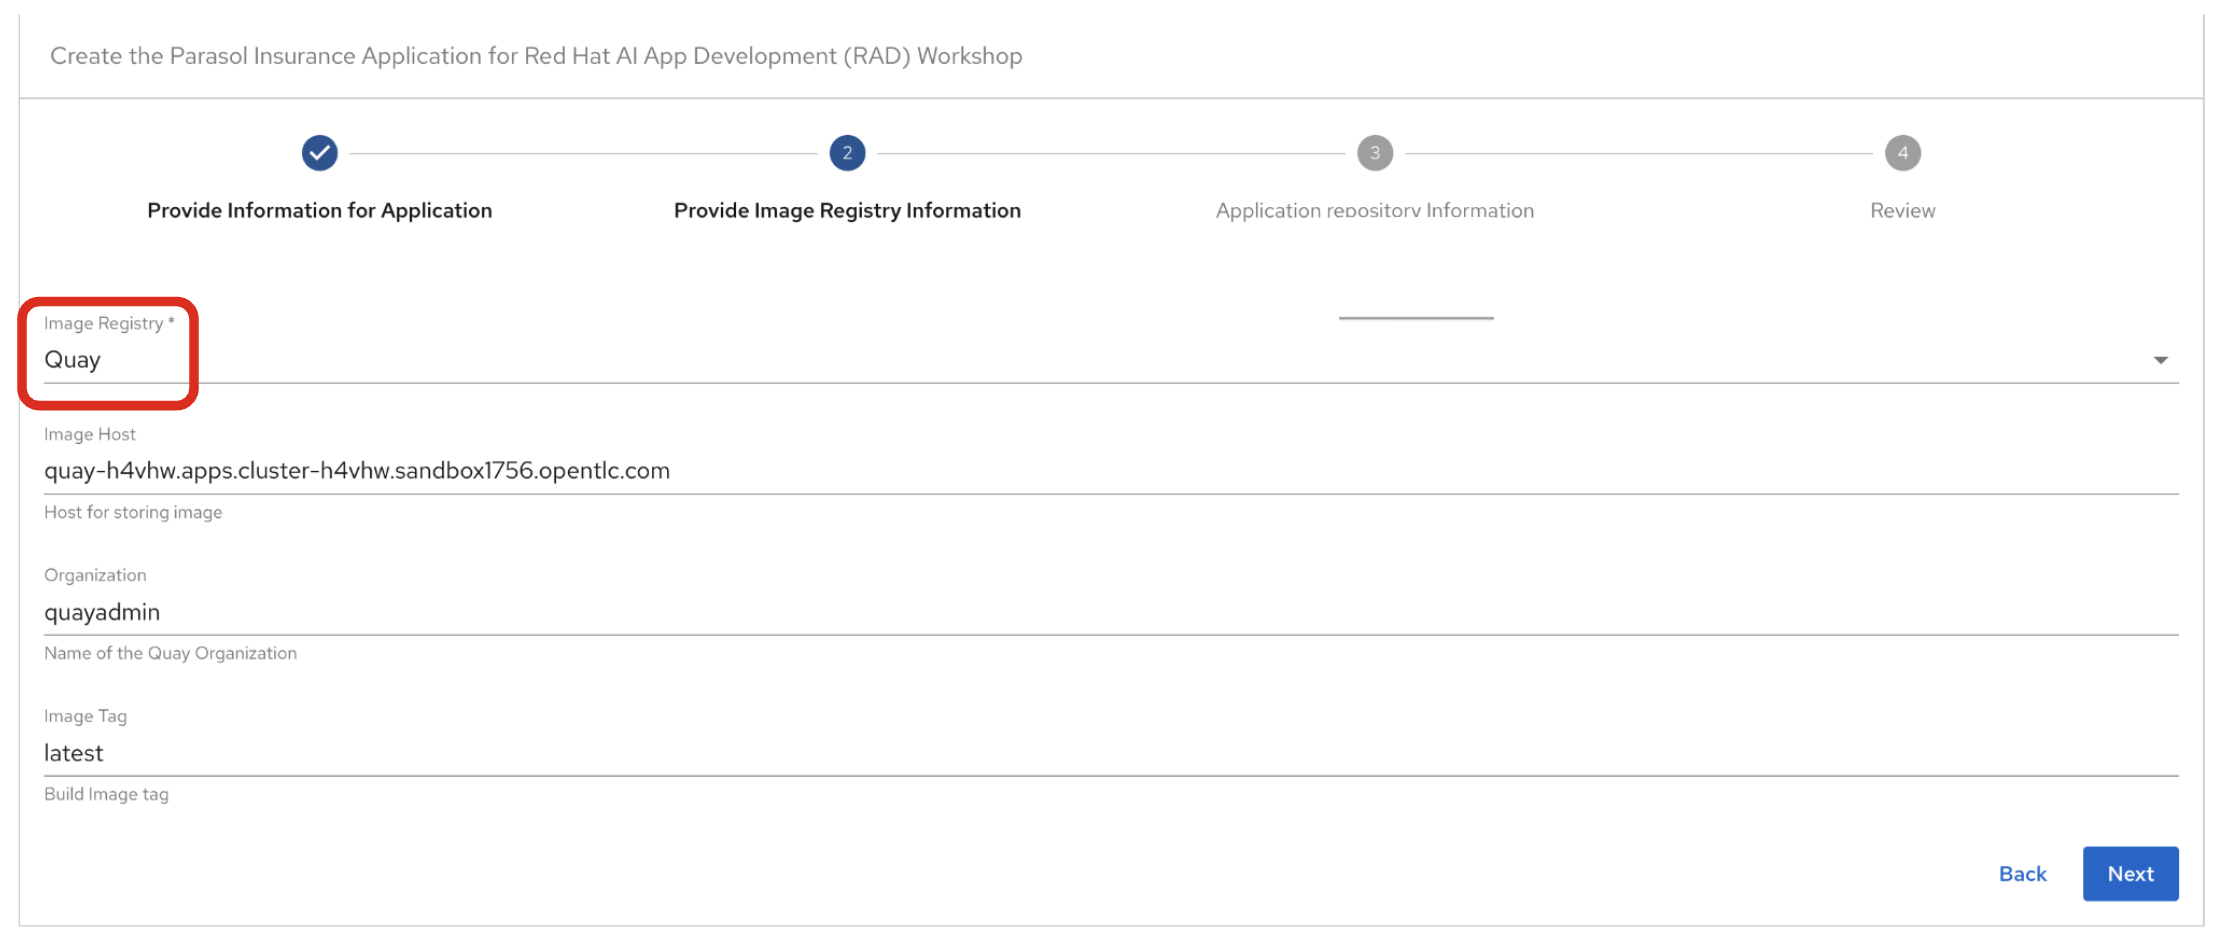
2.2.1. Provide Information for Application
-
Name: The name of the component. Replace the Name with the following domain:
parasol-app-user1-
Group Id: Maven Group Id. (leave this as-is)
-
Artifact Id: Maven Artifact Id. (leave this as-is)
-
Java Package Name: Name for the java package. (e.g.
org.redhat.janus- leave this as-is)
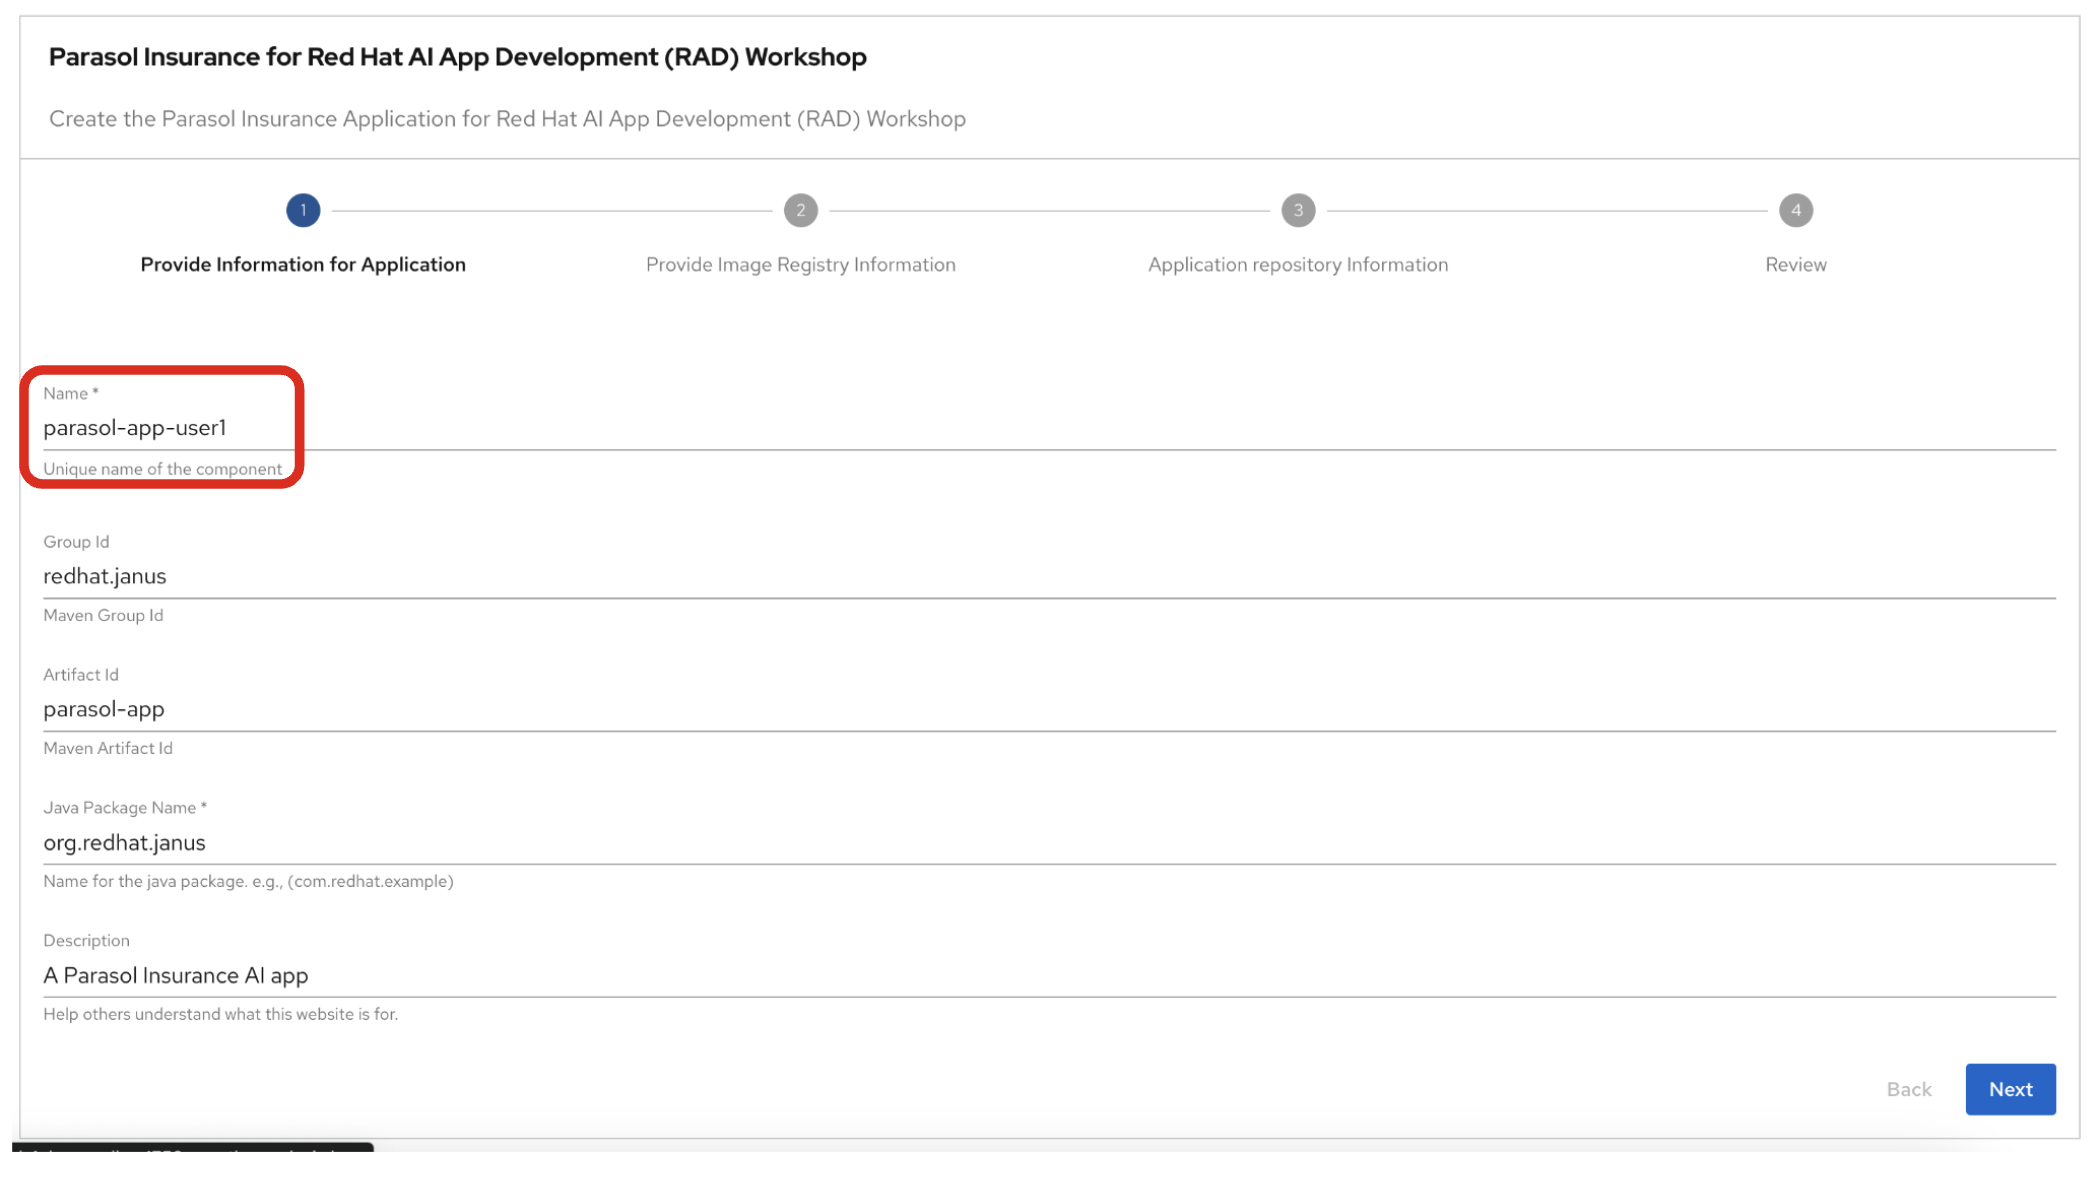
Click on Next.

3. Observe the application overview
You have just created the Parasol application with Red Hat Developer Hub. This application is used by Parasol Customer Service Representatives to enter, organize, and update existing insurance claims for its customers. An AI-powered chatbot is included for reps to use to answer questions about the claims. This chatbot is driven by an LLM that has been fine-tuned with Parasol Insurance private data, including corporate policies around insurance claims.
3.1. Open component in catalog
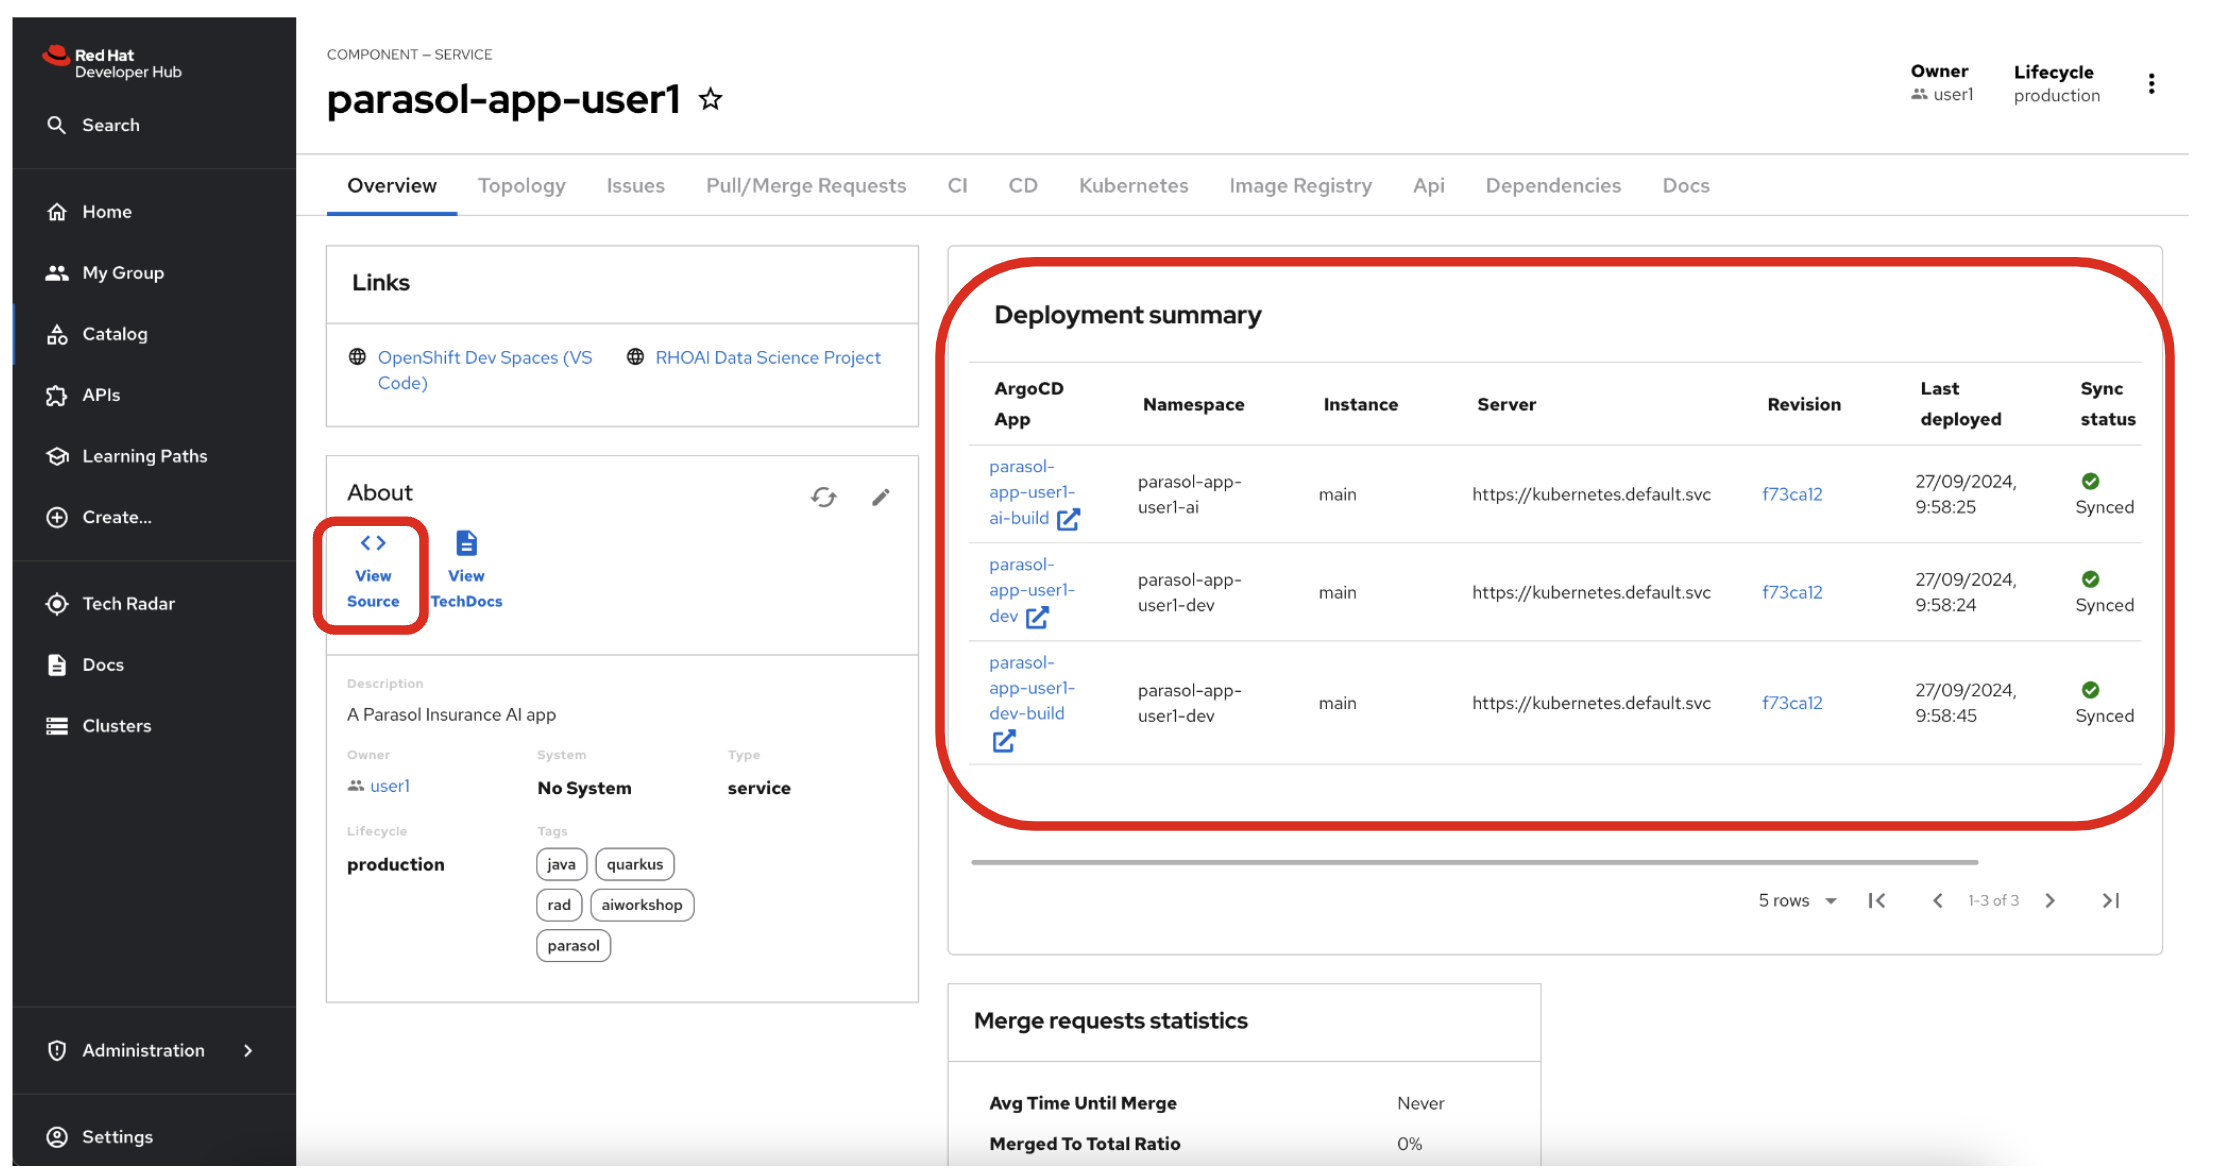
When all of the initialization steps are successful (green check mark), click Open Component in catalog.
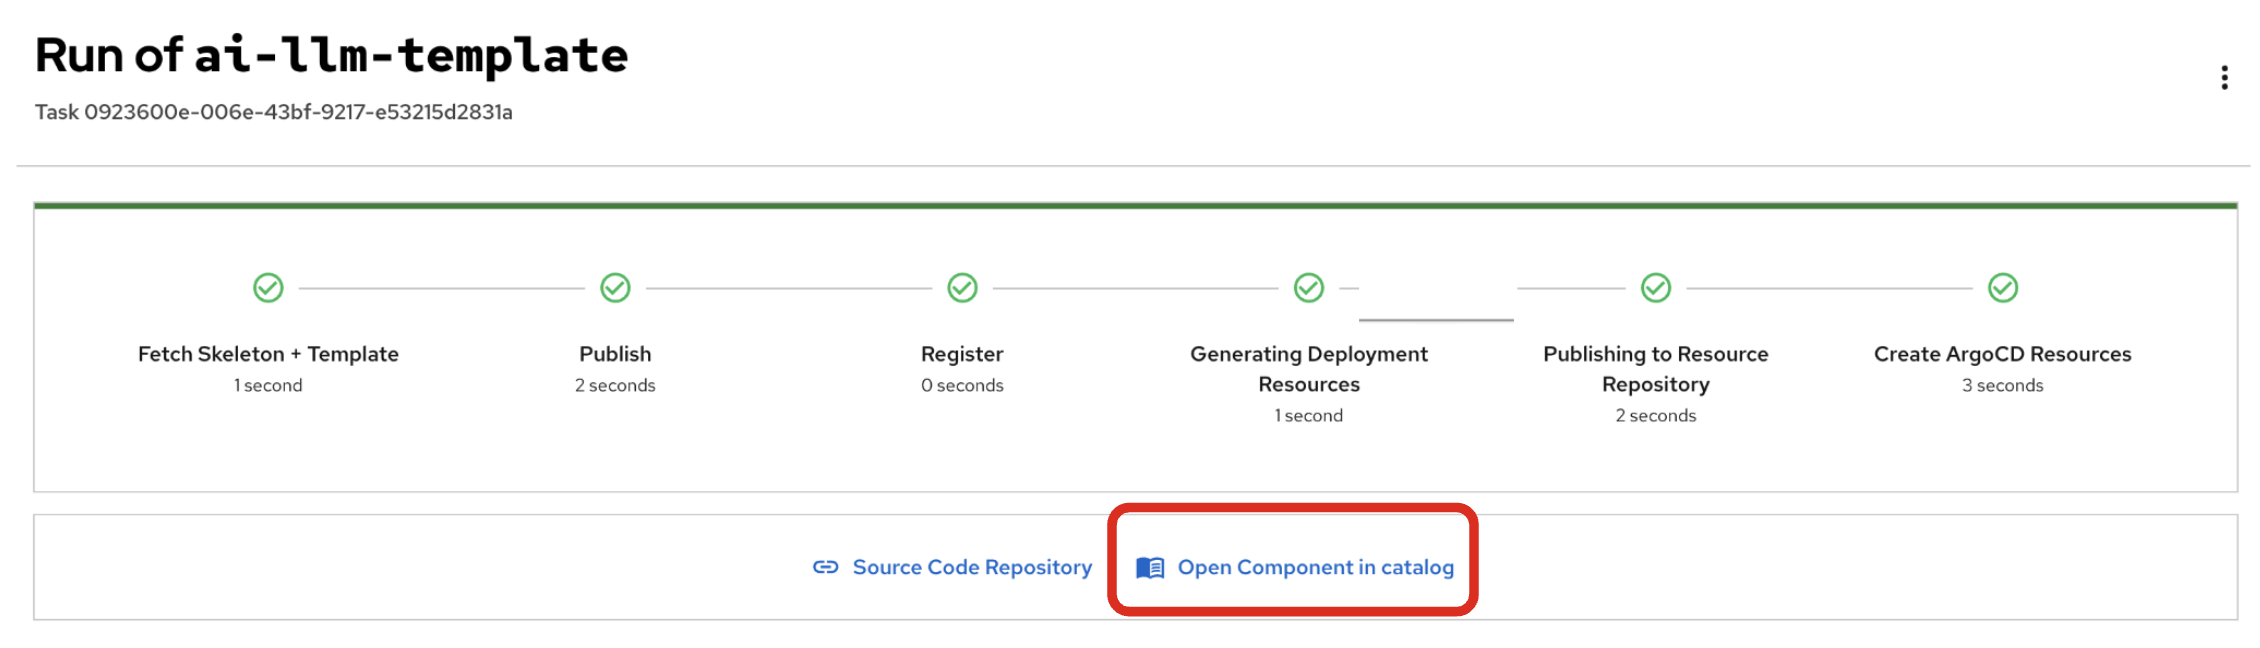
Dev Hub will open a new tab with the component information. Take a few moments to review the Deployment summary on the overview page.
| It may take a minute or two for items to appear in the Deployment summary section. |
3.2. View source
Click on VIEW SOURCE to access the new source code repository created.
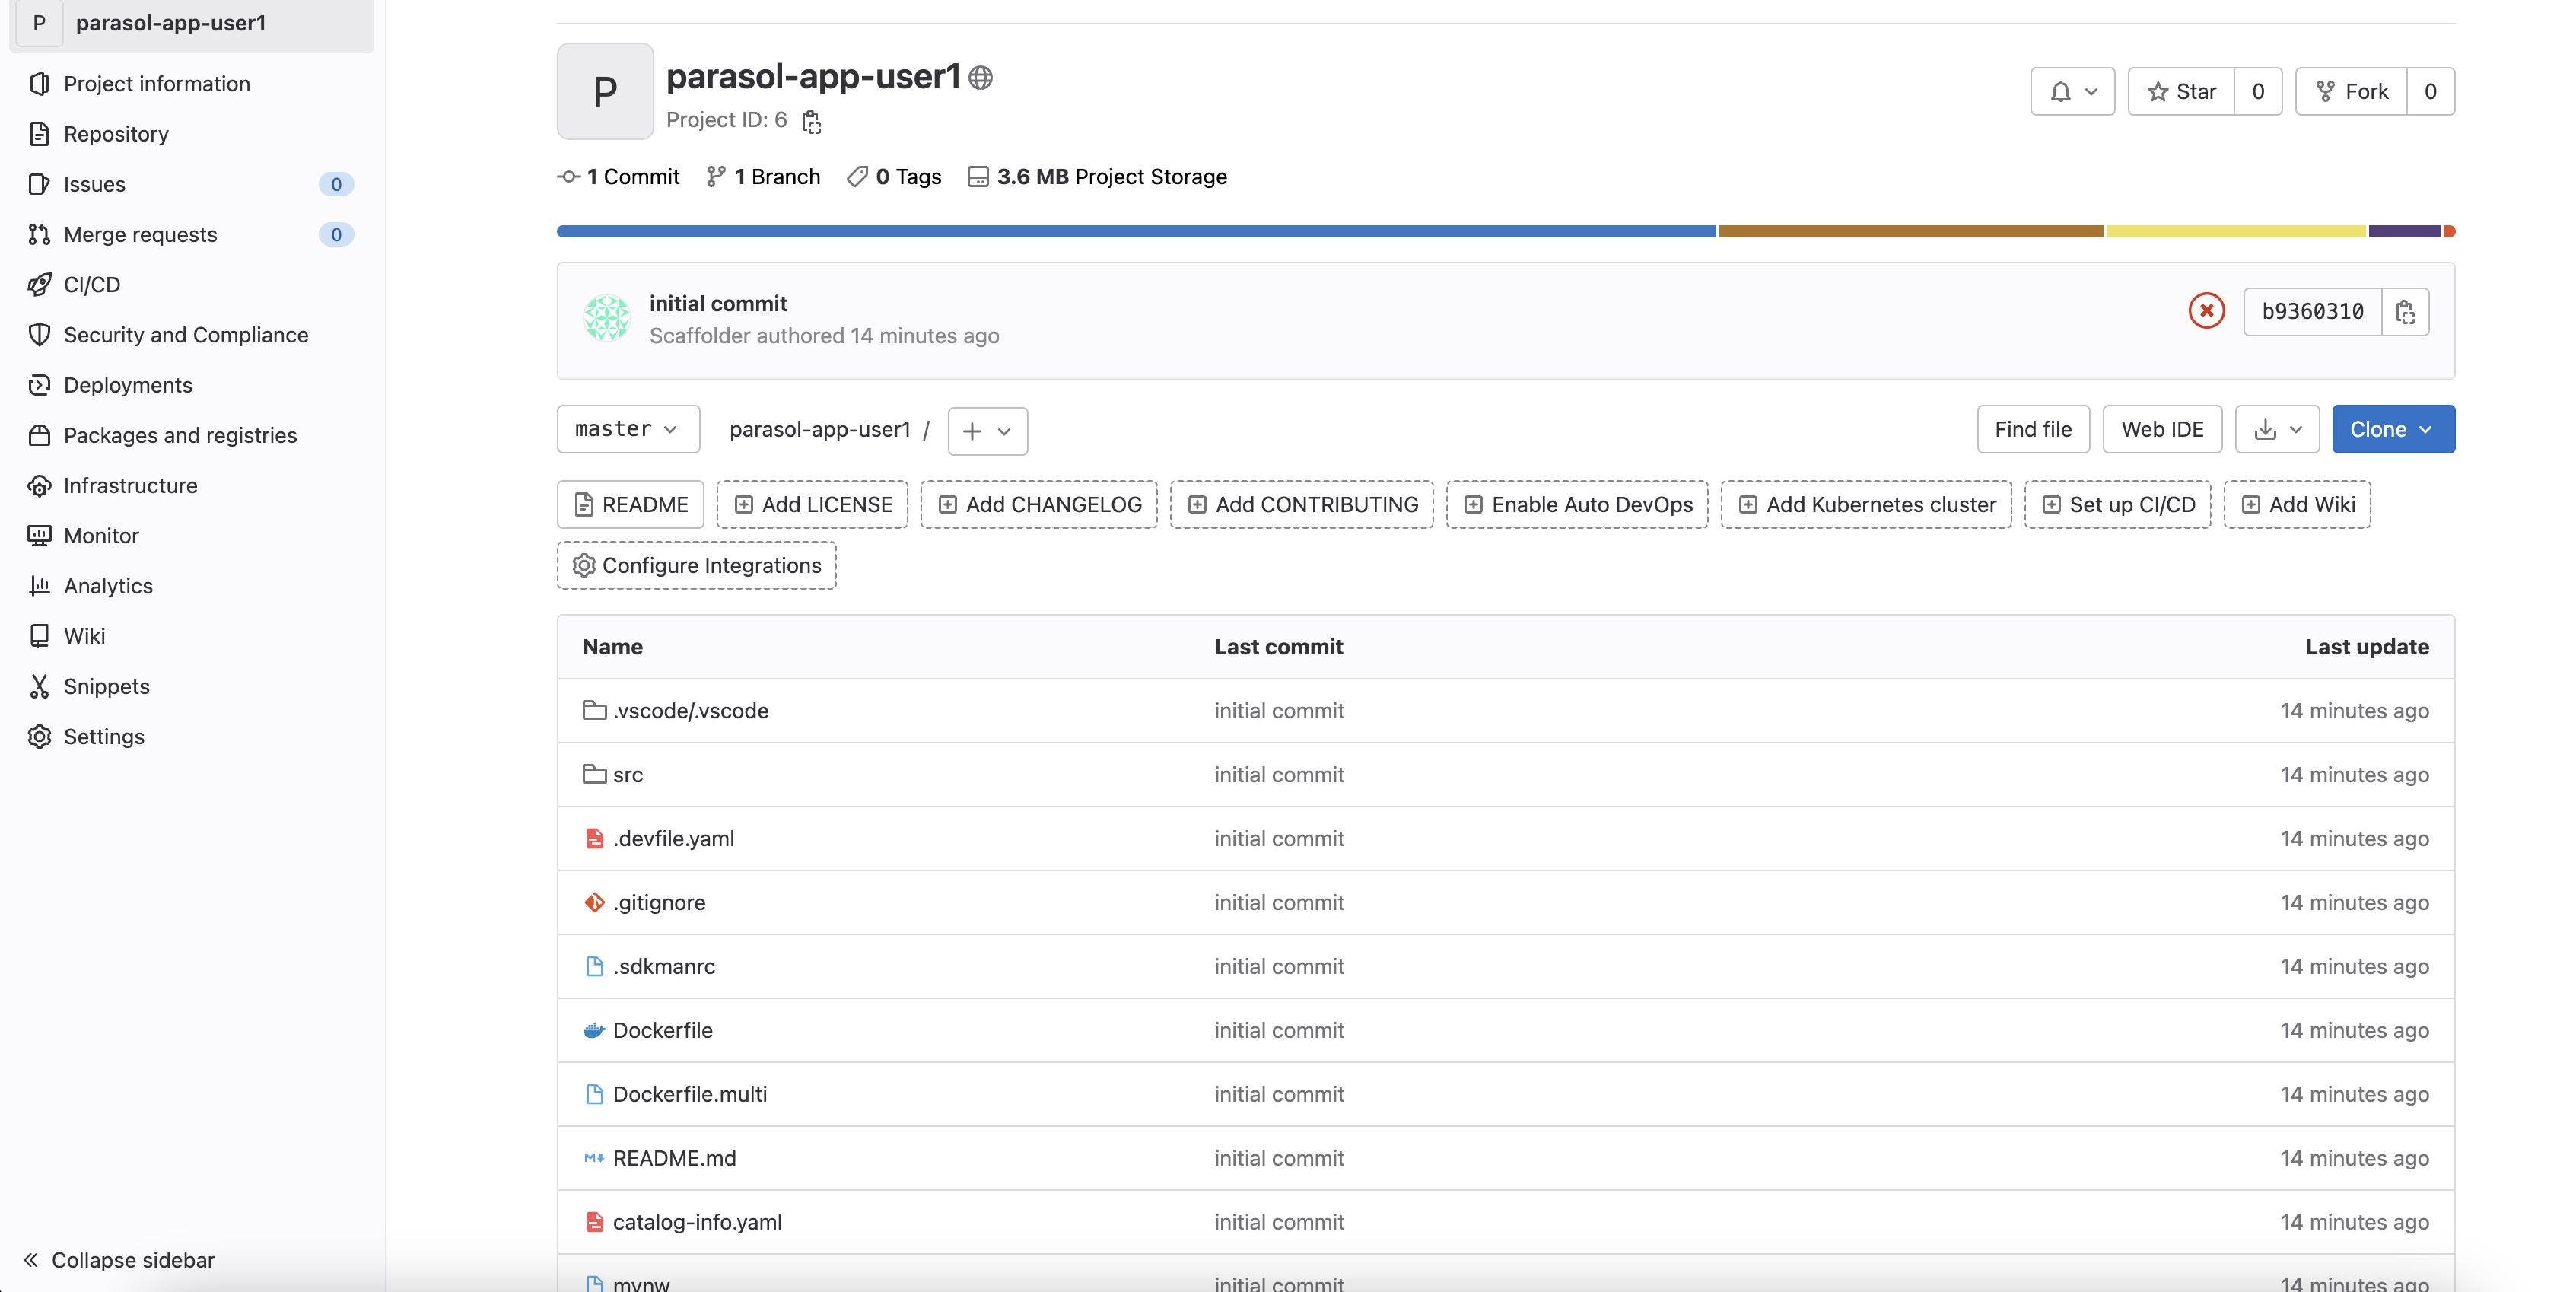
Go back to your Parasol component on Red Hat Developer Hub: Red Hat Developer Hub UI.
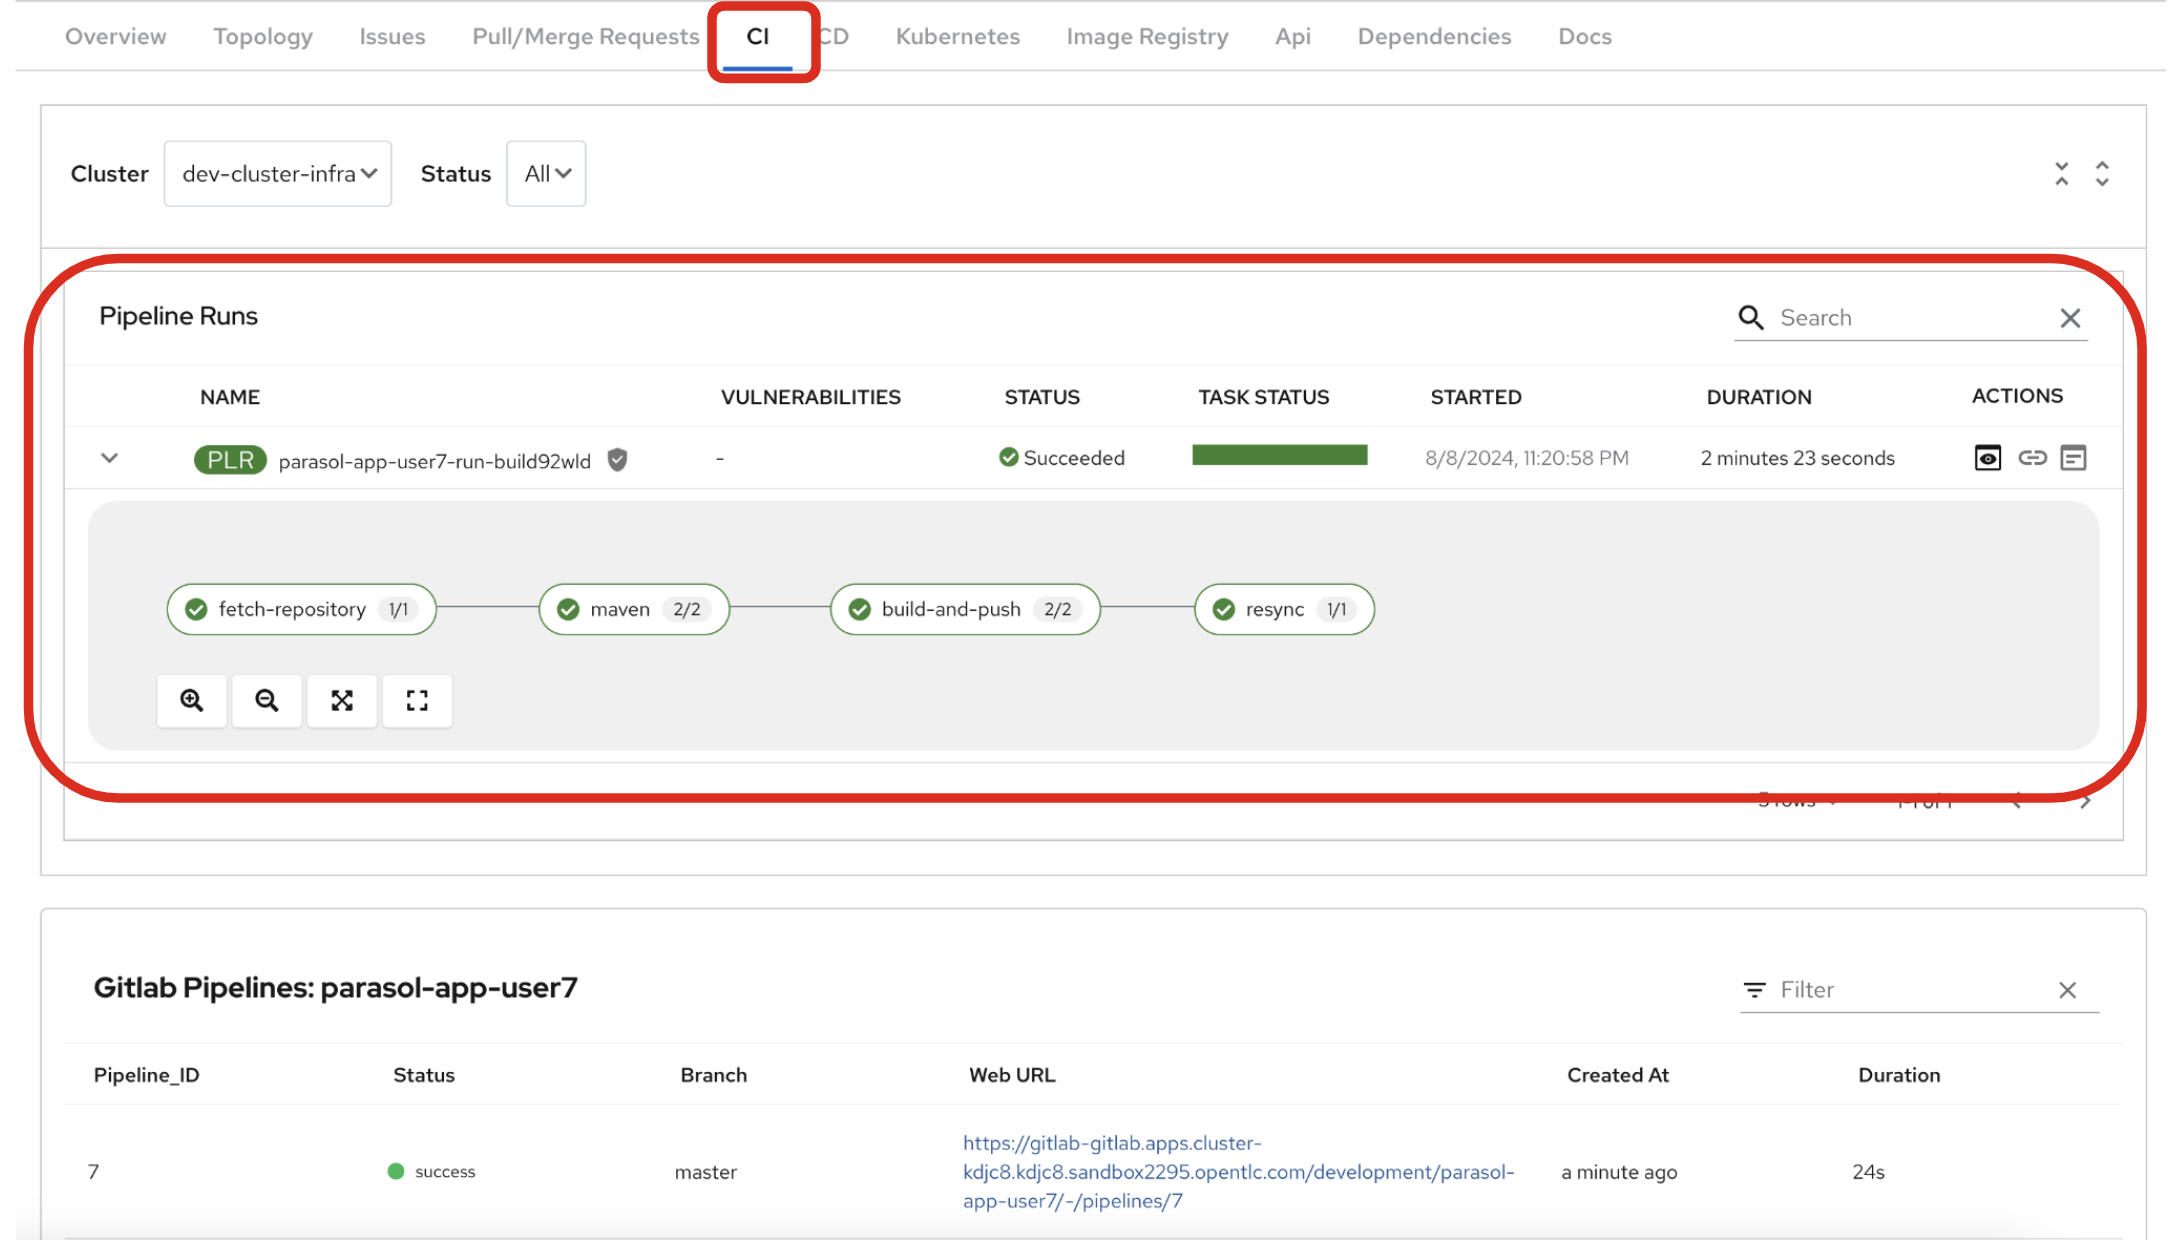
3.3. Review continuous integration and delivery (CI/CD)
Click on CI tab to review your pipeline information. The pipeline will be automatically triggered and run. After a few minutes, you will see the pipeline finished as Succeeded.
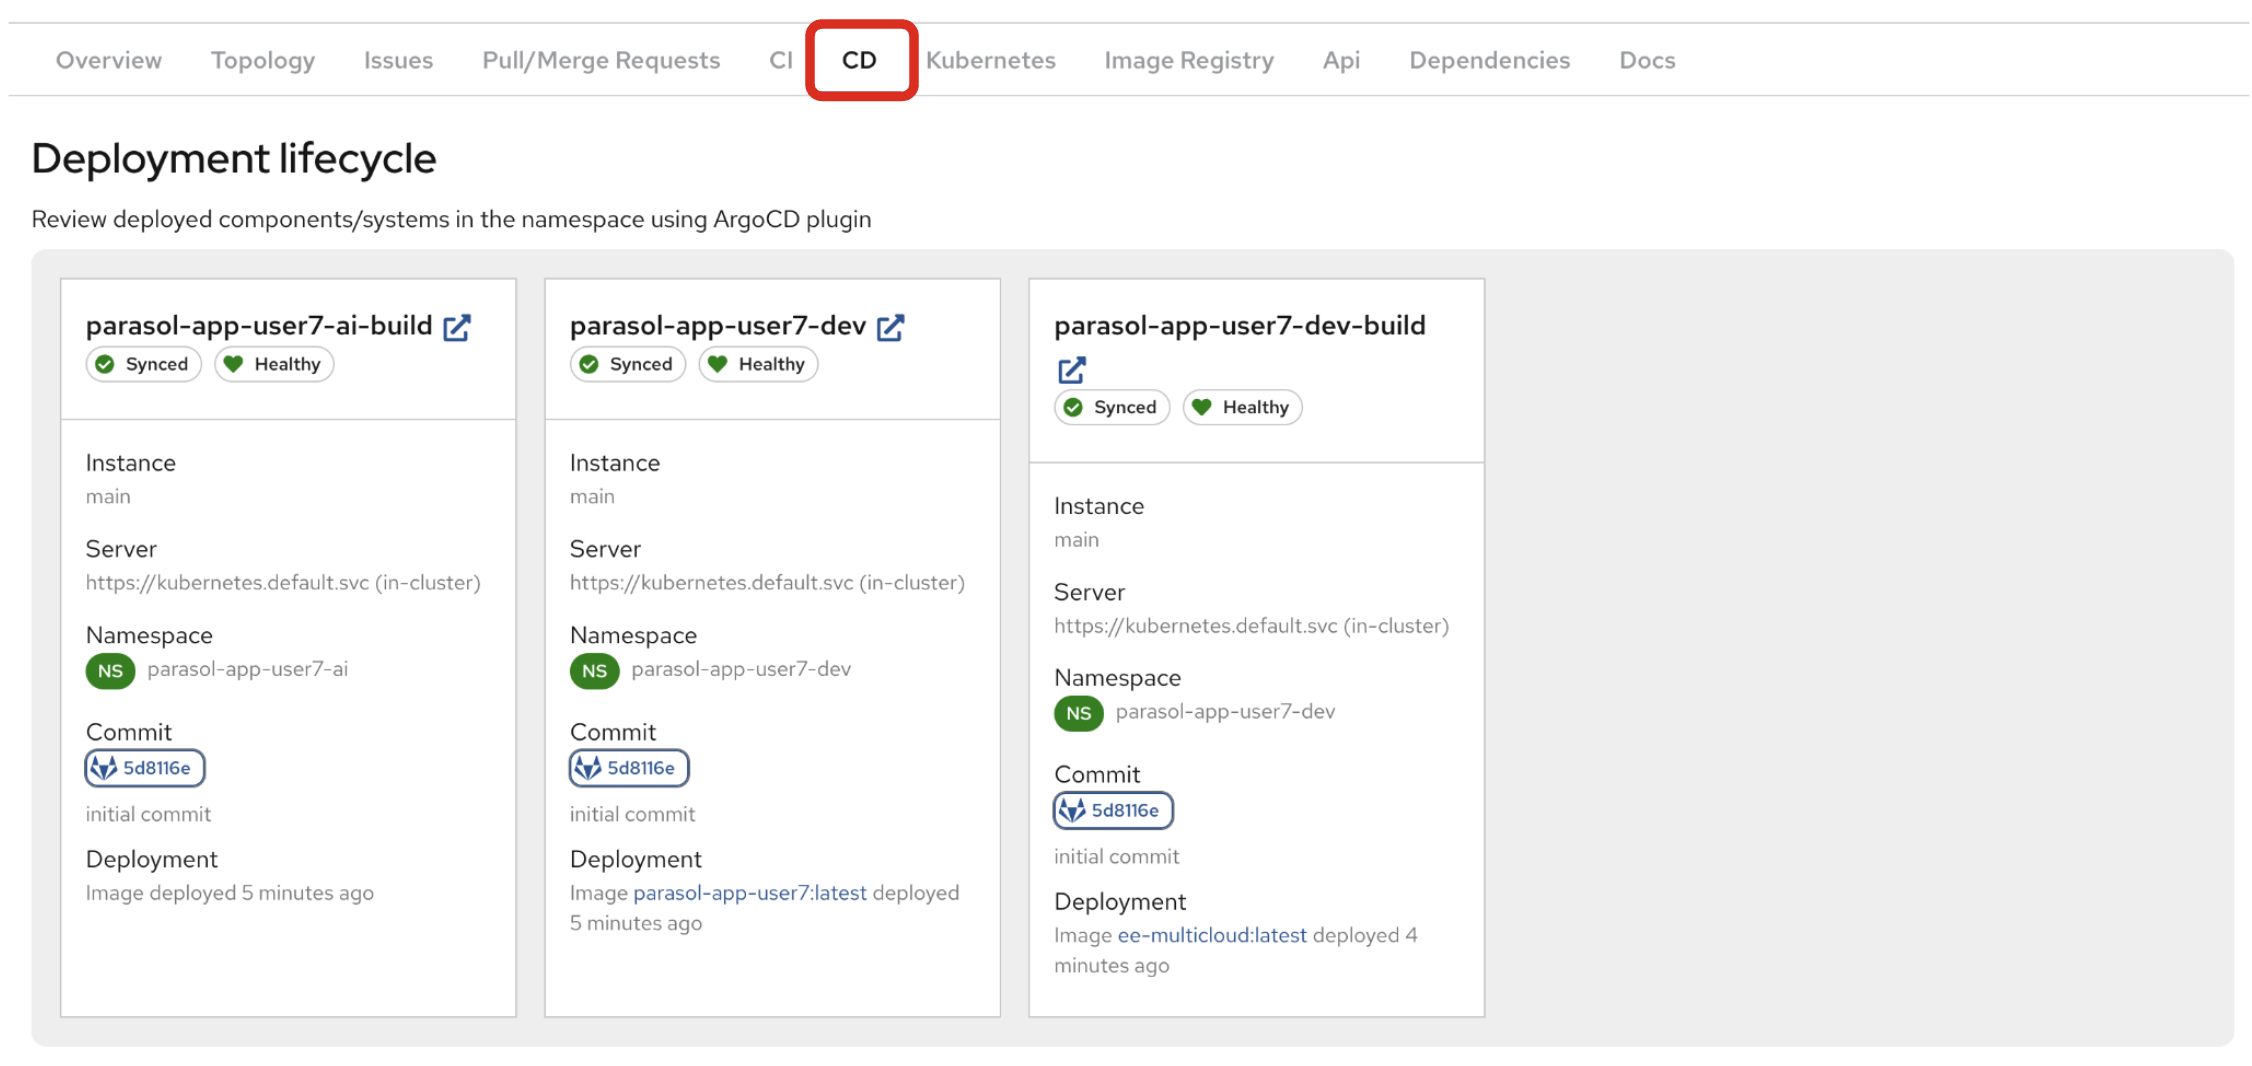
Click on CD to review ArgoCD History.
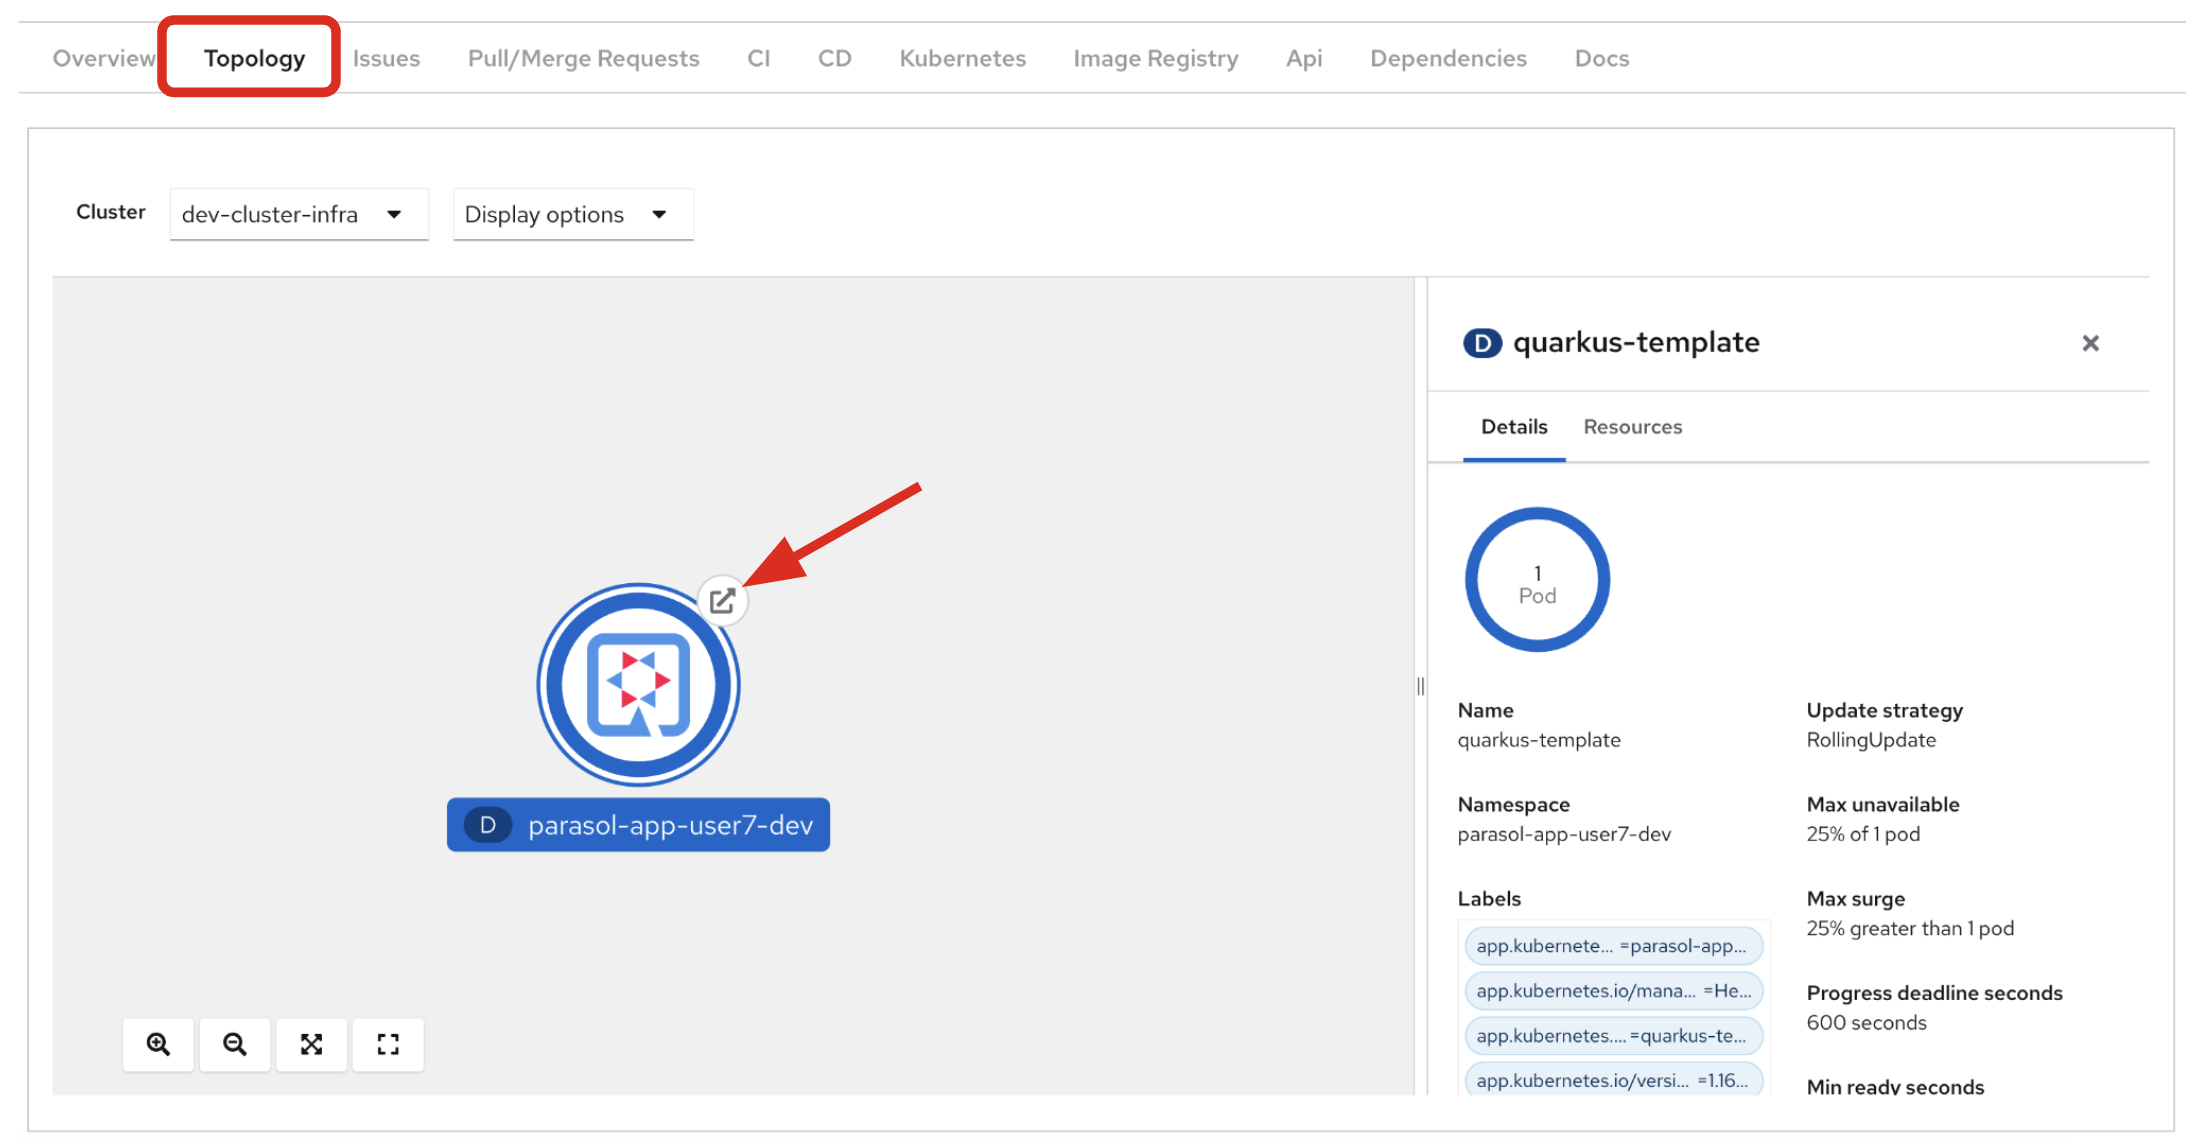
Click on TOPOLOGY to review your deployment status. Then, you will see the deployment parasol-app-user1 in the Topology.
If the deployment shows up as red, make sure to wait until the Pipeline Run on the CI tab completes successfully.
|
3.4. Verify the deployment
Access the Parasol web page to verify everything is working as expected.
3.4.1. Explore the Parasol application
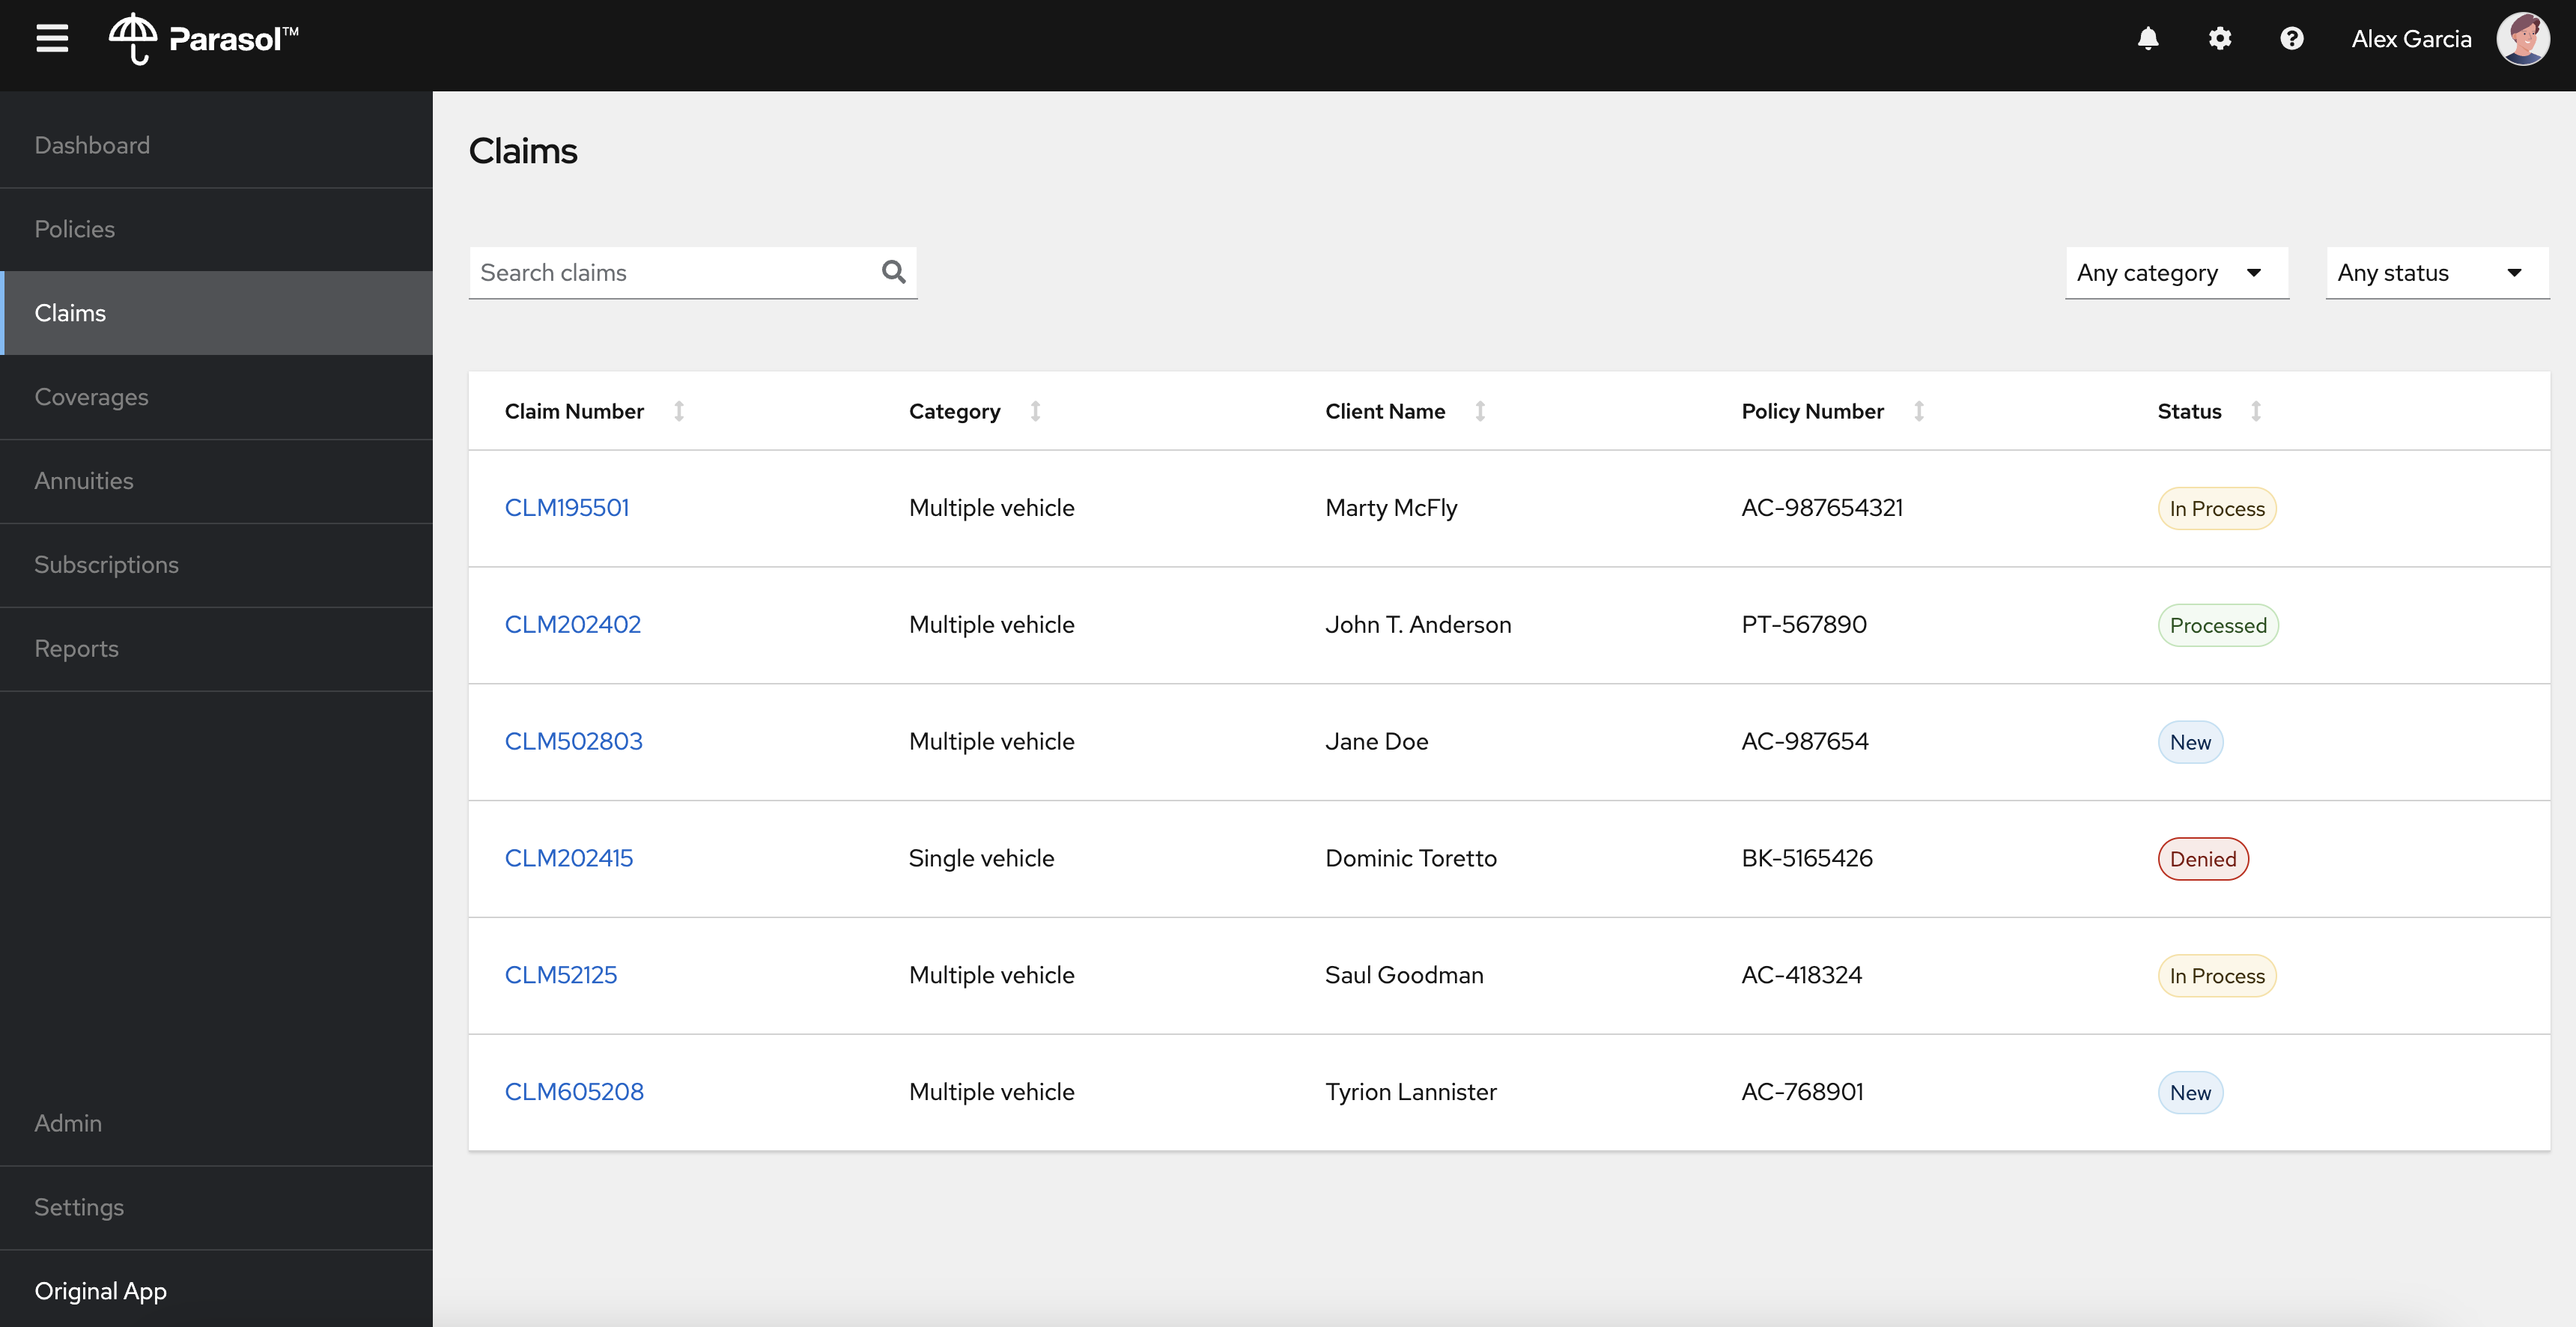
Select the claim number, CLM195501 to view the claim details such as summary, documents, etc.
Click on the Chatbot icon on the right bottom to open the chatbot popup.

3.4.2. Play with the AI chatbot
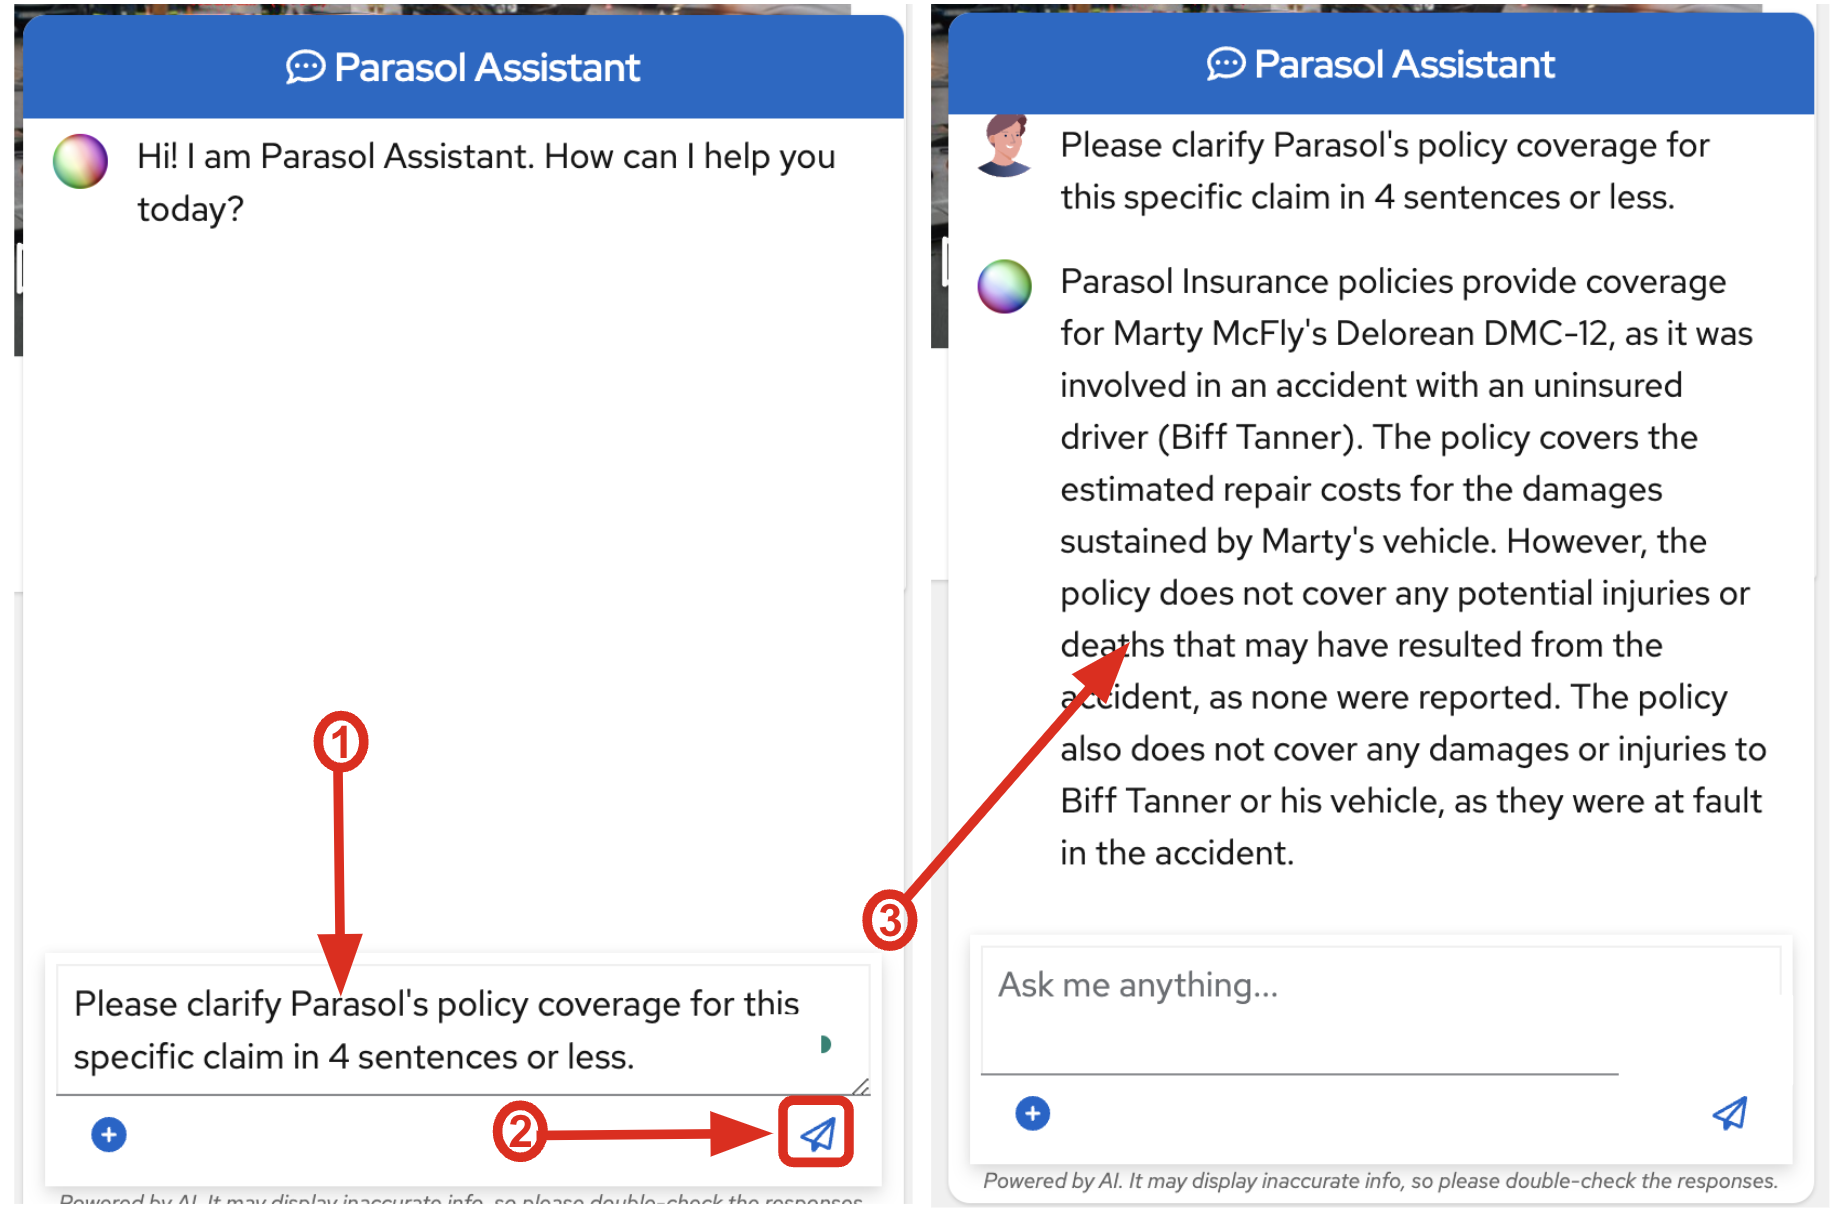
As a Parasol customer service representative, try to ask any questions about the claim to the AI chatbot. For example, you can ask if the policy is still covered or not for this car incident.
Please clarify Parasol's policy coverage for this specific claim in 4 sentences or less.Then, click on paper airplane icon (or press Enter) to send the query. The AI chatbot will connect to the trained Parasol LLM and respond with an answer.
|
If nothing happens when you click the paper airplane icon, please refresh the page and try again. |
You will see the answer in a few seconds. The answer provided may differ from what is shown below, but in general it should include Parasol-specific policy requirements from the data that was used to train the model.
Congratulations, you’ve confirmed that the existing Parasol application works! let’s look at the insurance app and start diving in to the real business problem.
4. Log into Red Hat OpenShift Dev Spaces
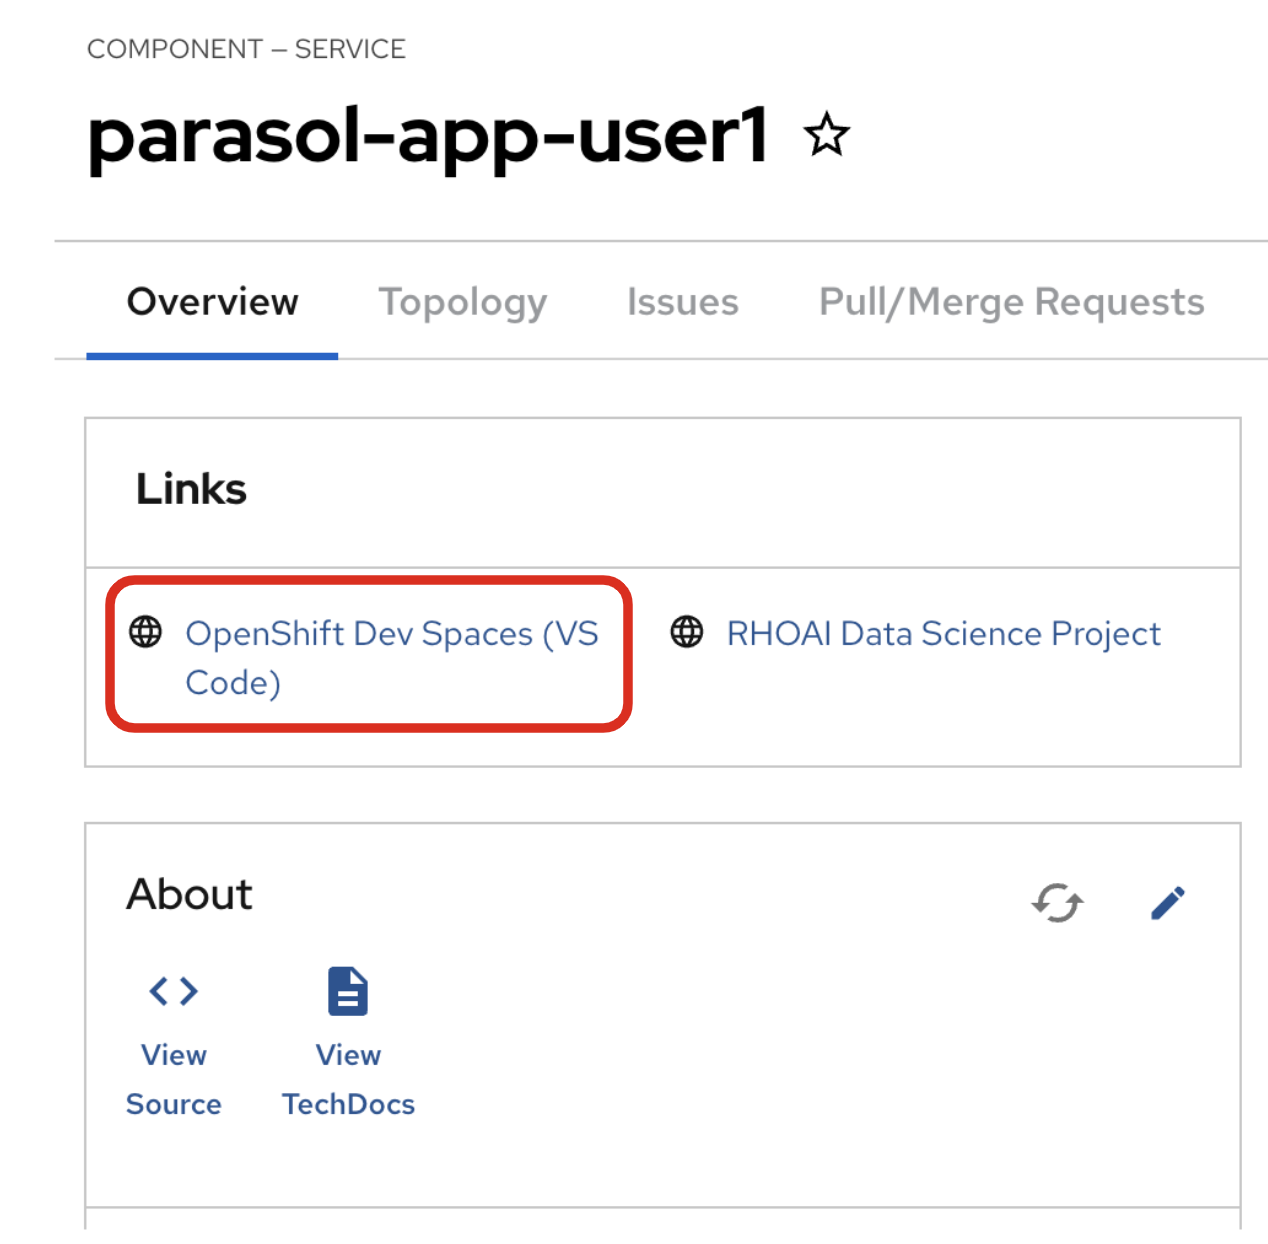
Go back to the Parasol component in Red Hat Developer Hub. From the OVERVIEW tab click on OpenShift Dev Spaces (VS Code) to make the necessary source code changes.
Click on Log into with OpenShift.
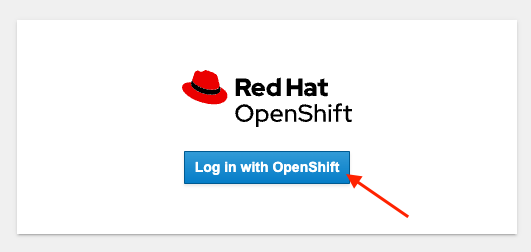
Log into with the following OpenShift credential on the Red Hat Single Sign-On (RH-SSO) page.
-
Username:
user1 -
Password:
openshift
|
You may need to authorize the access to DevSpaces by clicking on Allow selected permissions. If you see the following dialog, click Allow selected permissions. 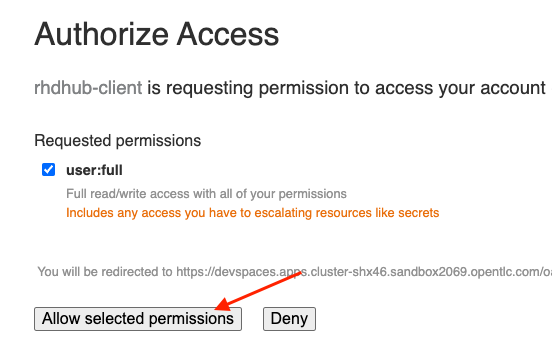
|
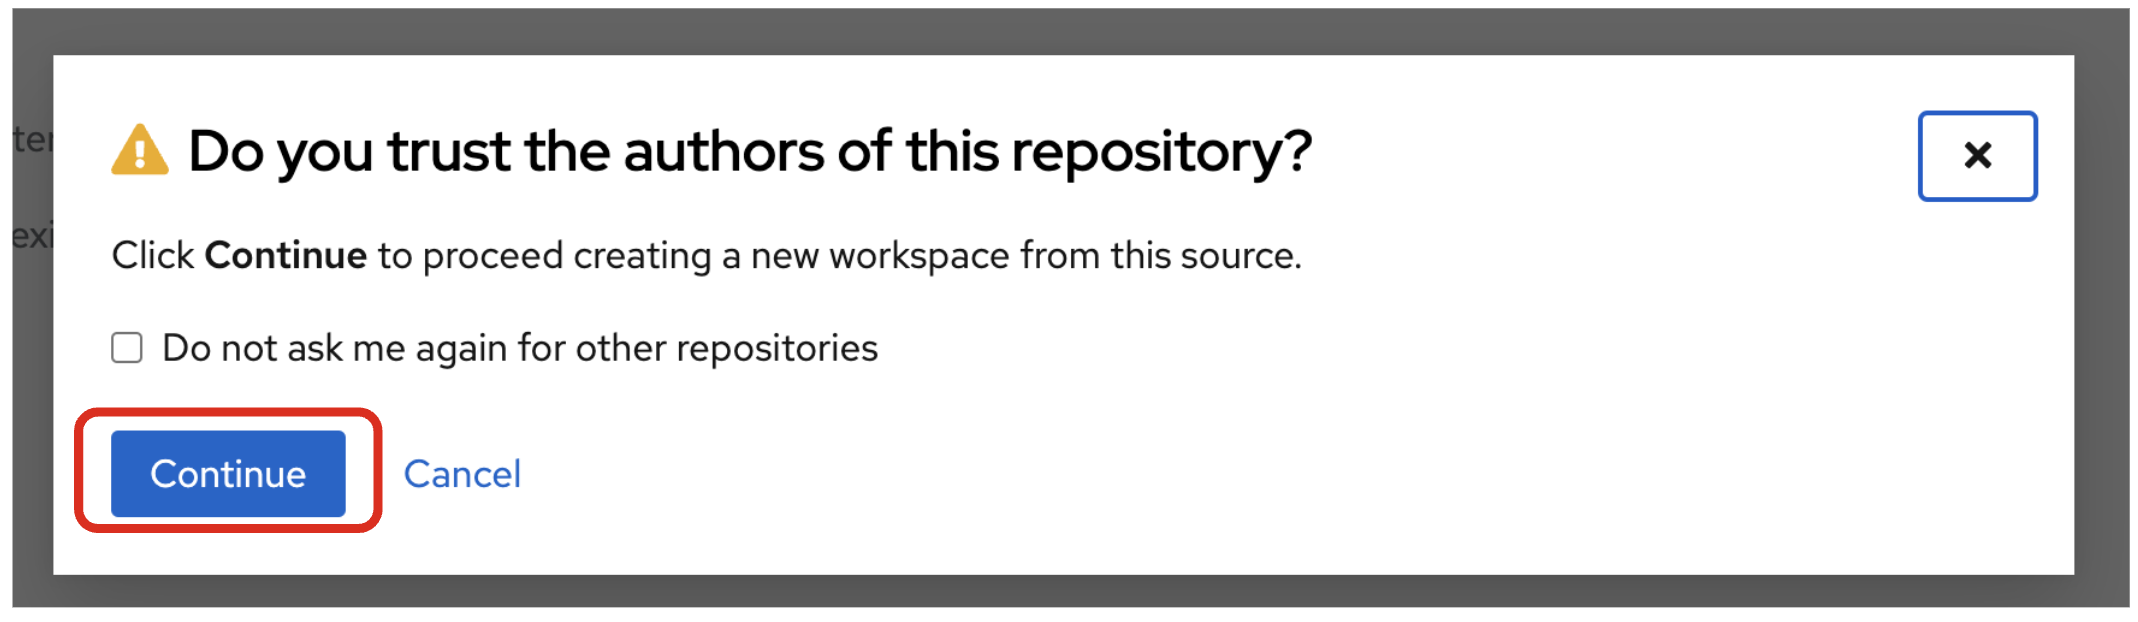
Click Continue to proceed creating a new workspace from this source.
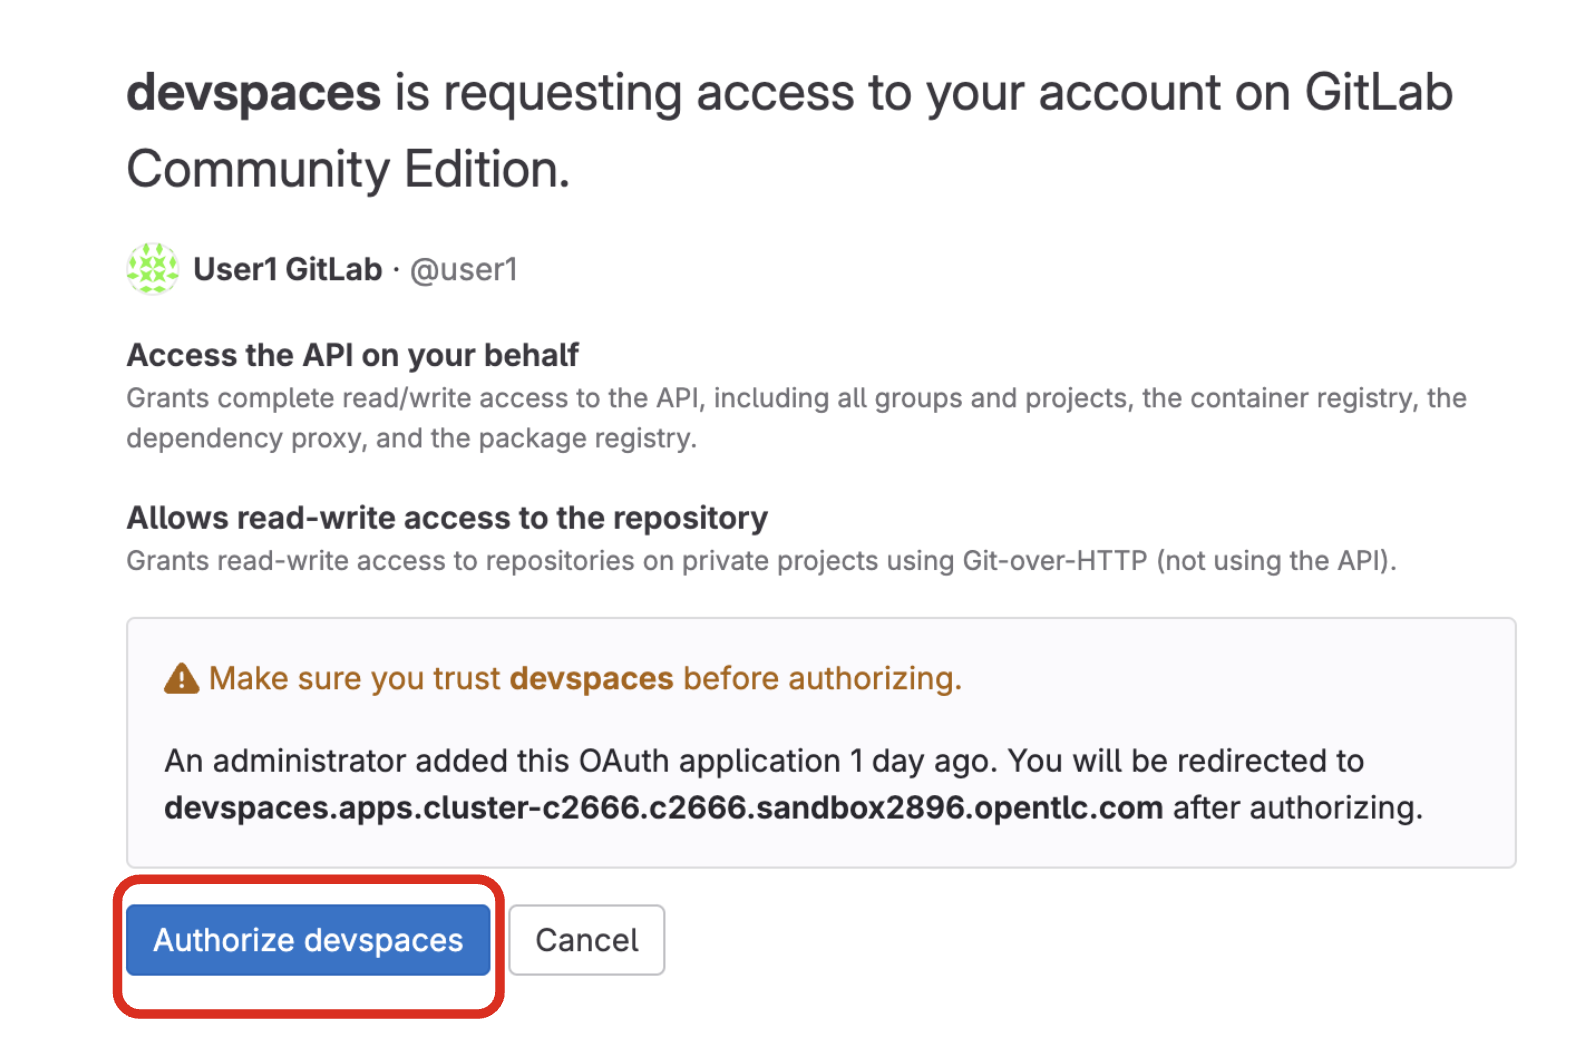
Authorize devspaces to use your account by clicking on the Authorize button.
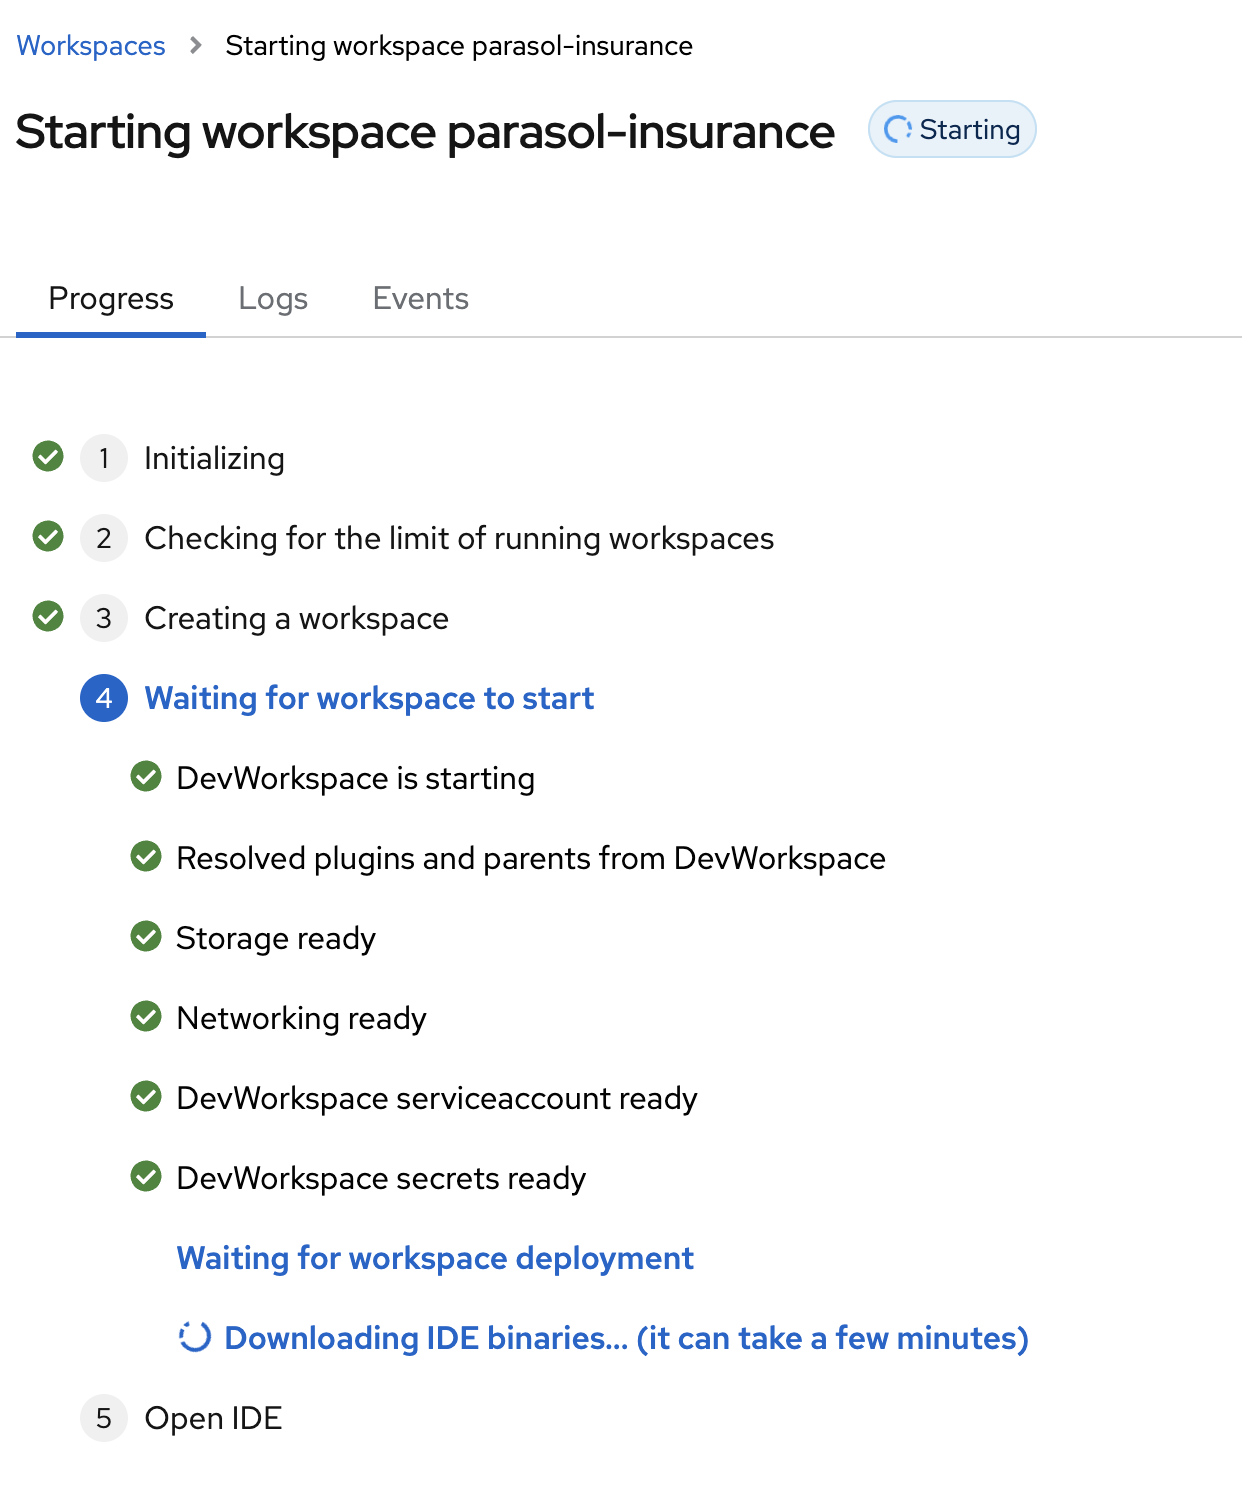
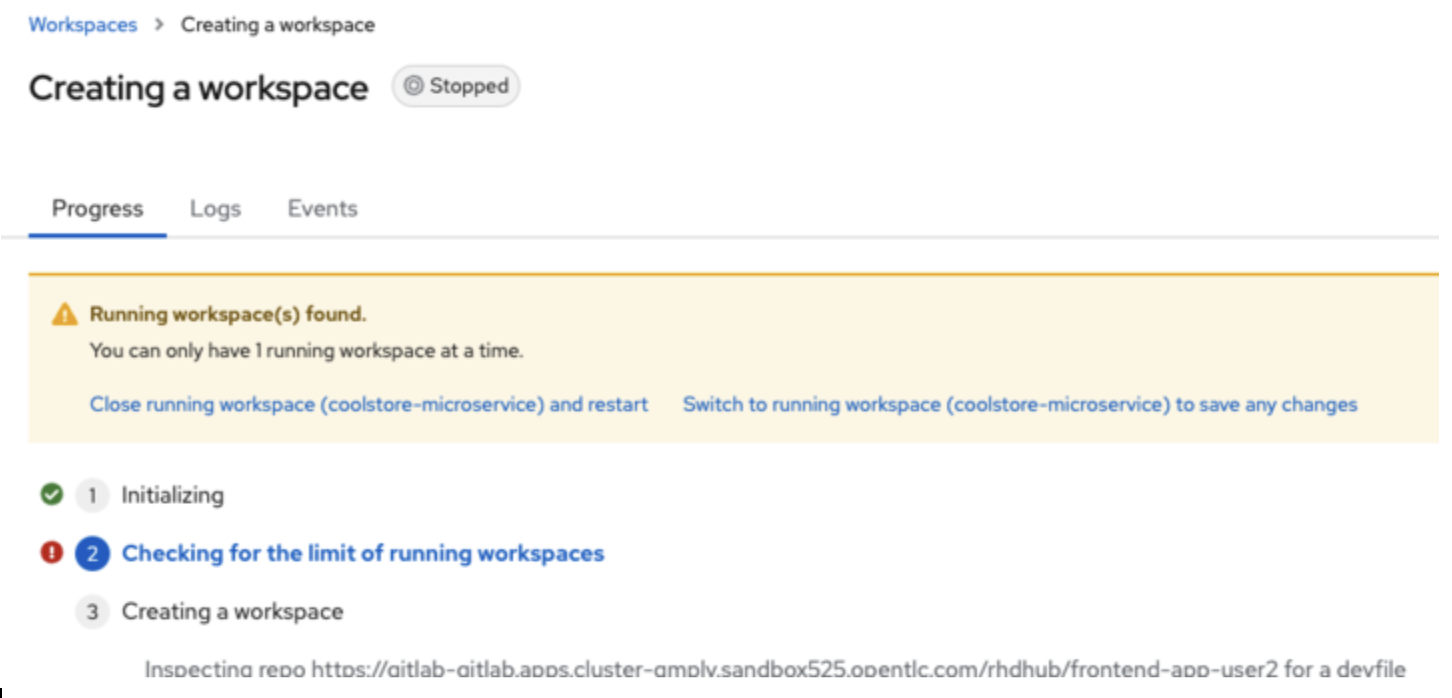
Wait for your Red Hat OpenShift Dev Spaces workspace to be ready. This can take a few minutes.
You will see a loading screen while the workspace is being provisioned, where Dev Spaces is creating a workspace based on a devfile stored in the source code repository, which can be customized to include your tools and configuration.
NOTE: In case your workspace fails to start, you can click on close running workspace and restart to try again.
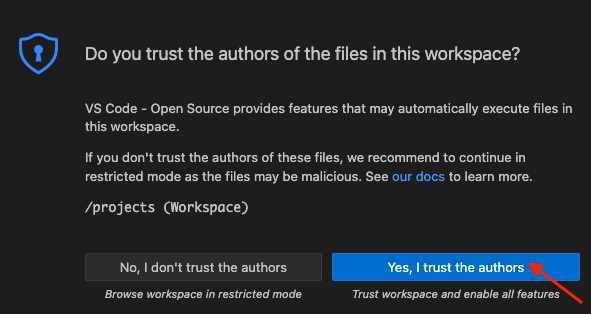
Confirm the access by clicking "Yes, I trust the authors".
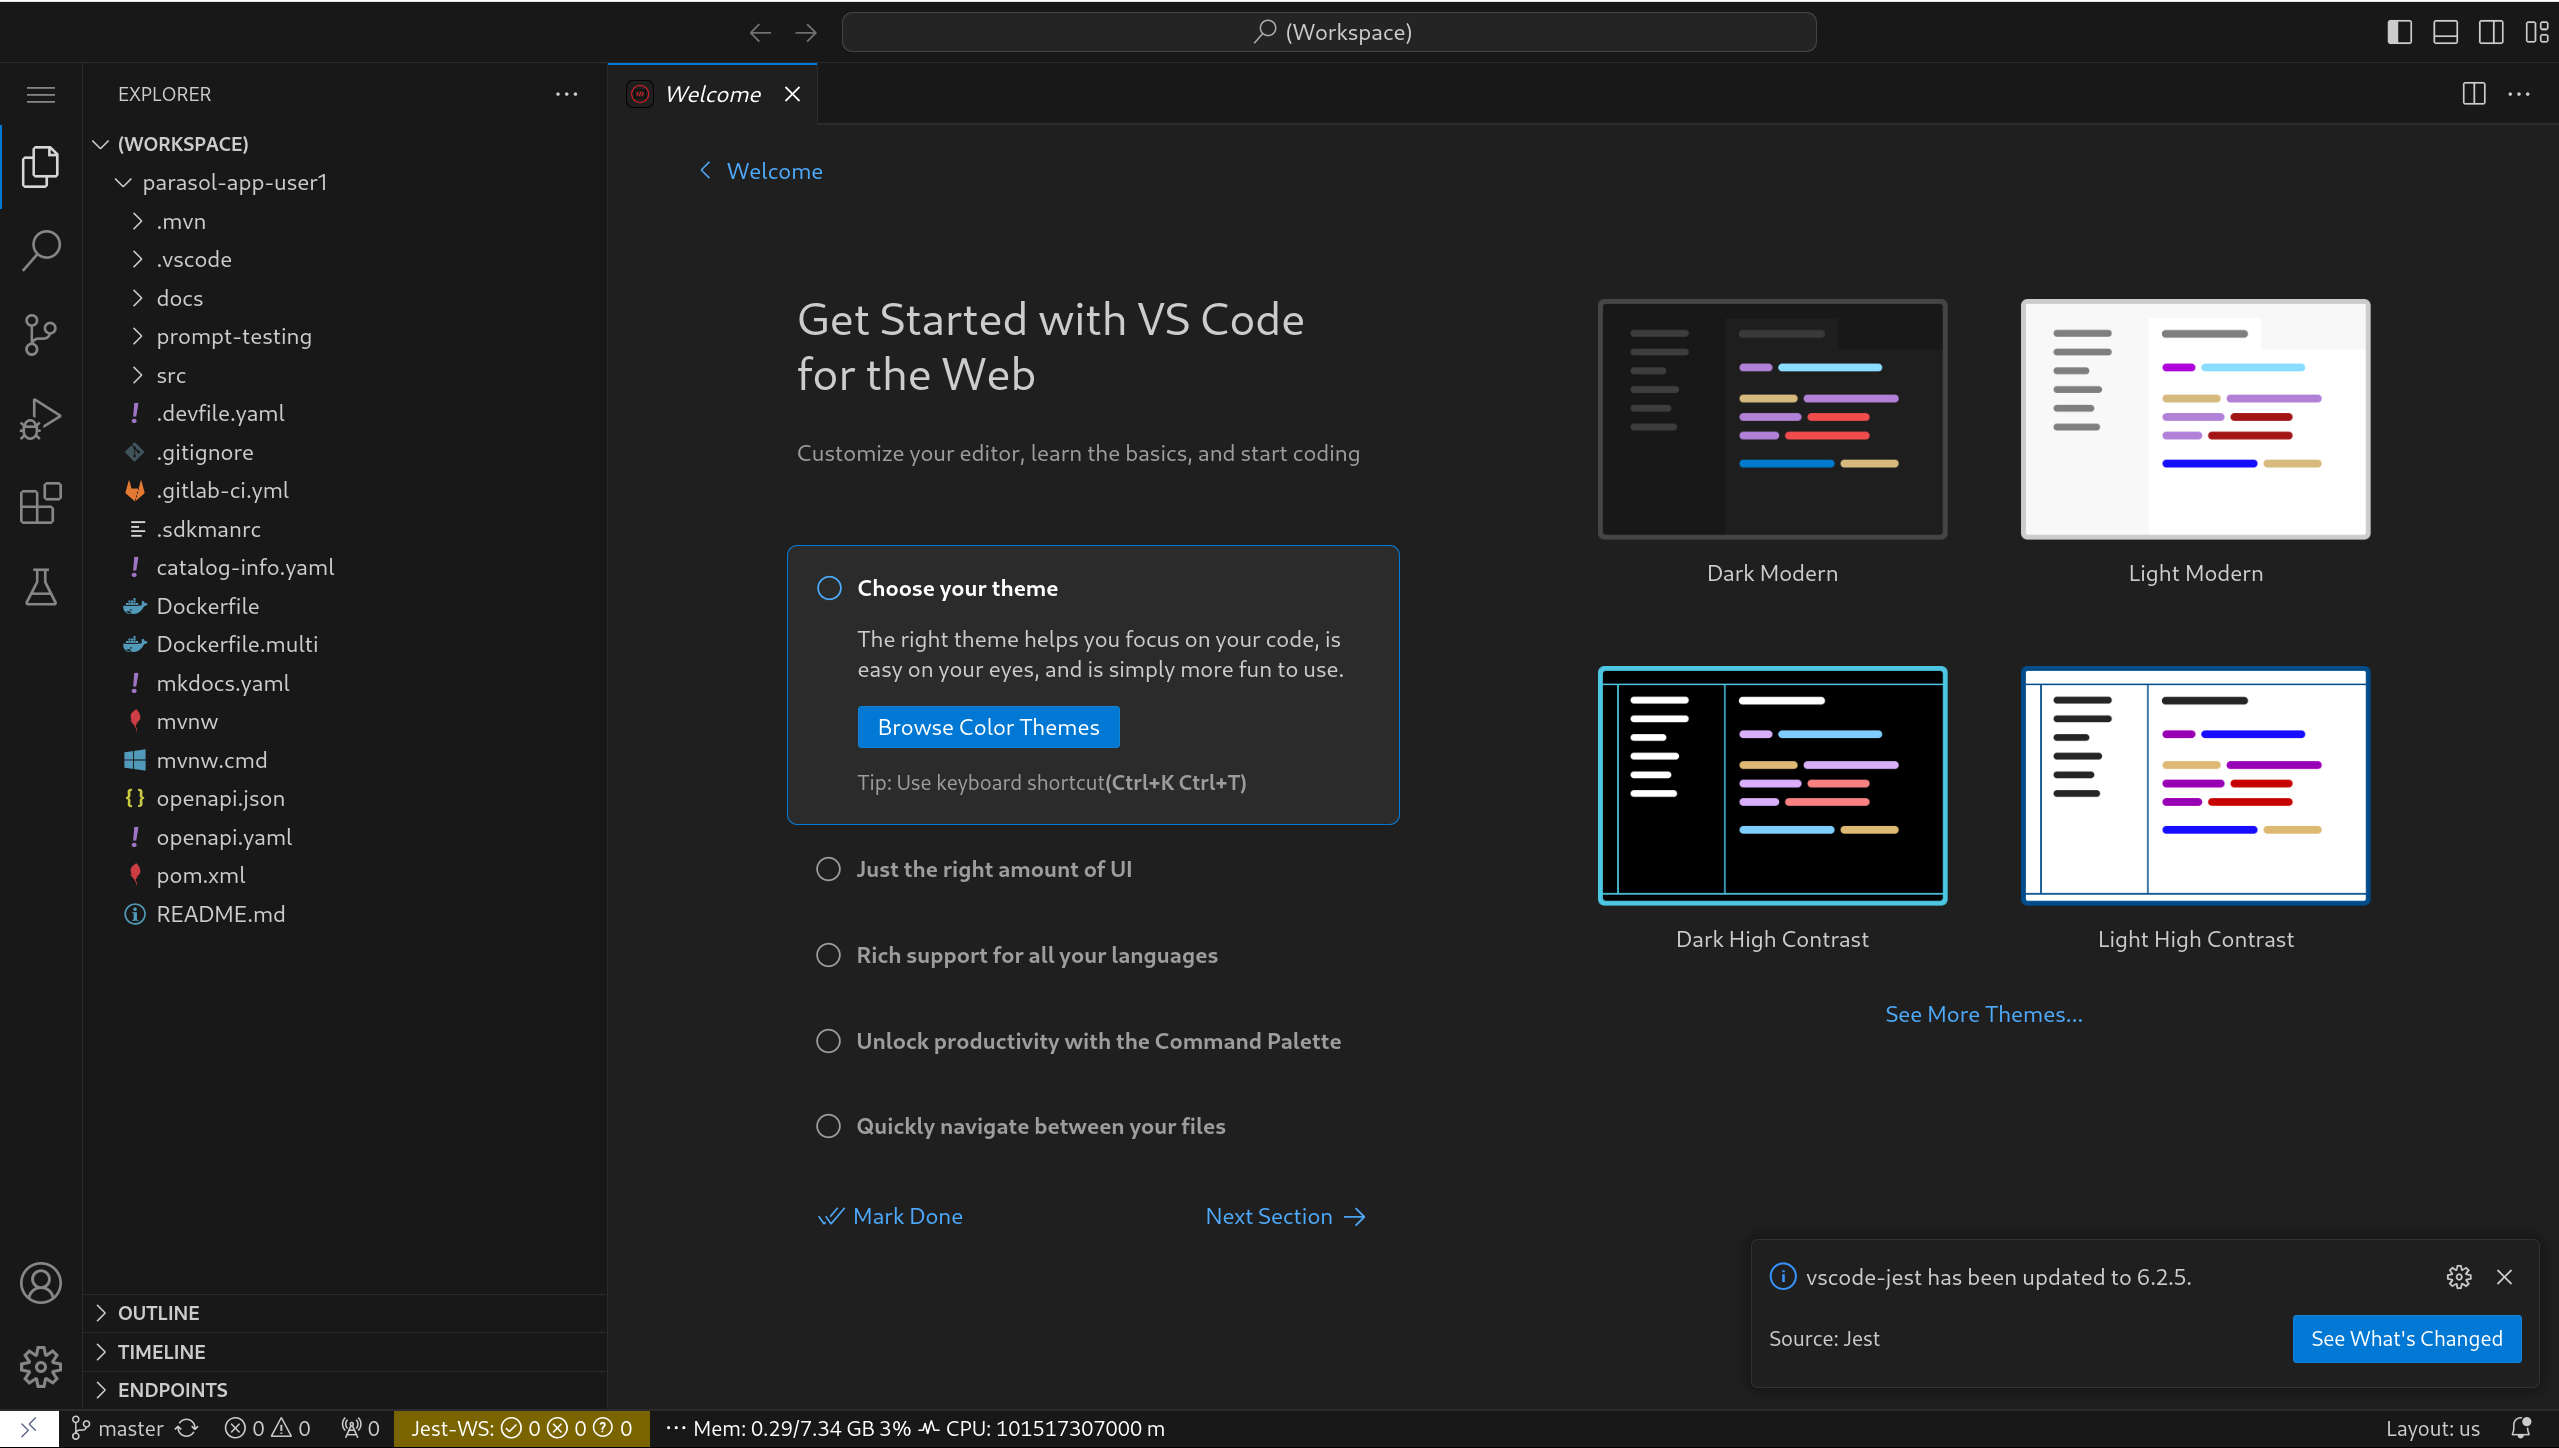
Then you should see:
5. Add a new generative AI feature
Now you’ll use the Dev Spaces to develop a new Generative AI feature, an email generator for responding to customer queries via email.
5.1. Create a new Gen AI email service
You’ll create a new Java AI service that generates emails based on Quarkus and the LangChain4j library. The Quarkus LangChain4j extensions bridge the gap between your Quarkus application and LangChain4j, a library that allows interaction with various LLMs like OpenAI, Hugging Face models, or Ollama, with the following key features and benefits:
-
Key Features
-
Declarative AI Services: Define how you want to interact with the LLM using annotations or configuration files.
-
Embedding Support: Integrates with document embedding stores like Redis, Chroma, or Infinispan to store and retrieve document context for the LLM.
-
Observability Integration: Allows monitoring and logging of LLM interactions within your Quarkus application.
-
Pluggable Authentication: Supports different authentication providers for accessing LLM services.
-
-
Benefits
-
Simplified LLM Integration: The extension streamlines the process of incorporating LLMs into your application, saving development time and effort.
-
Declarative Approach: It offers a declarative way to interact with LLMs, making the code more readable and maintainable. You specify what you want the LLM to do, and the extension handles the underlying communication.
-
Embedding Support: Supports Diverse LLMs: The extension is designed to work with a variety of LLM providers, giving you flexibility in choosing the LLM that best suits your needs.
-
5.1.1. Create a new branch in Gitlab
Open a Terminal window in the VS Code workspace.
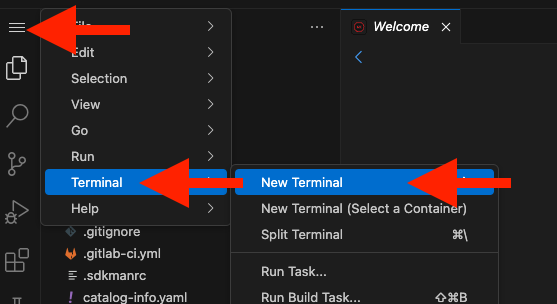
Before you begin developing your new feature, you need to create a new branch in Gitlab called new-gen-ai-service. Open a terminal in the VS Code workspace. Run the following git command to create the new branch.
git checkout -b new-gen-ai-service5.1.2. Get started with live coding
Before you start coding, you need to start with the Quarkus Dev Mode that is a powerful feature to significantly speed up the development lifecycle of Quarkus applications. It provides hot reload capabilitiesn (Live Coding), allowing you to see the results of your code changes instantly without requiring a full application restart.
Run the following command in the VS Code terminal to start Quarkus Dev Mode.
./mvnw clean quarkus:devThe output should look similar to the following (wait for the ASCII art!):
....
 --/ __ \/ / / / _ | / _ \/ //_/ / / / __/
 -/ /_/ / /_/ / __ |/ , _/ ,< / /_/ /\ \
--\___\_\____/_/ |_/_/|_/_/|_|\____/___/
INFO  [io.quarkus] (Quarkus Main Thread) insurance-app 1.0.0-SNAPSHOT on JVM (powered by Quarkus xx.xx.xx) started in 19.615s. Listening on: http://0.0.0.0:8080
INFO  [io.quarkus] (Quarkus Main Thread) Profile dev activated. Live Coding activated.
INFO  [io.quarkus] (Quarkus Main Thread) Installed features: [agroal, cdi, hibernate-orm, hibernate-orm-panache, jdbc-h2, langchain4j, langchain4j-ollama, langchain4j-openai, langchain4j-websockets-next, narayana-jta, quinoa, qute, rest, rest-client, rest-client-jackson, rest-jackson, smallrye-context-propagation, vertx, websockets-next]

--
Tests paused
Press [e] to edit command line args (currently ''), [r] to resume testing, [o] Toggle test output, [:] for the terminal, [h] for more options>
Validate your local Parasol application against the production version by accessing the Parasol web page (it may take up to a minute to come up - wait for the "Listening on…" message as shown above).
5.1.3. Preview the changes you need to make
To add the new feature, you will either create or edit the following files. Use this list as a checklist to ensure you’ve made all the changes. If you get errors when you try to run the app, be sure each file was changed as described in the instructions below!
-
src/main/java/org/parasol/model/Email.java- A Java record defining an incoming email from a customer -
src/main/java/org/parasol/model/EmailResponse.java- A Java record defining a response (subject+message) -
src/main/java/org/parasol/ai/EmailService.java- interface for interacting with the underlying LLM -
src/main/java/org/parasol/resources/EmailResource.java- A REST-like web frontend interface -
src/main/resources/application.properties- The Quarkus configuration where you’ll define the parameters for connecting to the LLM inference service -
src/main/webui/src/app/components/EmailGenerate/EmailGenerate.tsx- A React web component providing a simple interface for providing a customer email -
src/main/webui/src/app/routes.tsx- A list of React routes to which you’ll add the new Email generator component
5.1.4. Create Java records beans
Create a new Java record, Email.java in the src/main/java/org/parasol/model folder to carry email data in a concise and immutable way.
To create this file, right-click on the model folder in the file tree, then select "New File…" and enter the name of the new file Email.java. The empty file will open.
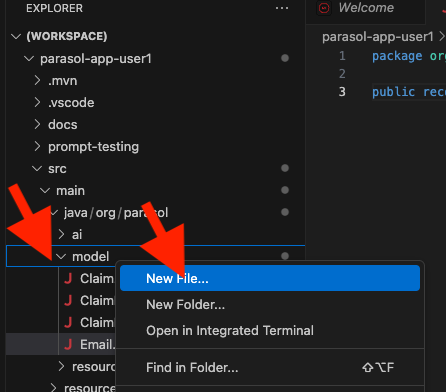
Copy the following code and paste it into the content editor.
package org.parasol.model;

public record Email(String text) { }|
Where is the Save button? VS Code will autosave your changes, that is why you can’t find a SAVE button - no more losing code because you forgot to save. You can undo with CTRL-Z (or CMD-Z on a Mac) or by using the |
Next, create a new Java record, EmailResponse.java in the src/main/java/org/parasol/model folder to store the response from the LLM. Copy the following code and paste it into the EmailResponse.java file.
package org.parasol.model;

public record EmailResponse(String subject, String message) { }
5.1.5. Create Java AI service
Create a new Java file, EmailService.java in the src/main/java/org/parasol/ai folder to serve as the AI Service connection point between your application and the LLM. Copy the following code and paste it into the EmailService.java file.
package org.parasol.ai;

import org.parasol.model.EmailResponse;

import dev.langchain4j.service.SystemMessage;
import dev.langchain4j.service.UserMessage;
import io.quarkiverse.langchain4j.RegisterAiService;

@RegisterAiService(modelName = "parasol-email")(1)
public interface EmailService {
    @SystemMessage("""(2)
      You are a helpful, respectful and honest assistant named "Parasol Assistant".

      You are responding to customer emails. Provide a friendly response that is written by Parasol. The response should thank them for being a customer. Include information about when parasol insurance was founded.

      Your response must look like the following JSON:

      {
        "subject": [A good one-line greeting],
        "message": [Your response, summarizing the information they gave and ask the customer for any follow-up information needed to file a claim]
      }
      """)
    EmailResponse chat(@UserMessage String claim);(3)
}| 1 | @RegisterAiService annotation is pivotal for registering the AI Service, represented as a Java interface. |
| 2 | @SystemMessage annotation defines the scope and initial instructions, serving as the first message sent to the LLM. It delineates the AI service’s role in the interaction. |
| 3 | @UserMessage annotation defines primary instructions dispatched to the LLM. It typically encompasses requests and the expected response format. |
5.1.6. Create Jakarta REST resource
Create a new Java file, EmailResource.java in the src/main/java/org/parasol/resources folder to serve a new REST endpoint. Copy the following code and paste it into the EmailResource.java file.
package org.parasol.resources;

import jakarta.inject.Inject;
import jakarta.ws.rs.Consumes;
import jakarta.ws.rs.POST;
import jakarta.ws.rs.Path;
import jakarta.ws.rs.Produces;
import jakarta.ws.rs.core.MediaType;

import org.parasol.ai.EmailService;
import org.parasol.model.Email;
import org.parasol.model.EmailResponse;

@Produces(MediaType.APPLICATION_JSON)
@Path("/api/email") (1)
public class EmailResource {

    @Inject
    EmailService bot;

    @POST
    @Consumes(MediaType.APPLICATION_JSON)
    public EmailResponse getresponse(Email claimEmail) {
        return bot.chat(claimEmail.text());
    }
}| 1 | @Path annotation defines the URL path for the resource. |
5.1.7. Add new LLM model configurations
Open the existing application.properties file in the src/main/resources folder to append the following Langchain4j configuration values.
quarkus.langchain4j.parasol-email.chat-model.provider=openai(1)
quarkus.langchain4j.openai.parasol-email.chat-model.temperature=0.3(2)
quarkus.langchain4j.openai.parasol-email.timeout=600s(3)
quarkus.langchain4j.openai.parasol-email.chat-model.model-name=parasol-instruct(4)
quarkus.langchain4j.openai.parasol-email.base-url=http://parasol-instruct-predictor.aiworkshop.svc.cluster.local:8080/v1(5)| 1 | Specify the model provider (e.g., openai, huggingface). Note that you use the Open AI API specification when you connect to the LLM (parasol-instruct) inference endpoint |
| 2 | Set the model temperature. Temperature is a parameter used in natural language processing models to increase or decrease the “confidence” a model has in its most likely response |
| 3 | Specify the timeout between question and response in the LLM |
| 4 | Specify the model name to connect to |
| 5 | Specify the base URL of the LLM inference endpoint that the application will connect to |
5.2. Update the frontend web application in Parasol Insurance
Let’s update the frontend React web application to give our customer service reps a nice interface for generating emails.
5.2.1. Create new React TypeScript component
Create a new EmailGenerate folder in the src/main/webui/src/app/components folder. Also, create a new TypeScript XML file, EmailGenerate.tsx in the src/main/webui/src/app/components/EmailGenerate folder to render the output of the LLM in the email subject and body content. Copy the following code and paste it into the EmailGenerate.tsx file.
import config from '@app/config';
import { Button, Form, FormGroup, TextArea, Spinner } from '@patternfly/react-core';
import * as React from 'react';
import { useState } from 'react';
interface ResponseData {
subject: string;
message: string;
}
const EmailGenerate: React.FunctionComponent = () => {
const [text, setText] = useState('');
const [error, setError] = useState('');
const [response, setResponse] = useState<ResponseData | null>(null);
const [loading, setLoading] = useState(false);
const handleSubmit = async (event: React.FormEvent) => {
event.preventDefault();
setLoading(true);
try {
const response = await fetch('/api/email', {
method: 'POST',
headers: {
'Content-Type': 'application/json'
},
body: JSON.stringify({ text: text })
});
console.log("response: ");
console.log(response);
if (response.ok) {
const data = await response.json();
setResponse(data);
setError('');
} else {
setError('Error: Failed to fetch response from server.');
}
} catch (error) {
setError('Error!');
} finally {
setLoading(false);
}
};
return (
<div style={{ display: 'flex', justifyContent: 'center', alignItems: 'center', height: '100vh' }}>
<Form onSubmit={handleSubmit} style={{ width: '800px', textAlign: 'center' }}>
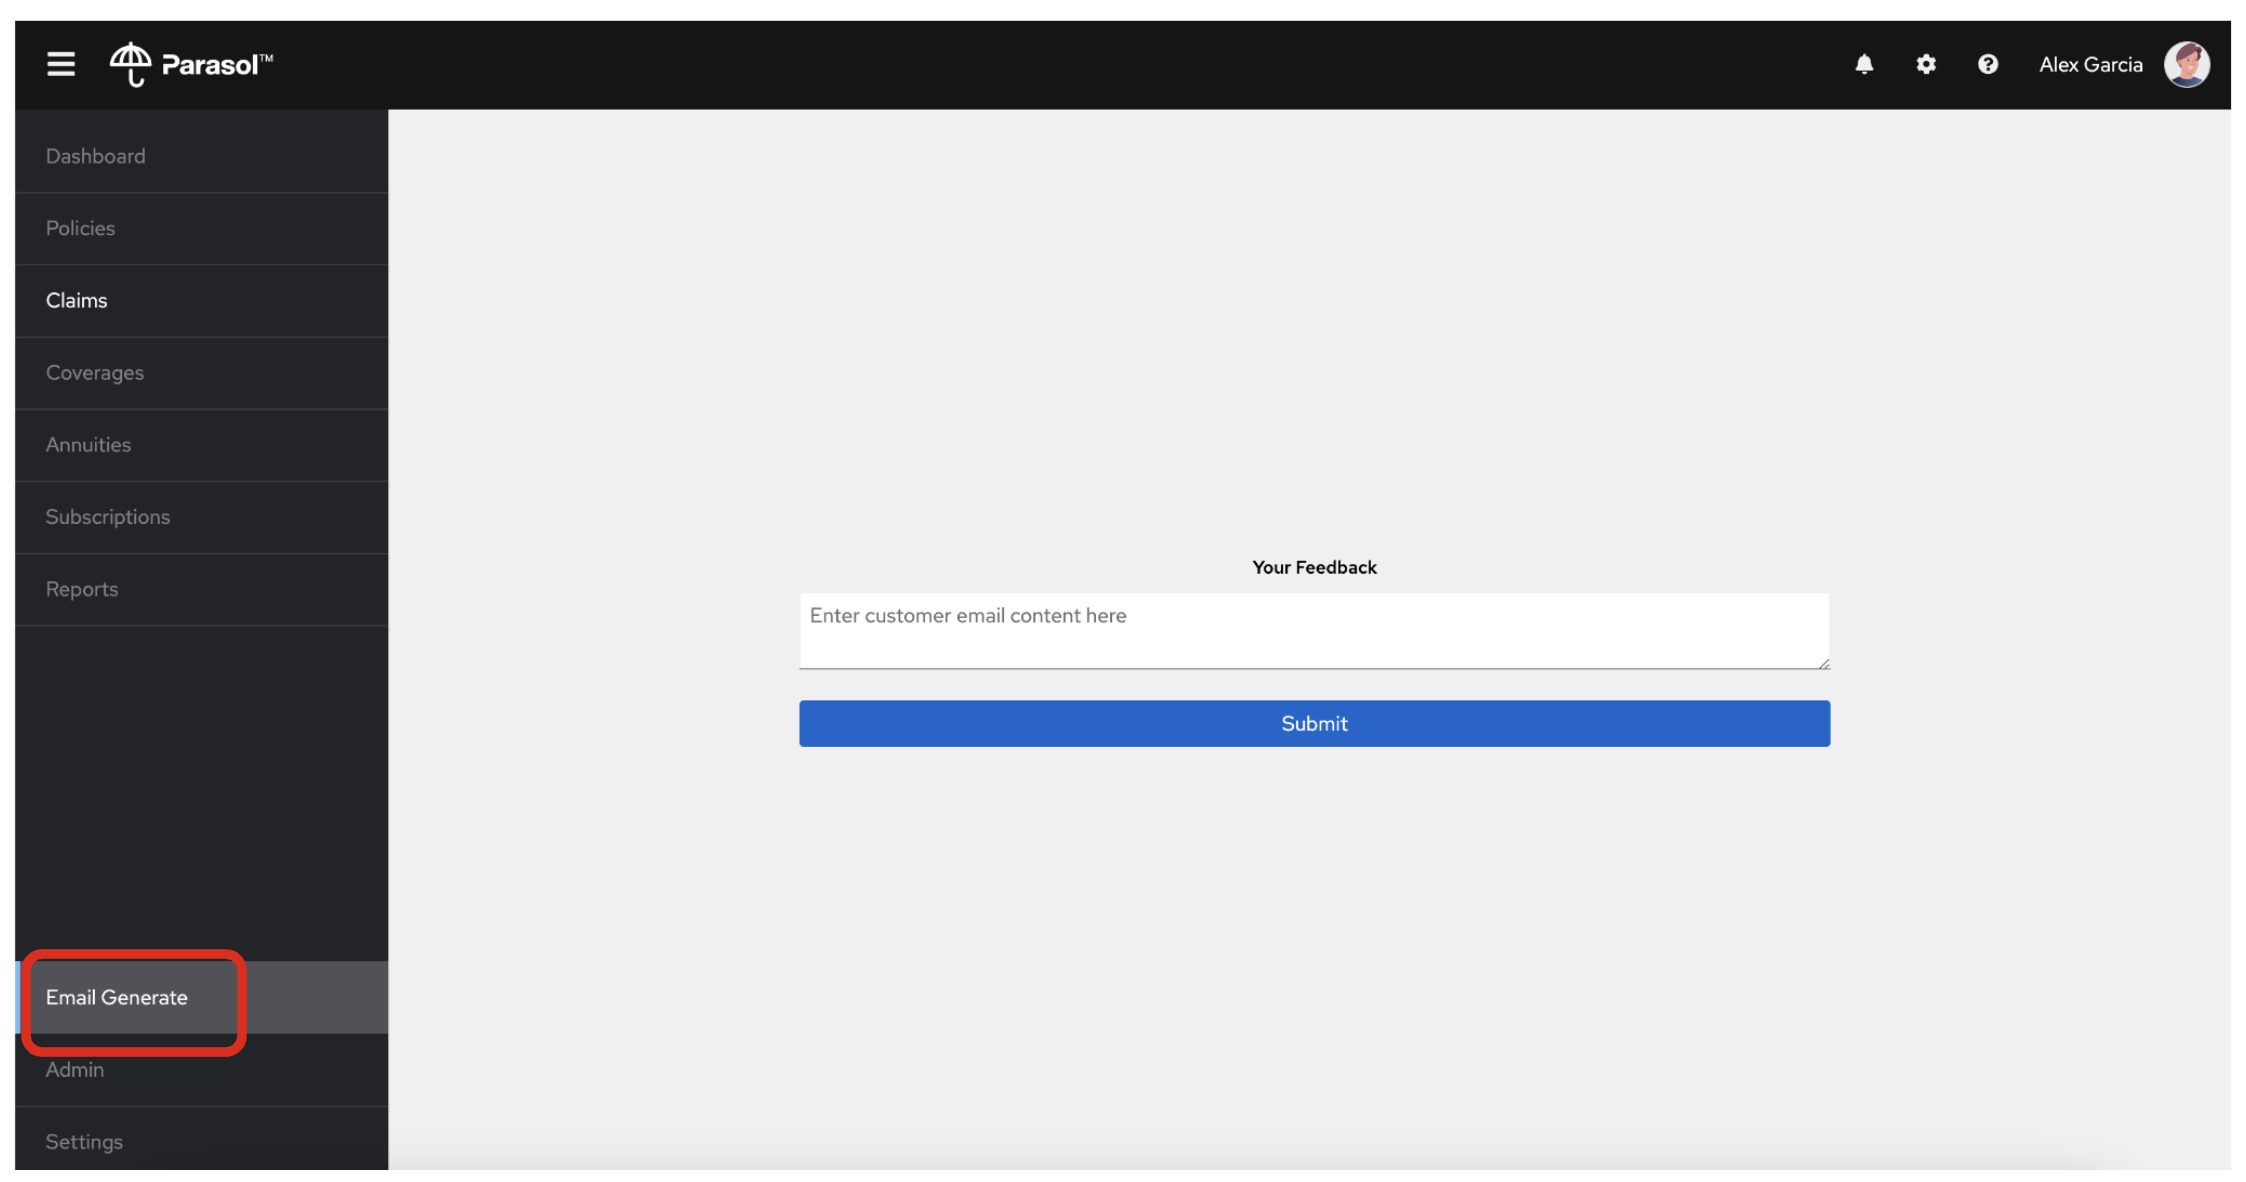
<FormGroup label="Your Feedback" fieldId="text-area">
<TextArea
onChange={(value) => setText(value.target.value)}
name="textArea"
id="text-area"
aria-label="Your feedback"
placeholder="Enter customer email content here"
style={{ width: '100%' }}
/>
</FormGroup>
<Button type="submit">Submit</Button>
{loading && <Spinner style={{justifyContent: 'center', alignItems: 'center'}} size="lg" />}
{response && (
<div id="email-response" style={{ marginTop: '20px', color: 'blue', textAlign: 'left', width: '100%' }}>
<div id="email-response-subject" style={{ fontWeight: 'bold', fontFamily: 'Arial' }}>Subject: {response.subject}</div>
<pre id="email-response-message" style={{ whiteSpace: 'pre-wrap', wordWrap: 'break-word', fontFamily: 'monospace', border: '1px solid black', padding: '10px' }}>
{response.message}
</pre>
</div>
)}
{error && (
<div style={{ marginTop: '20px', color: 'red', textAlign: 'left', width: '100%' }}>{error}</div>
)}
</Form>
</div>
)
}
export { EmailGenerate };This interface allows customer service representatives to copy and paste the customer email into the box, and then it generates a response email. That’s the feature you are adding here.
5.2.2. Add a new menu item in the navigation bar
Open the routes.tsx file in the src/main/webui/src/app folder and uncomment the following code out in line 8 and 89 - 95 to show the new menu item.
|
For example, press Ctrl+/ on Windows or Cmd+/ on macOS to comment out the code. |
import { EmailGenerate } from './components/EmailGenerate/EmailGenerate';{
component: EmailGenerate,
exact: true,
label: 'Email Generate',
path: '/EmailGenerate',
title: 'Email Generate'
},5.2.3. Local test the new feature
Before committing, do a quick functional test locally to ensure you got all the changes correct. If you stopped the Quarkus dev mode, start it again.
Reload the Parasol web page.
|
If you’re still seeing the old page, try refreshing the page without the browser caches by pressing Ctrl+F5 or Cmd+Shift+R on macOS. |
The new Email Generate menu item will appear on the left panel. Click on it.
Try to submit a simple draft email content. Copy/paste in the following email received from a customer:
    Dear Parasol Insurance Team,

    My name is Dominic Toretto.

    I hope this email finds you well. I'm reaching out to file a claim regarding a recent incident involving my car, which is covered under my policy with Parasol. The accident occurred last night on the streets of Los Angeles, and I wanted to provide you with all the necessary details.

    Location: The accident took place at the intersection of Sunset Boulevard and Vine Street in downtown Los Angeles. It was one of those crazy nights, where the streets were alive with the sound of engines and the glow of neon lights.

    Circumstances: So, here's the deal. I was out cruising with the crew, enjoying the vibe of the city, when suddenly we found ourselves in the middle of a high-speed chase. There was this dude, let's call him Johnny Tran for the sake of this email, who thought he could outmaneuver us. Little did he know, we don't play by the rules.

    Anyway, Johnny pulled some slick moves, cutting through traffic like a bat outta hell. Naturally, being the king of the streets that I am, I had to show him what real speed looks like. So, I hit the nitrous and went full throttle.

    But then, outta nowhere, this semi-truck decided to make a left turn without signaling. I had to make a split-second decision, and I ended up launching my car off a ramp, trying to clear the truck like we're in one of those crazy action flicks. It was like something straight outta the movies, I tell ya.

    Long story short, the stunt didn't exactly go as planned. My car ended up crashing into a billboard, flipping over a couple of times before finally coming to a stop. Yeah, it was a total wreck. But hey, at least we walked away without a scratch, just a little shaken, not stirred, if you catch my drift.

    Damage: As for the damage to my car, let's just say its gonna need more than a few wrenches and some duct tape to fix this baby up. The front end is smashed in, the windows are shattered, and I''m pretty sure the chassis is twisted beyond recognition. It''s gonna take a miracle to get her back on the road.

    I understand that accidents happen, but Im counting on Parasol to have my back in times like these. Ive been a loyal customer for years, and I trust that you'll handle my claim with the same speed and precision that I handle my rides.

    Please let me know what steps I need to take to get the ball rolling on this claim. I'm ready to do whatever it takes to get my car back in top shape and back on the streets where it belongs.

    Looking forward to hearing from you soon.
Click on Submit to generate the email subject and body. It will take a few seconds to receive the result (generated data) from the Parasol Instruct LLM model.

Great! Now you’re ready to merge this code into the application. We’ll create a pull request which will automatically build the new app so that we can test it.
6. Create a new pull request
Create a new pull request (PR) to add the new Gen AI feature in the Parasol Insurance’s application.
6.1. Commit your source code changes
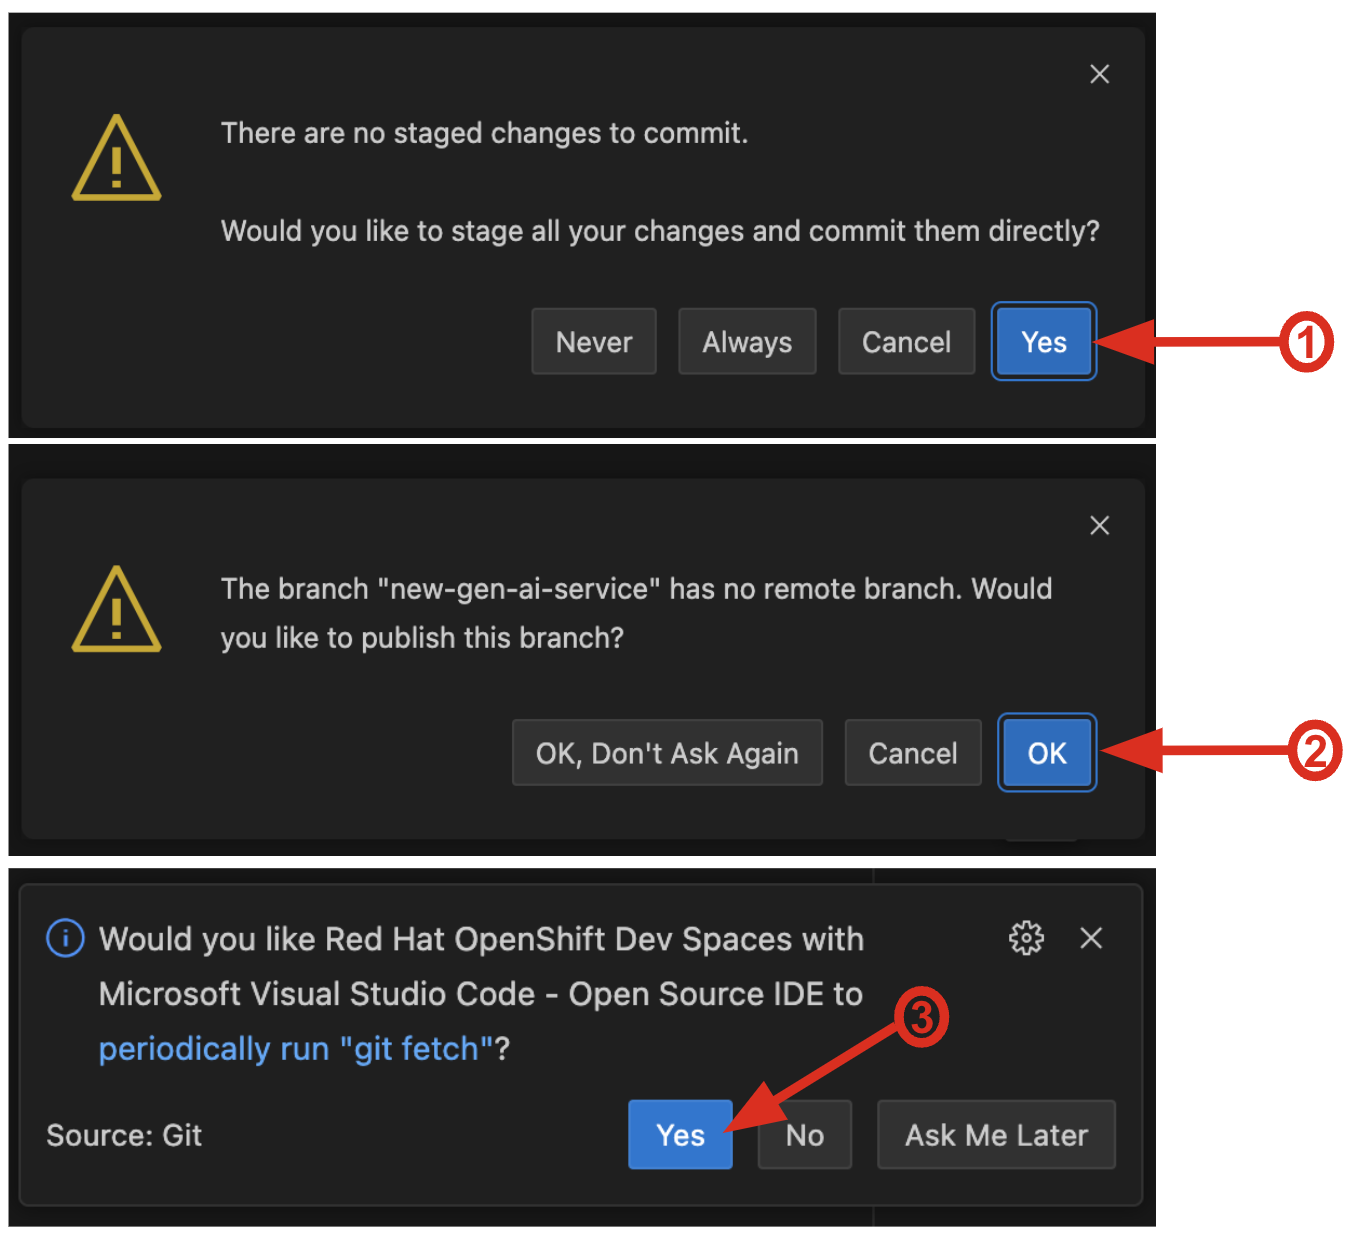
Click on the Source Control icon. Then, follow the next steps.
-
Add a Message (e.g.,
Add a new Gen AI feature) for the commit. -
Click on Commit arrow.
-
Select the option Commit & Push.
![]](_images/devhub/dev_commit.png)
In Git, code changes are typically staged before being committed. This staging process allows you to selectively choose which parts of your code to include in the next commit. While using remote branches is generally recommended for collaborative development and managing code across multiple machines, in this workshop, we’ll streamline the process by creating a pull request directly to your working repository. This will help us focus on the core concepts and techniques without getting bogged down in the complexities of remote branches.
Confirm the following 3 popups.
6.2. Merge the pull request
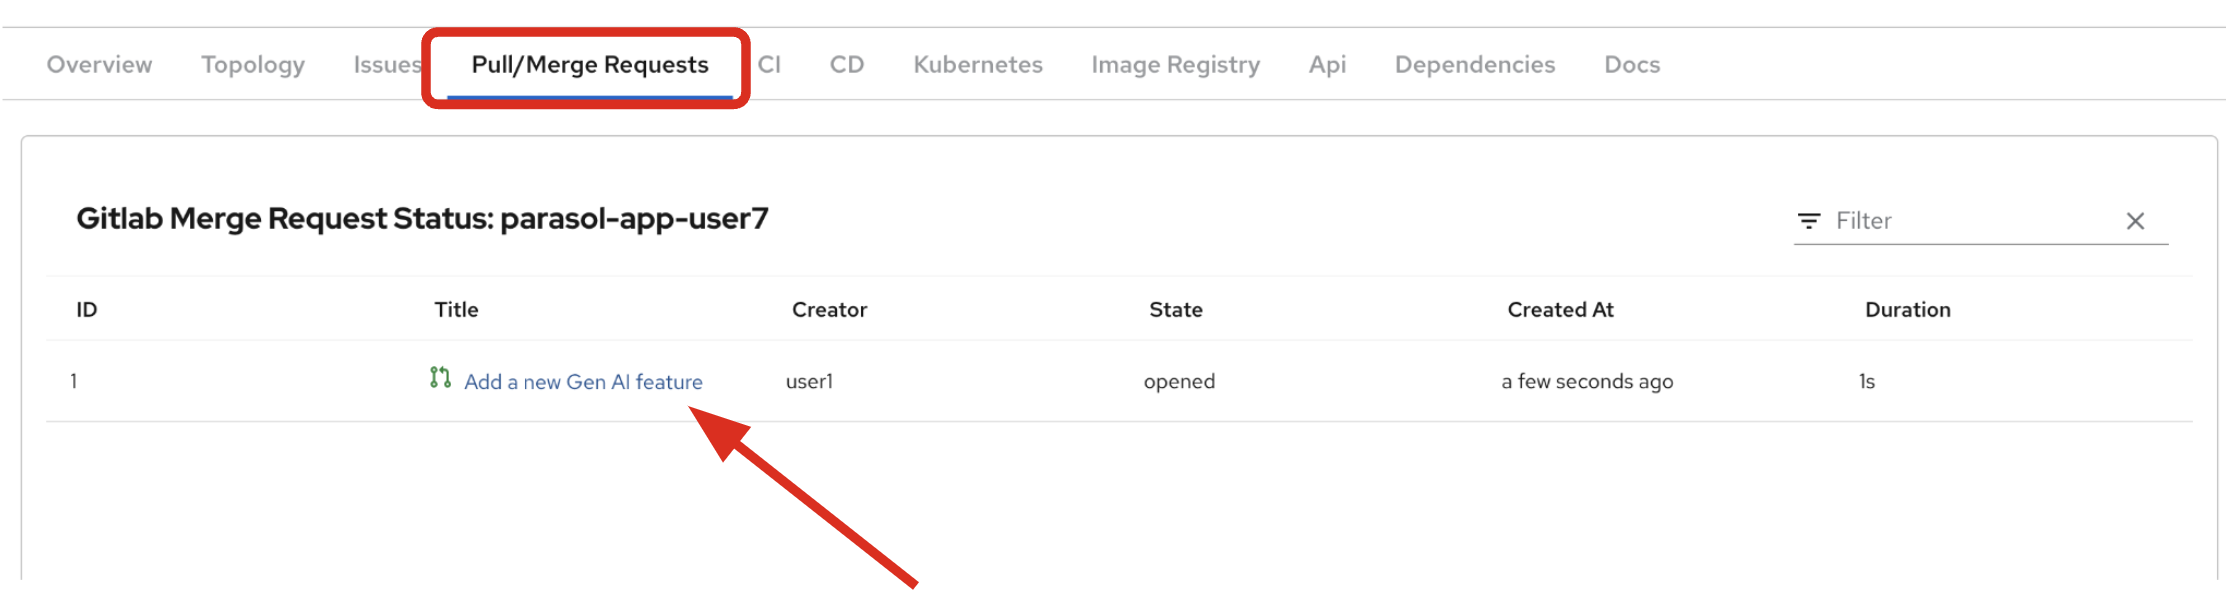
Go to the Gitlab. Click on the Create merge requests to merge the pull request. If you don’t see the merge request, refresh the page.
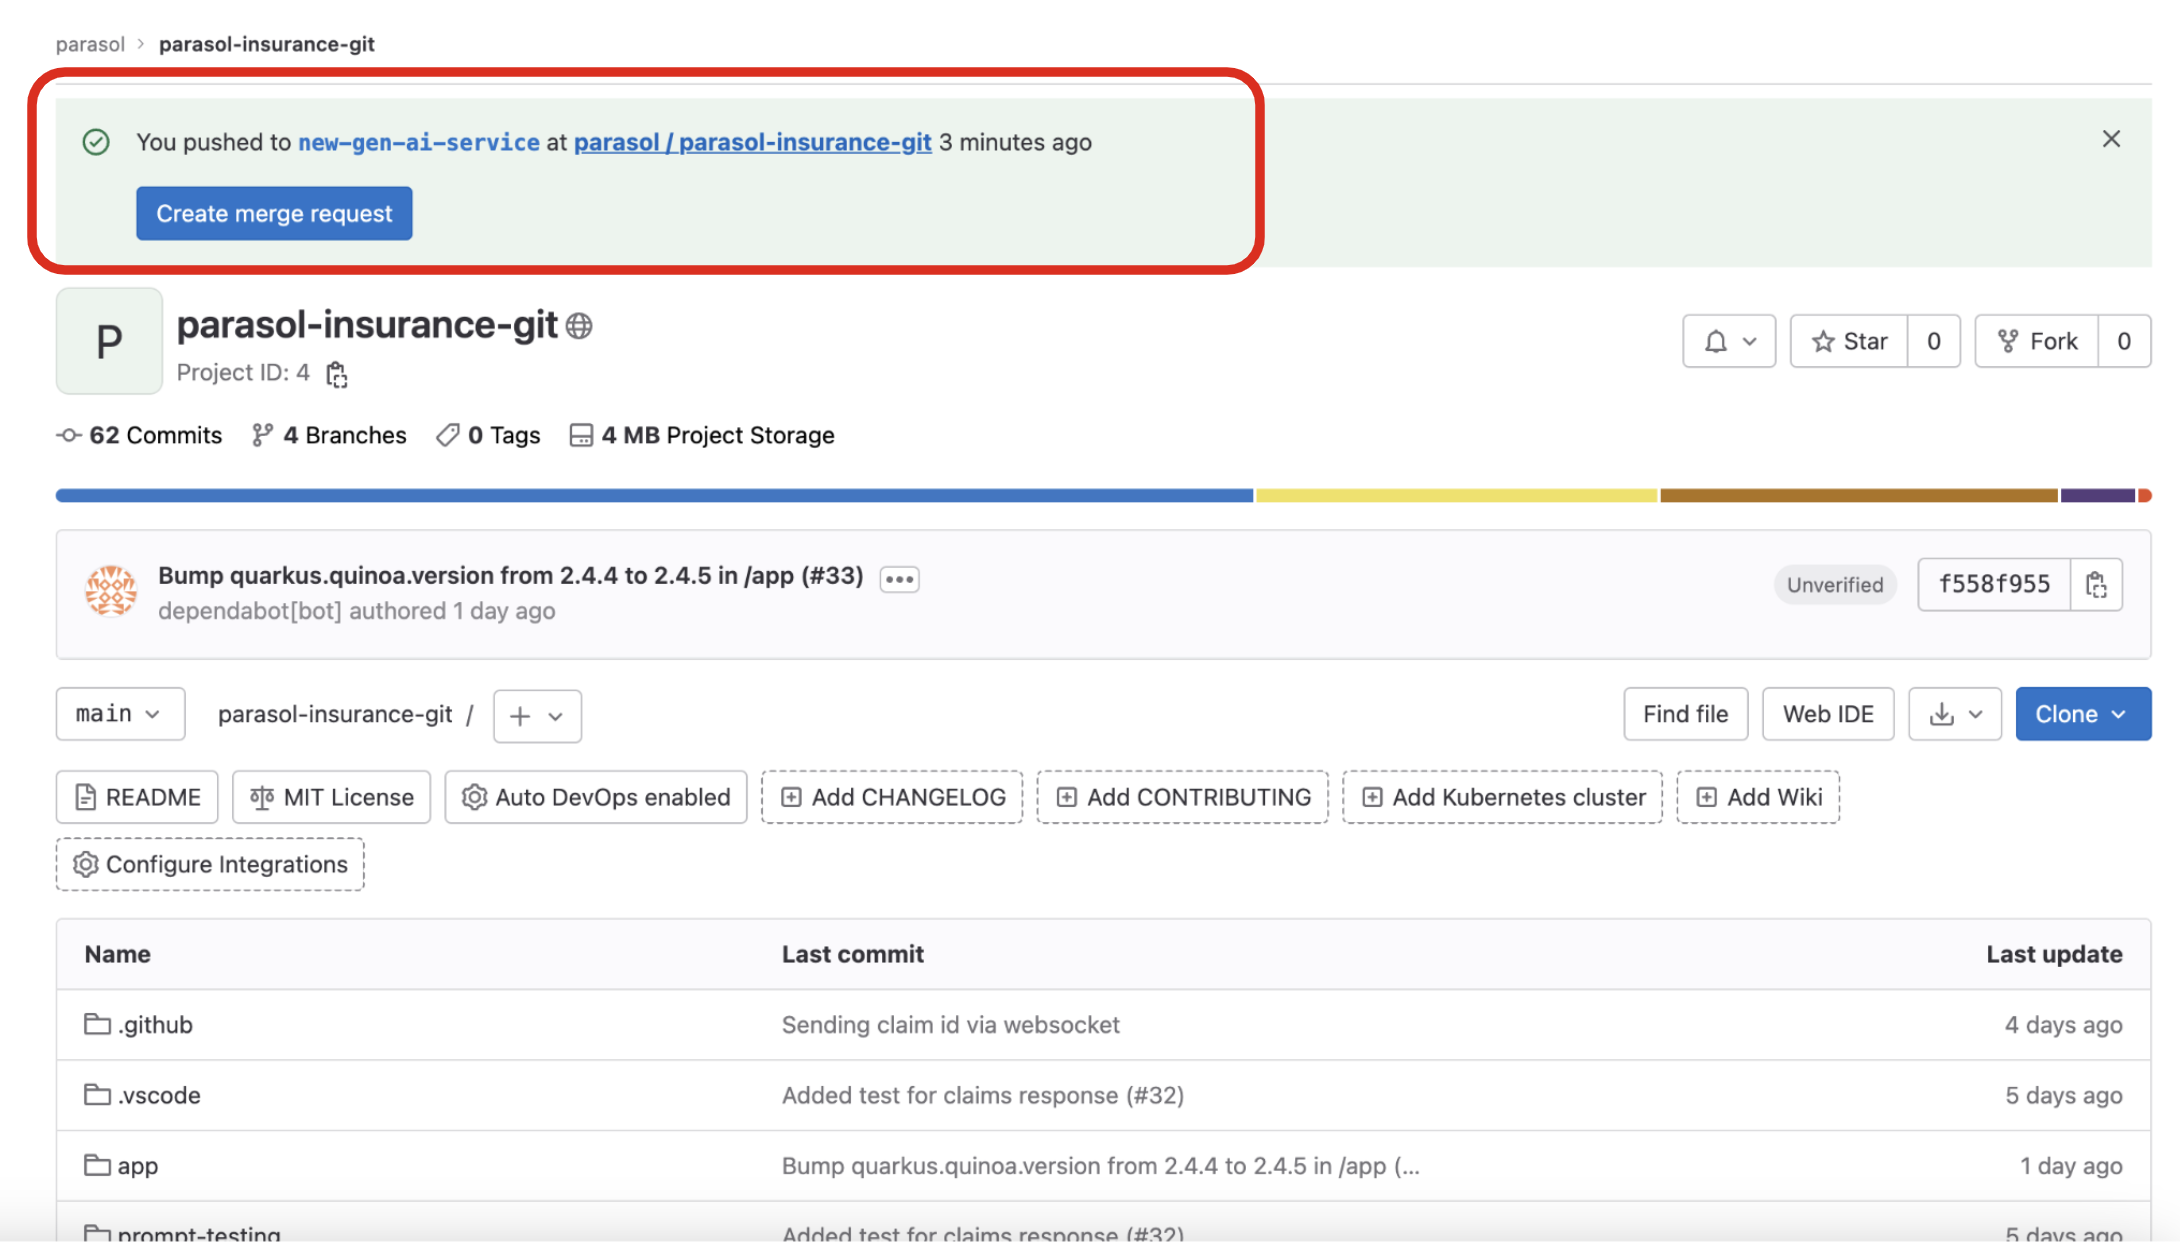
You will see the details of the New merge request page. Fill out the form and click on Create merge request.
-
Description: This is a new Gen AI feature to generate an email body and subject in the Parasol Insurance.
-
Assignee: user1 GitLab - click on the Assign to me
-
Reviewer: select user1 GitLab
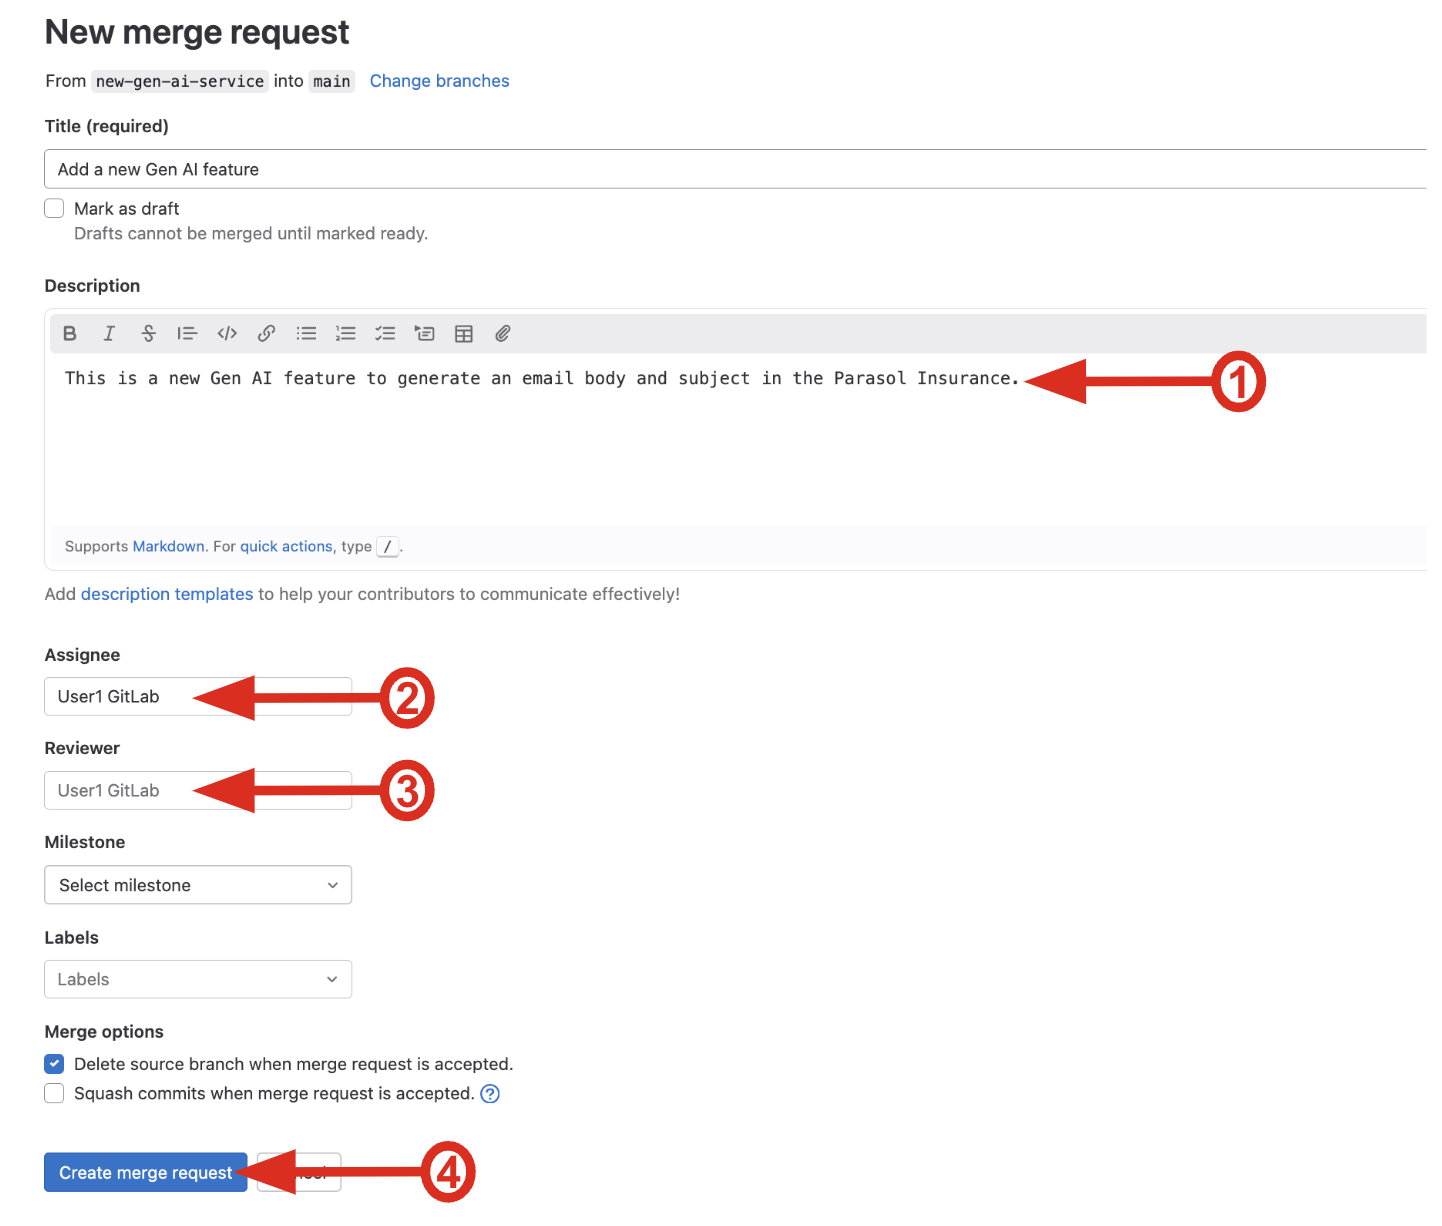
|
The reviewer and assignee should be different in reality. To make the PR process easier, you can use the same user. |
You can also search for the PR request in Developer Hub.
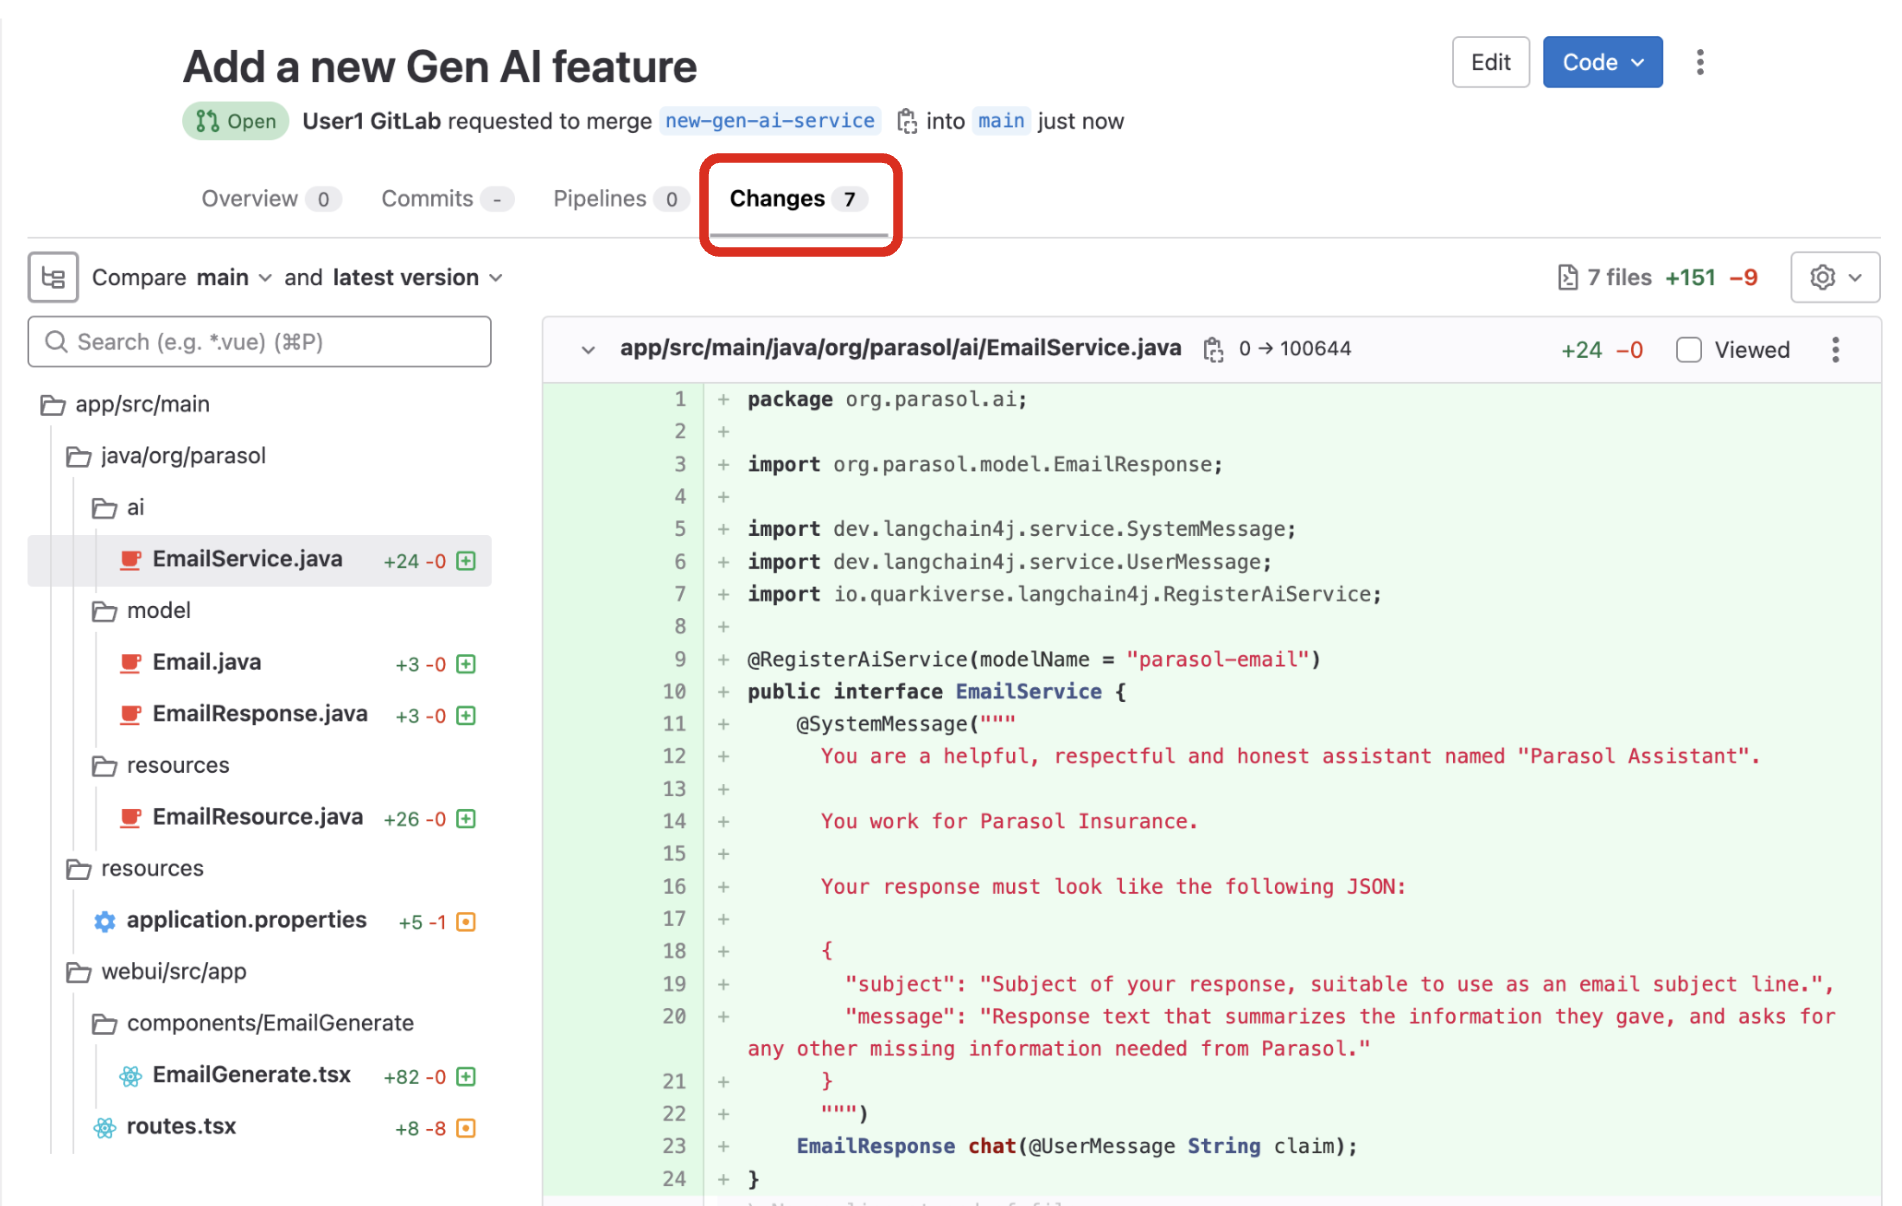
6.3. Review the changes
Select the Changes tab in the Gitlab to review what code has changed in the pull request. This should be done by an application architect or senior developer in general.
Switch back to the Overview tab and click on Merge to merge the pull request. Note that the reviewer usually approves the pull request before merging.
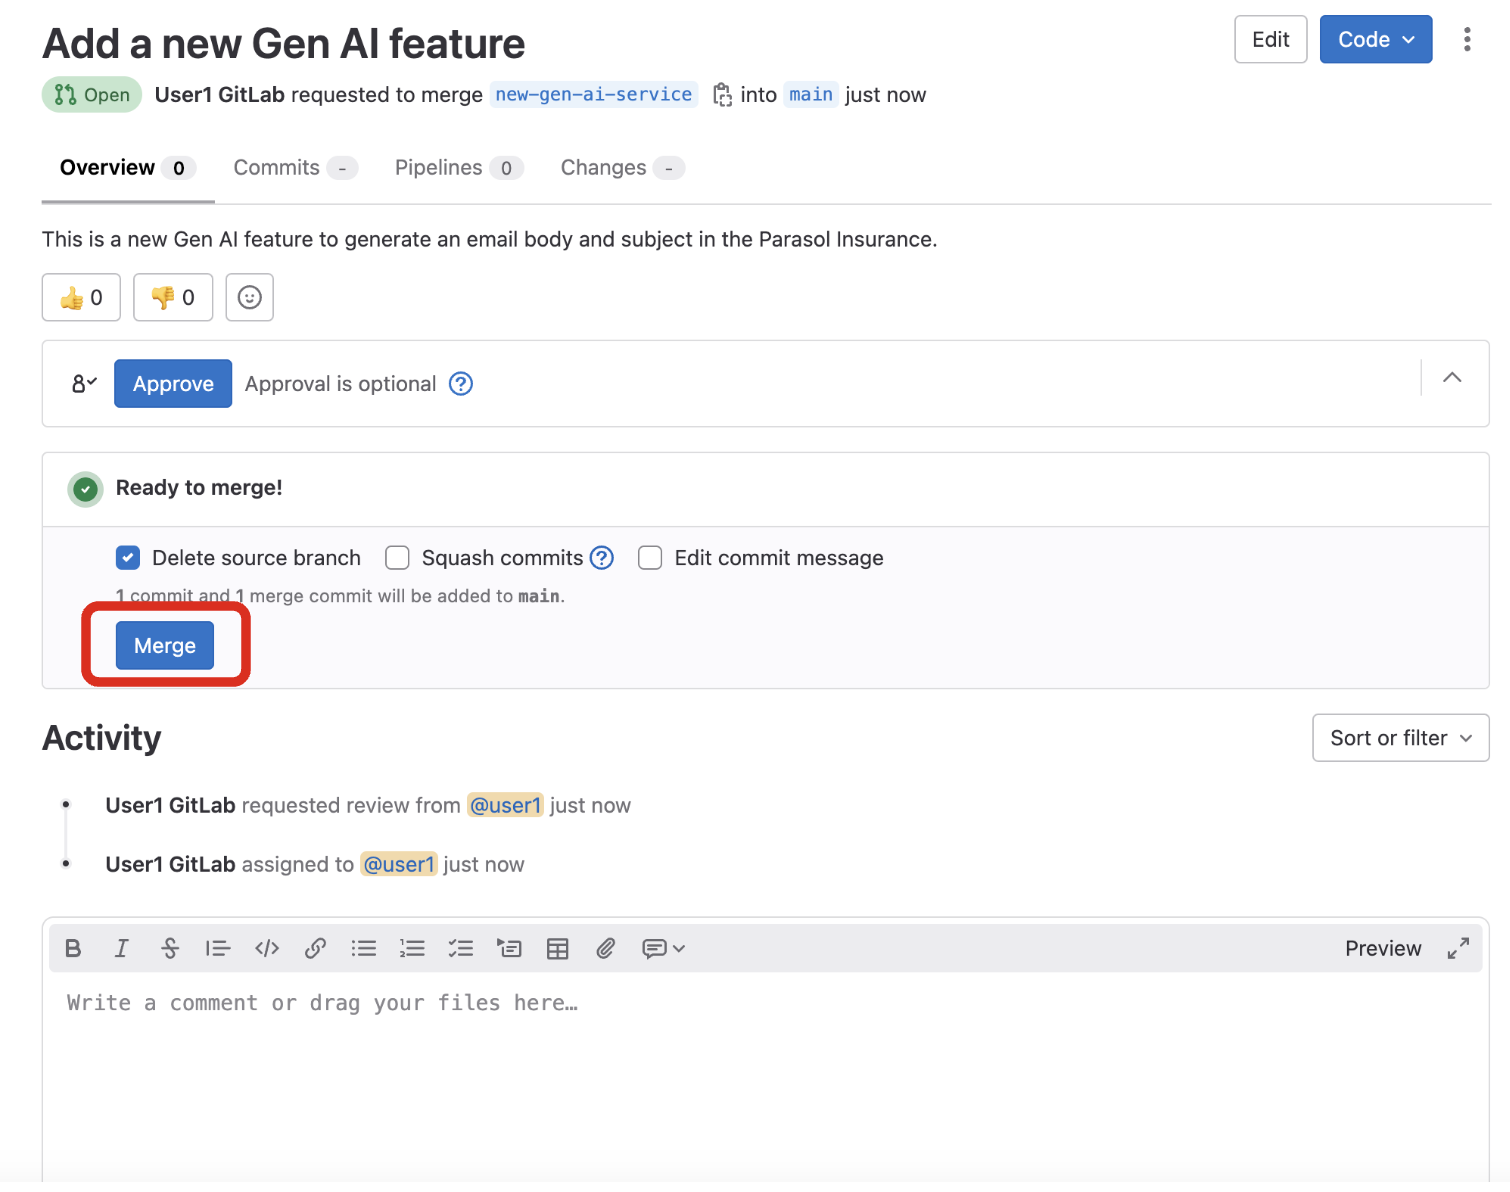
A few seconds later, the pull request will be merged.
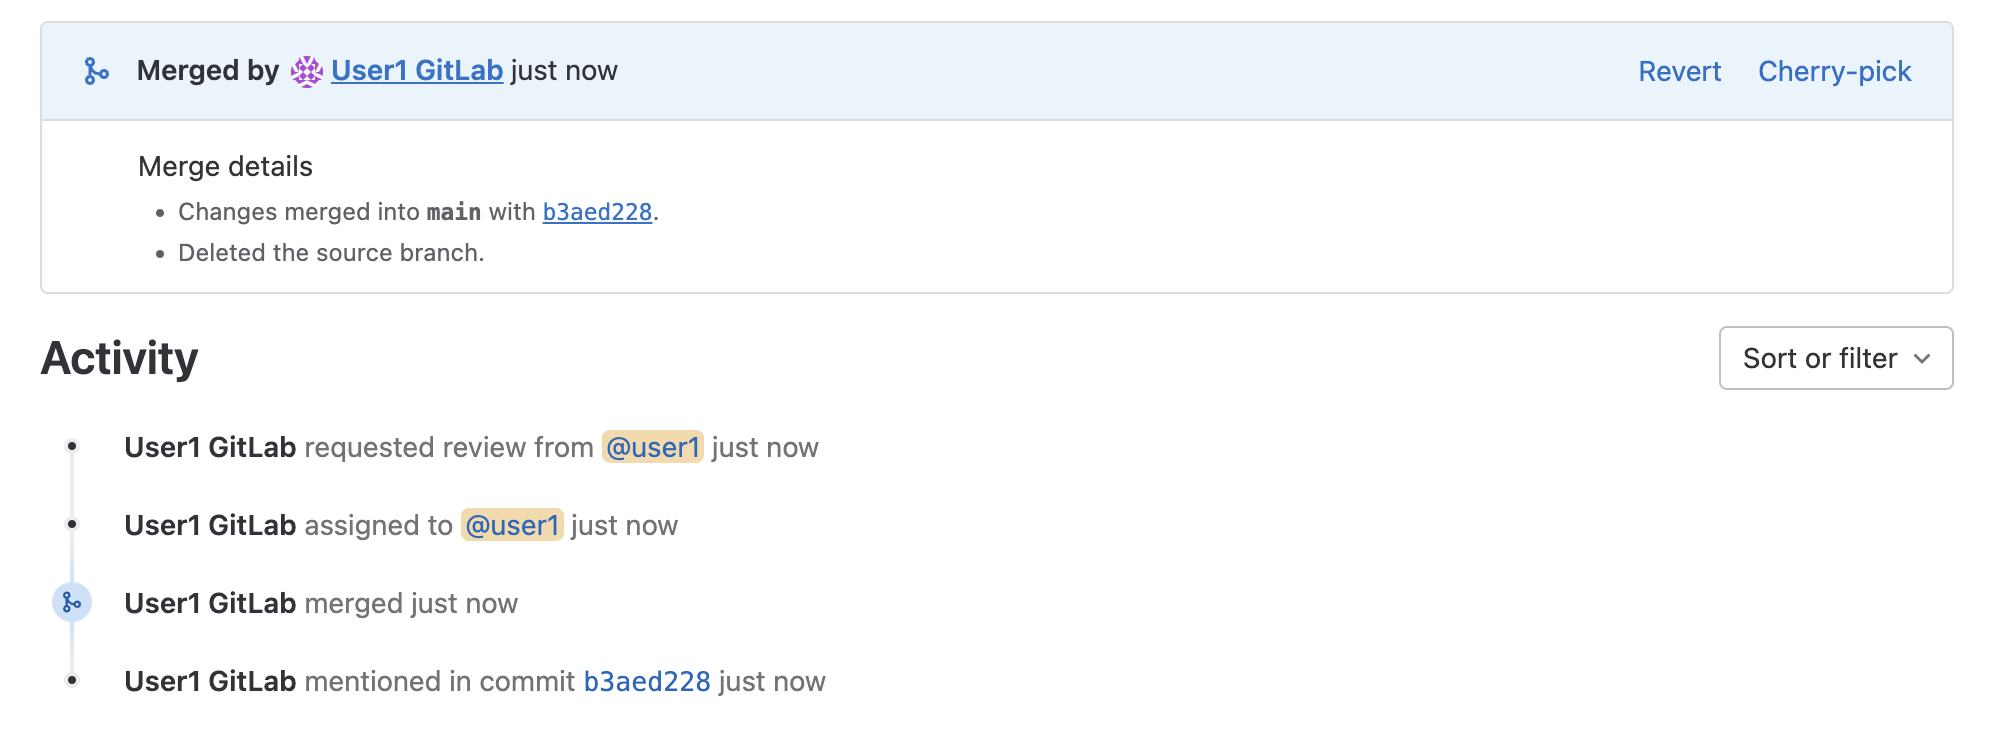
The PR merge will trigger a new pipeline that will deploy the new Gen AI feature in the Parasol Insurance’s application.
7. Monitor the new deployment
Your source code changes triggered a new pipeline to update the version of the frontend application.
Monitor if the new deployment rolls out by the OpenShift GitOps in the Dev Hub web console.
Go back to your frontend component on the Red Hat Developer Hub: Red Hat Developer Hub UI.
Explore the pipelines by clicking on the CI tab. A new pipeline will be triggered to build the new Gen AI feature. Wait for pipeline to finish.
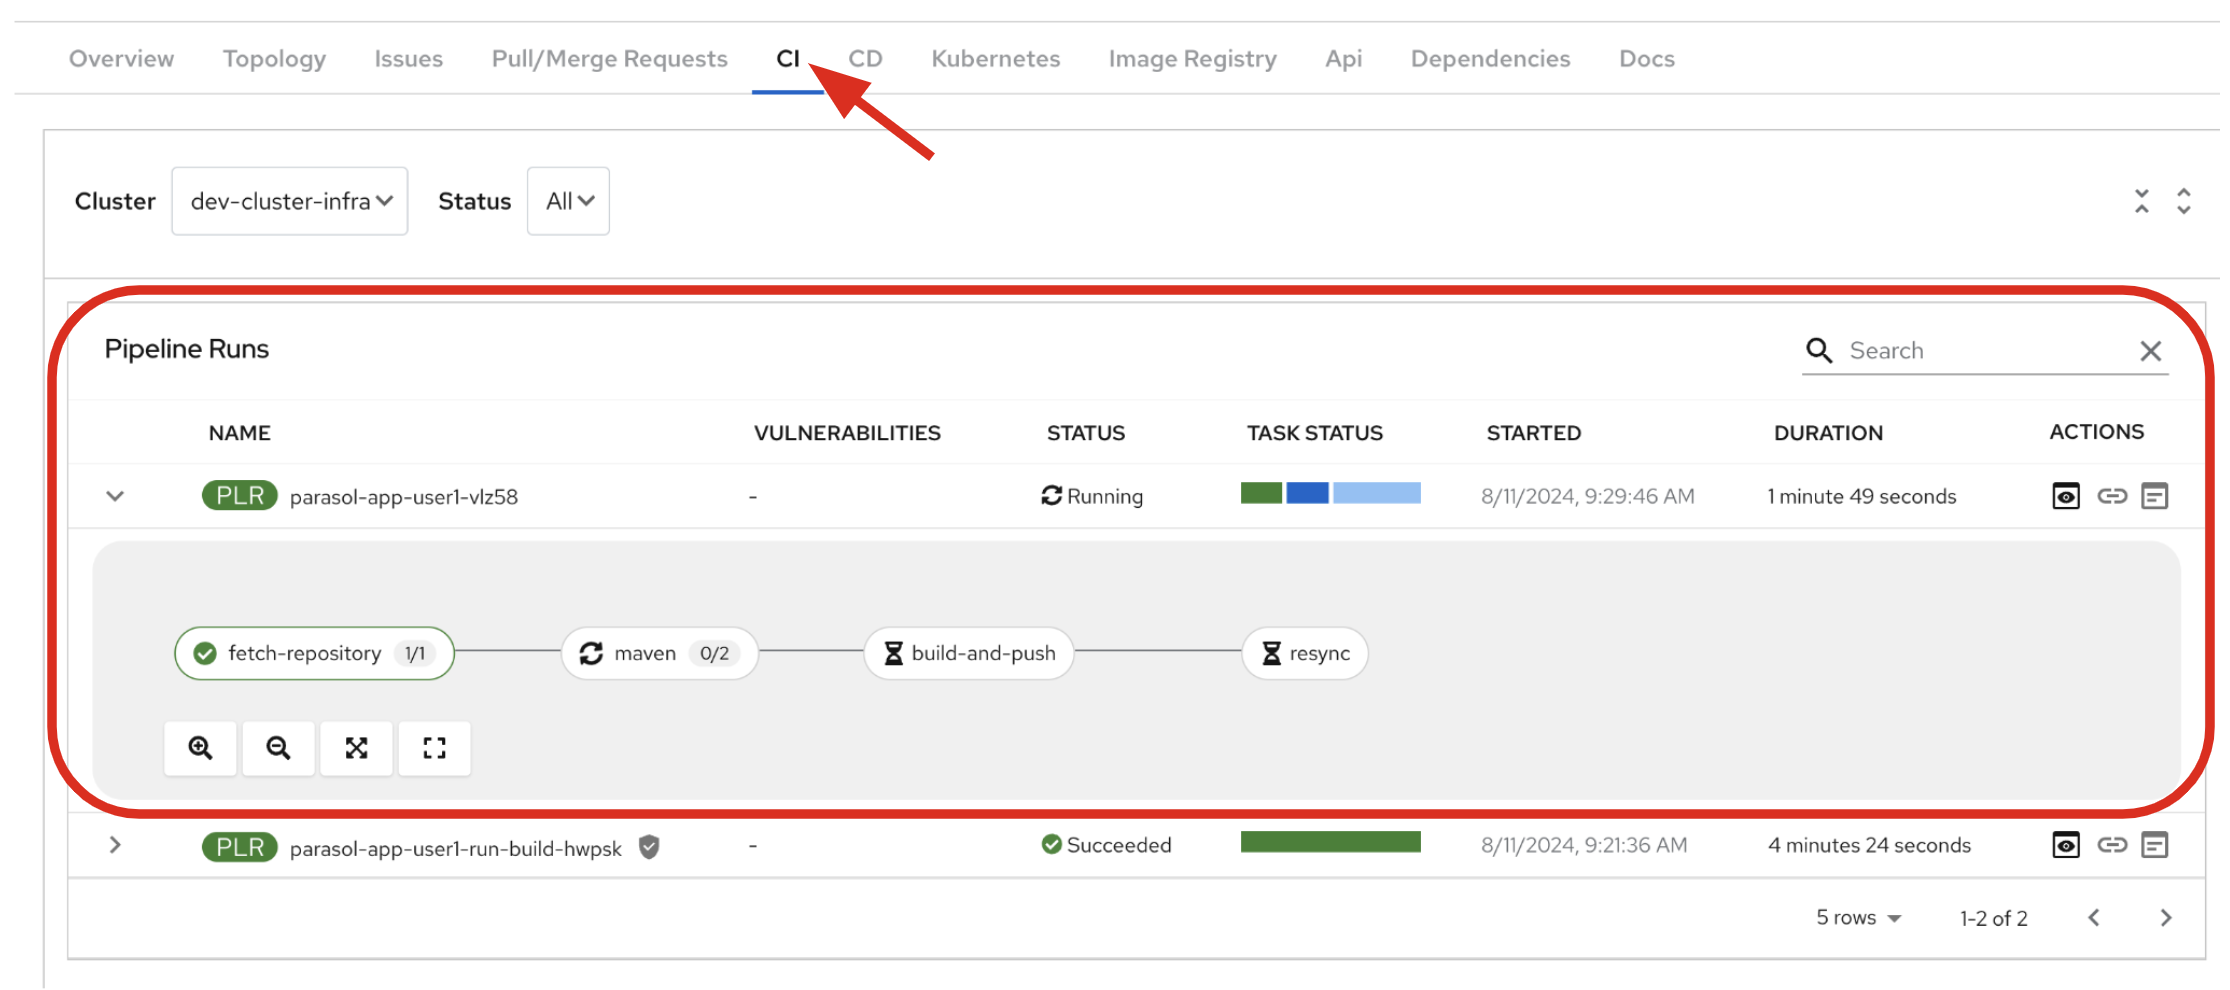
Congratulations! You have finished deploying a new Gen AI feature in the Parasol Insurance. You can now test the new feature in your git request.
8. Verify the new app’s functionality
Reload the Parasol web page in production to verify everything is working as expected. Ensure not to reload the local page when you were testing using Quarkus dev mode.
|
If you’re still seeing the old page, try refreshing the page without the browser caches by pressing Ctrl+F5 or Cmd+Shift+F5 on macOS. |
The new Email Generate menu item will appear on the left panel. Click on it.
Try to submit a simple draft email content. Copy/paste in the following email received from a customer:
    Dear Parasol Insurance Team,

    My name is Dominic Toretto.

    I hope this email finds you well. I'm reaching out to file a claim regarding a recent incident involving my car, which is covered under my policy with Parasol. The accident occurred last night on the streets of Los Angeles, and I wanted to provide you with all the necessary details.

    Location: The accident took place at the intersection of Sunset Boulevard and Vine Street in downtown Los Angeles. It was one of those crazy nights, where the streets were alive with the sound of engines and the glow of neon lights.

    Circumstances: So, here's the deal. I was out cruising with the crew, enjoying the vibe of the city, when suddenly we found ourselves in the middle of a high-speed chase. There was this dude, let's call him Johnny Tran for the sake of this email, who thought he could outmaneuver us. Little did he know, we don't play by the rules.

    Anyway, Johnny pulled some slick moves, cutting through traffic like a bat outta hell. Naturally, being the king of the streets that I am, I had to show him what real speed looks like. So, I hit the nitrous and went full throttle.

    But then, outta nowhere, this semi-truck decided to make a left turn without signaling. I had to make a split-second decision, and I ended up launching my car off a ramp, trying to clear the truck like we're in one of those crazy action flicks. It was like something straight outta the movies, I tell ya.

    Long story short, the stunt didn't exactly go as planned. My car ended up crashing into a billboard, flipping over a couple of times before finally coming to a stop. Yeah, it was a total wreck. But hey, at least we walked away without a scratch, just a little shaken, not stirred, if you catch my drift.

    Damage: As for the damage to my car, let's just say its gonna need more than a few wrenches and some duct tape to fix this baby up. The front end is smashed in, the windows are shattered, and I''m pretty sure the chassis is twisted beyond recognition. It''s gonna take a miracle to get her back on the road.

    I understand that accidents happen, but Im counting on Parasol to have my back in times like these. Ive been a loyal customer for years, and I trust that you'll handle my claim with the same speed and precision that I handle my rides.

    Please let me know what steps I need to take to get the ball rolling on this claim. I'm ready to do whatever it takes to get my car back in top shape and back on the streets where it belongs.

    Looking forward to hearing from you soon.
Click on Submit to generate the email subject and body. It will take a few seconds to receive the result (generated data) from the Parasol Instruct LLM model.
You’ve confirmed what the new Email feature in the Parasol application look like and how it works. Notice that this email includes specific details that Parasol needs, since we are using the fine-tuned model with Parasol-proprietary policy information! This will help our customer service reps in their interactions with customers.
9. Conclusion
We hope you have enjoyed this module!
Here is a quick summary of what we have learned:
-
How Red Hat Developer Hub enables you to build, deploy, and manage an AI application (Parasol).
-
How to develop new Generative AI features with a fine-tuned LLM model using Red Hat’s cloud IDE, Red Hat Dev Spaces on Red Hat OpenShift.
-
How to release the new Gen AI feature using GitOps practices in Developer Hub and Red Hat OpenShift AI.