Model Testing - 30 minutes
1. Goals of this lab
Parasol’s developers are always expected to thoroughly test their code. In this exercise, you will explore the unique challenges and techniques involved in testing AI models and applications, which differ significantly from traditional enterprise applications. Traditional apps often have deterministic outputs, whereas AI models can produce varied and context-dependent results, requiring specialized testing approaches. A number of tools are being developed to help enable model testing for example promptfoo, deepeval, and deepchecks. In this module we will use one of these tools "promptfoo" to test the consistency of model responses.
In this lab we’re going to use a trained model which has been fine tuned with Parasol Insurance specific data. We’re going to write some tests which will use predefined prompts which should return accurate responses demonstrating the trained model.
To test the responses to ensure they are accurate we’re going to use another model (an embedding model) to test for similarity between two sentences.
| Embedding is a means of representing objects like text, images and audio as points in a continuous vector space where the locations of those points in space are semantically meaningful to machine learning (ML) algorithms. Embedding enables machine learning models to find similar objects. Our tests will use an embedding model served by OpenShift AI to compare two strings semantically to ensure there are similar enough to pass a threshold. |
| If you haven’t accessed Red Hat Developer Hub and Red Hat Dev Spaces yet, complete the following sections. Otherwise, proceed to the Model Testing Overview section. |
2. Deploy the existing Parasol application in Red Hat Developer Hub
Red Hat Developer Hub (RHDH) is an enterprise-grade, self-managed, and customizable developer portal built on top of Backstage.io. It’s designed to streamline the development process for organizations, specifically those using Red Hat products and services. Here’s a breakdown of its key benefits:
-
Increased Developer Productivity: Reduces time spent searching for resources and setting up environments.
-
Improved Collaboration: Provides a central platform for developers to share knowledge and best practices.
-
Reduced Cognitive Load: Minimizes the need for developers to juggle multiple tools and resources.
-
Enterprise-Grade Support: Backed by Red Hat’s support infrastructure, ensuring stability and reliability.
Red Hat Developer Hub has already been installed and configured in the workshop environment.
2.1. Access Red Hat Developer Hub
Red Hat Developer Hub integrates with Red Hat Single Sign On (RH-SSO) to enhance security and user experience for developers within an organization. By integrating with RH-SSO, developers only need to log in once to access both RHDH and other applications secured by RH-SSO. This eliminates the need to manage multiple login credentials for different developer tools and services. RH-SSO centralizes user authentication and authorization to strengthen security by ensuring only authorized users can access RHDH and other protected resources. In addition, The platform engineering team can manage user access and permissions centrally through RH-SSO, simplifying administration and reducing the risk of unauthorized access.
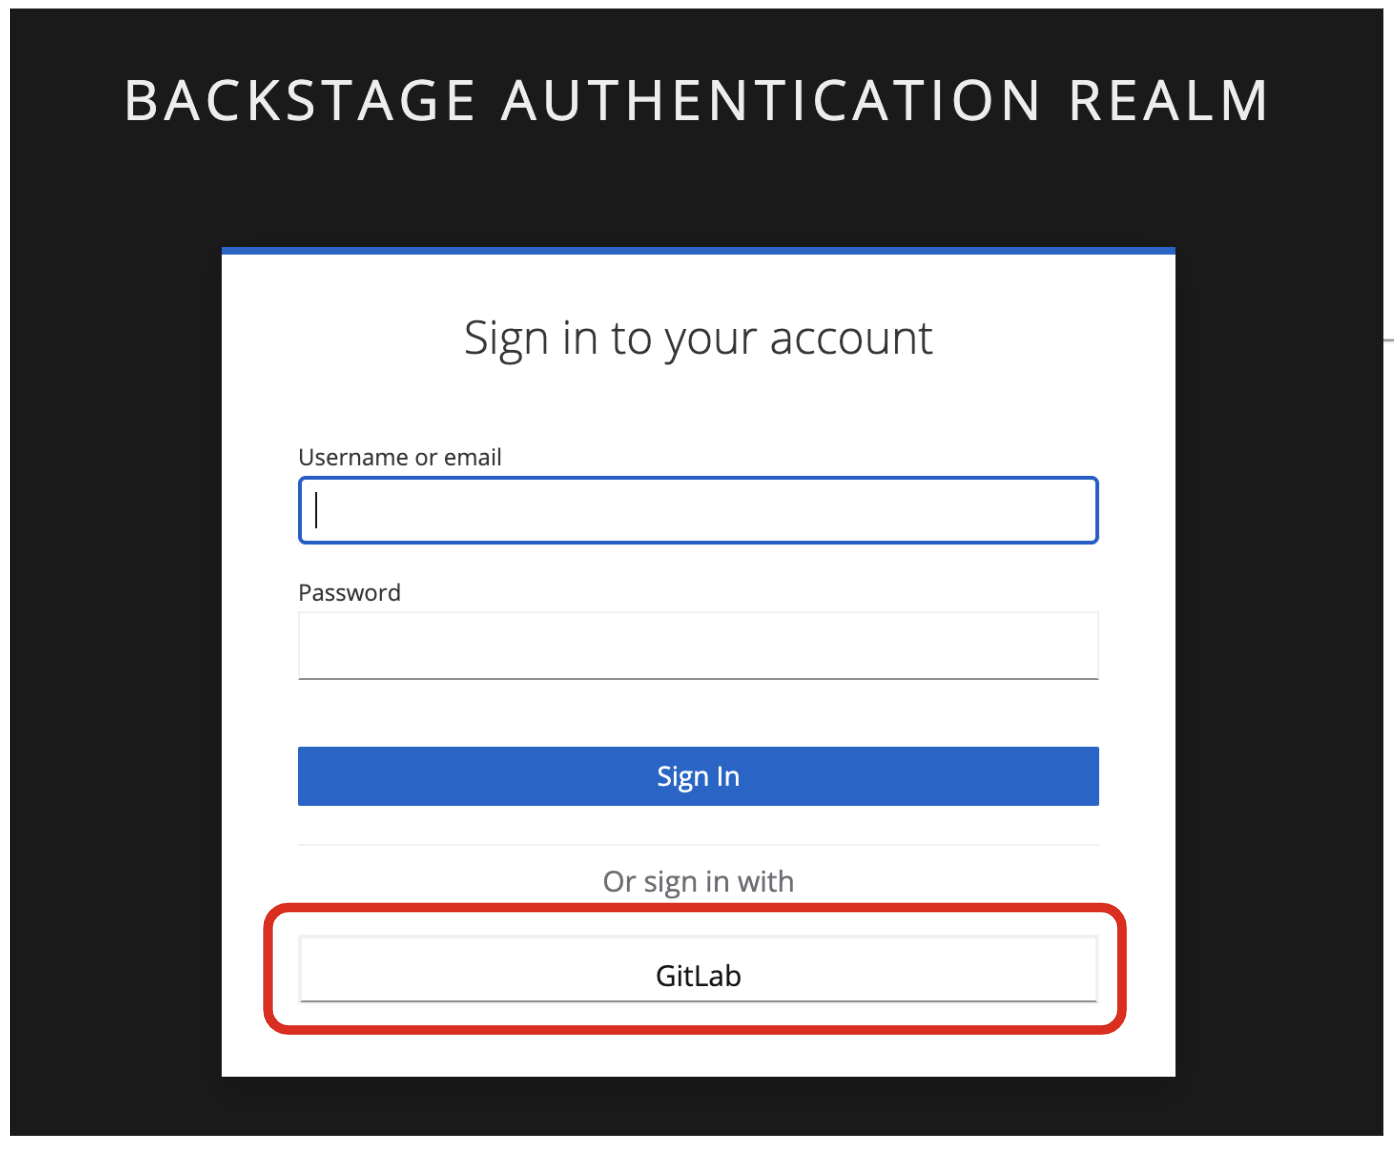
To get started, access Red Hat Developer Hub Dashboard to authenticate by GitLab.
Choose the GitLab option.
Enter the following credential in the Gitlab login page.
-
Username:
user1-
Password:
openshift
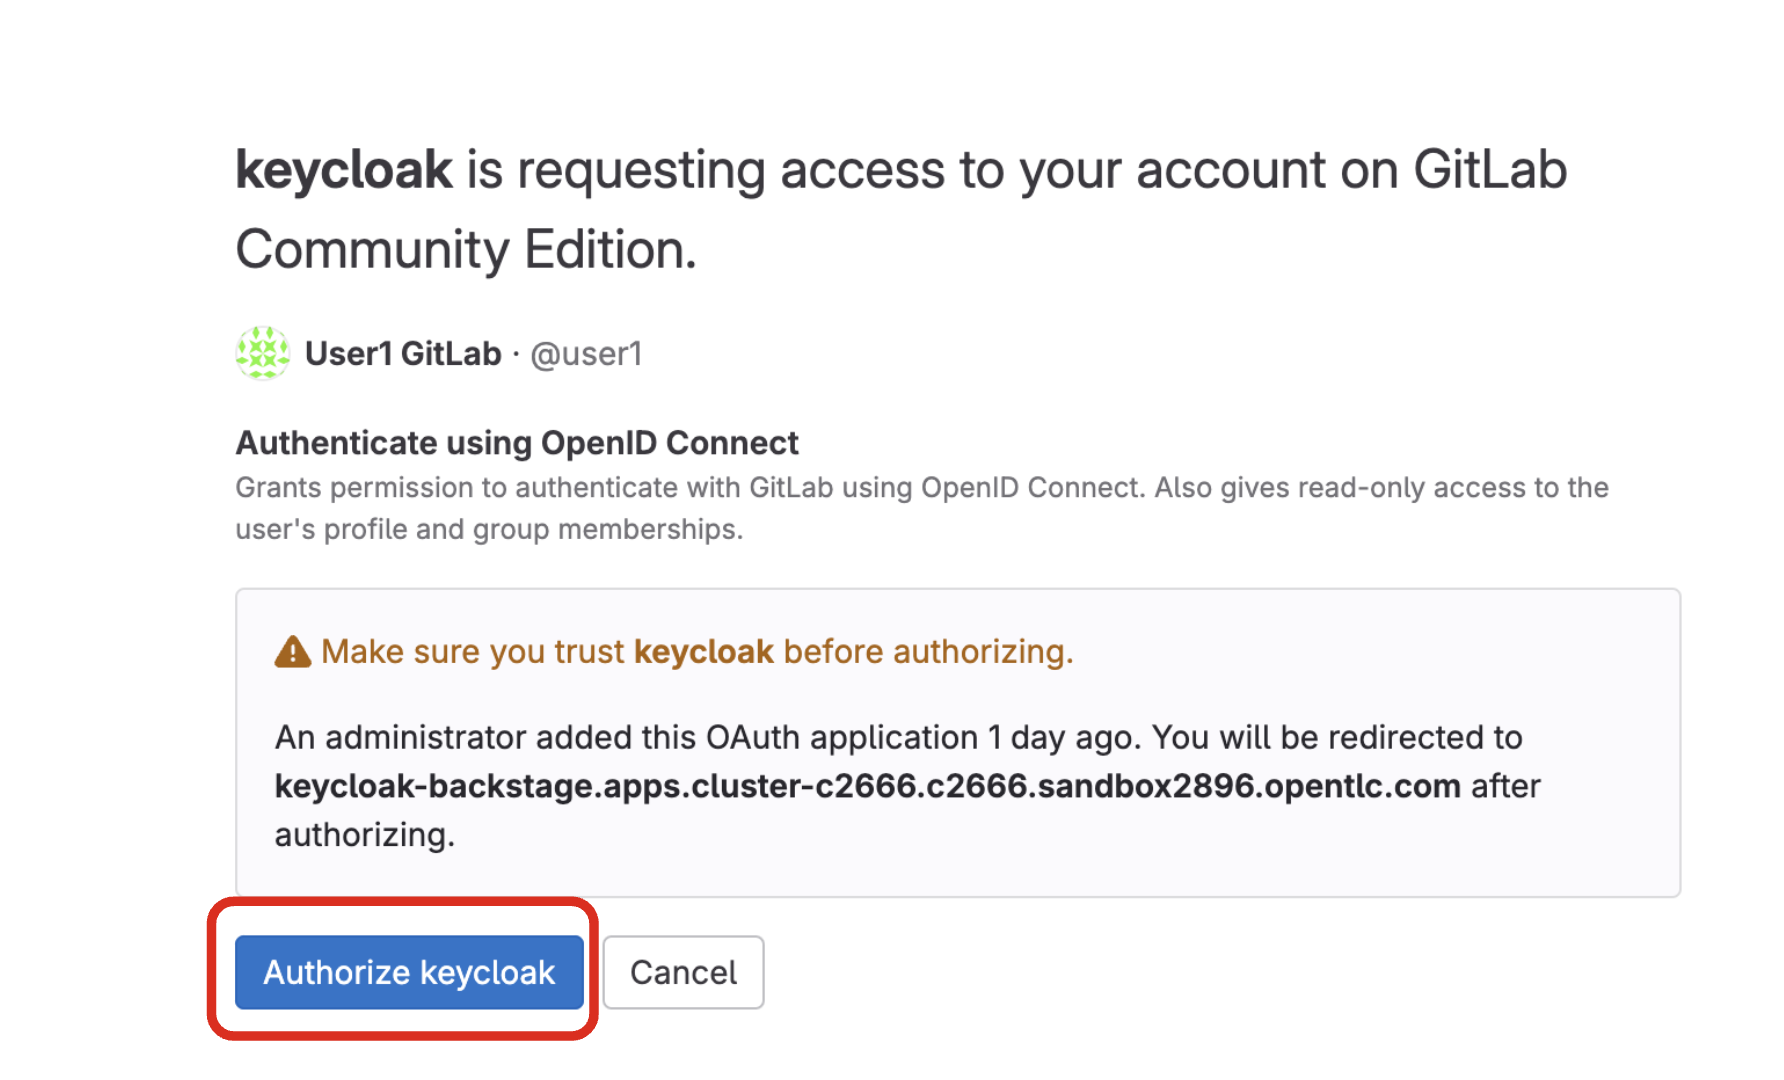
Click Authorize Keycloak to allow the authentication to proceed.
Find more information about the Red Hat Developer Hub here.
2.2. Use software templates to deploy the Parasol Customer Service App
In Red Hat Developer Hub, a software template serves as a pre-configured blueprint for creating development environments and infrastructure. Software templates streamline the process of setting up development environments by encapsulating pre-defined configurations. This saves developers time and effort compared to manually configuring everything from scratch.
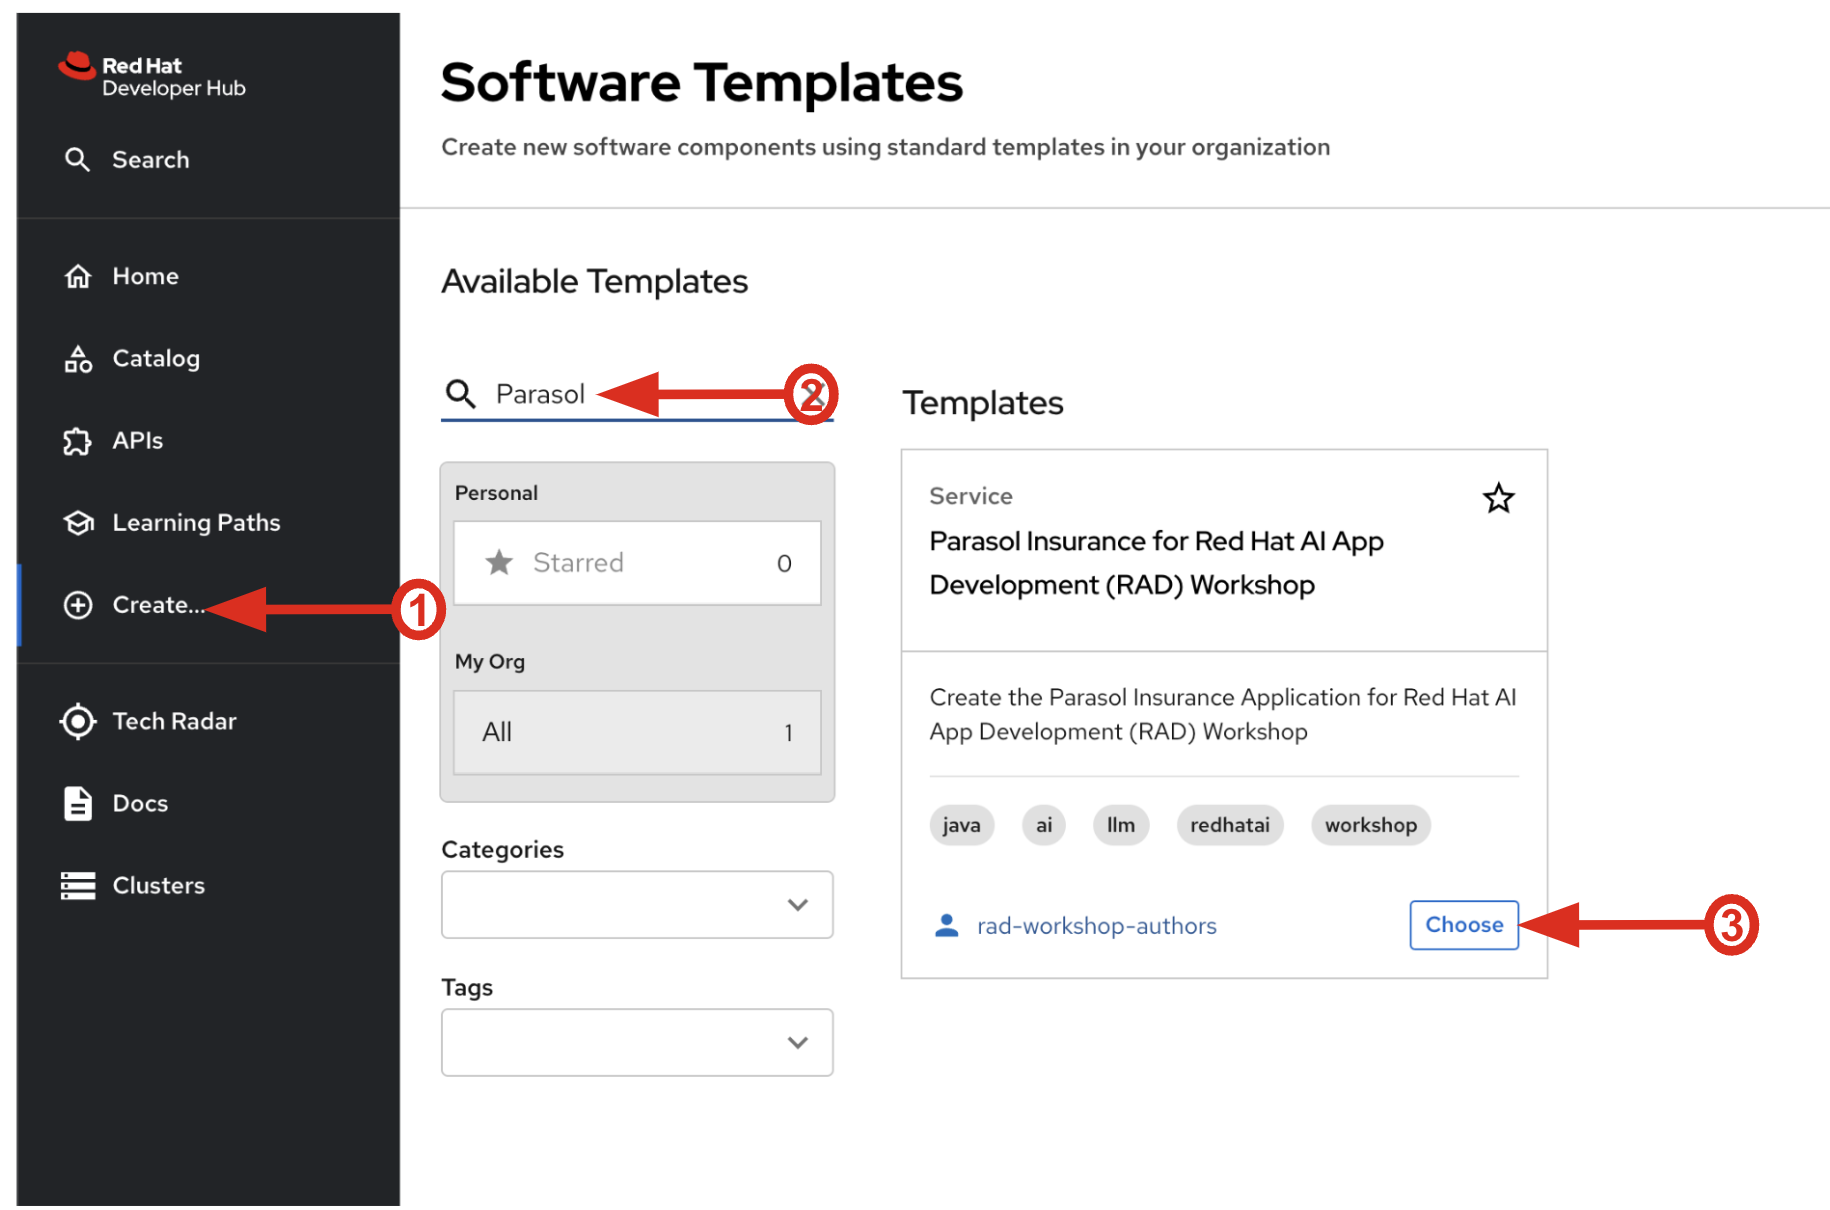
Click on Create… on the left menu. Then, type Parasol in the search bar. Then, Choose the Parasol Insurance for Red Hat AI App Development (RAD) Workshop template.
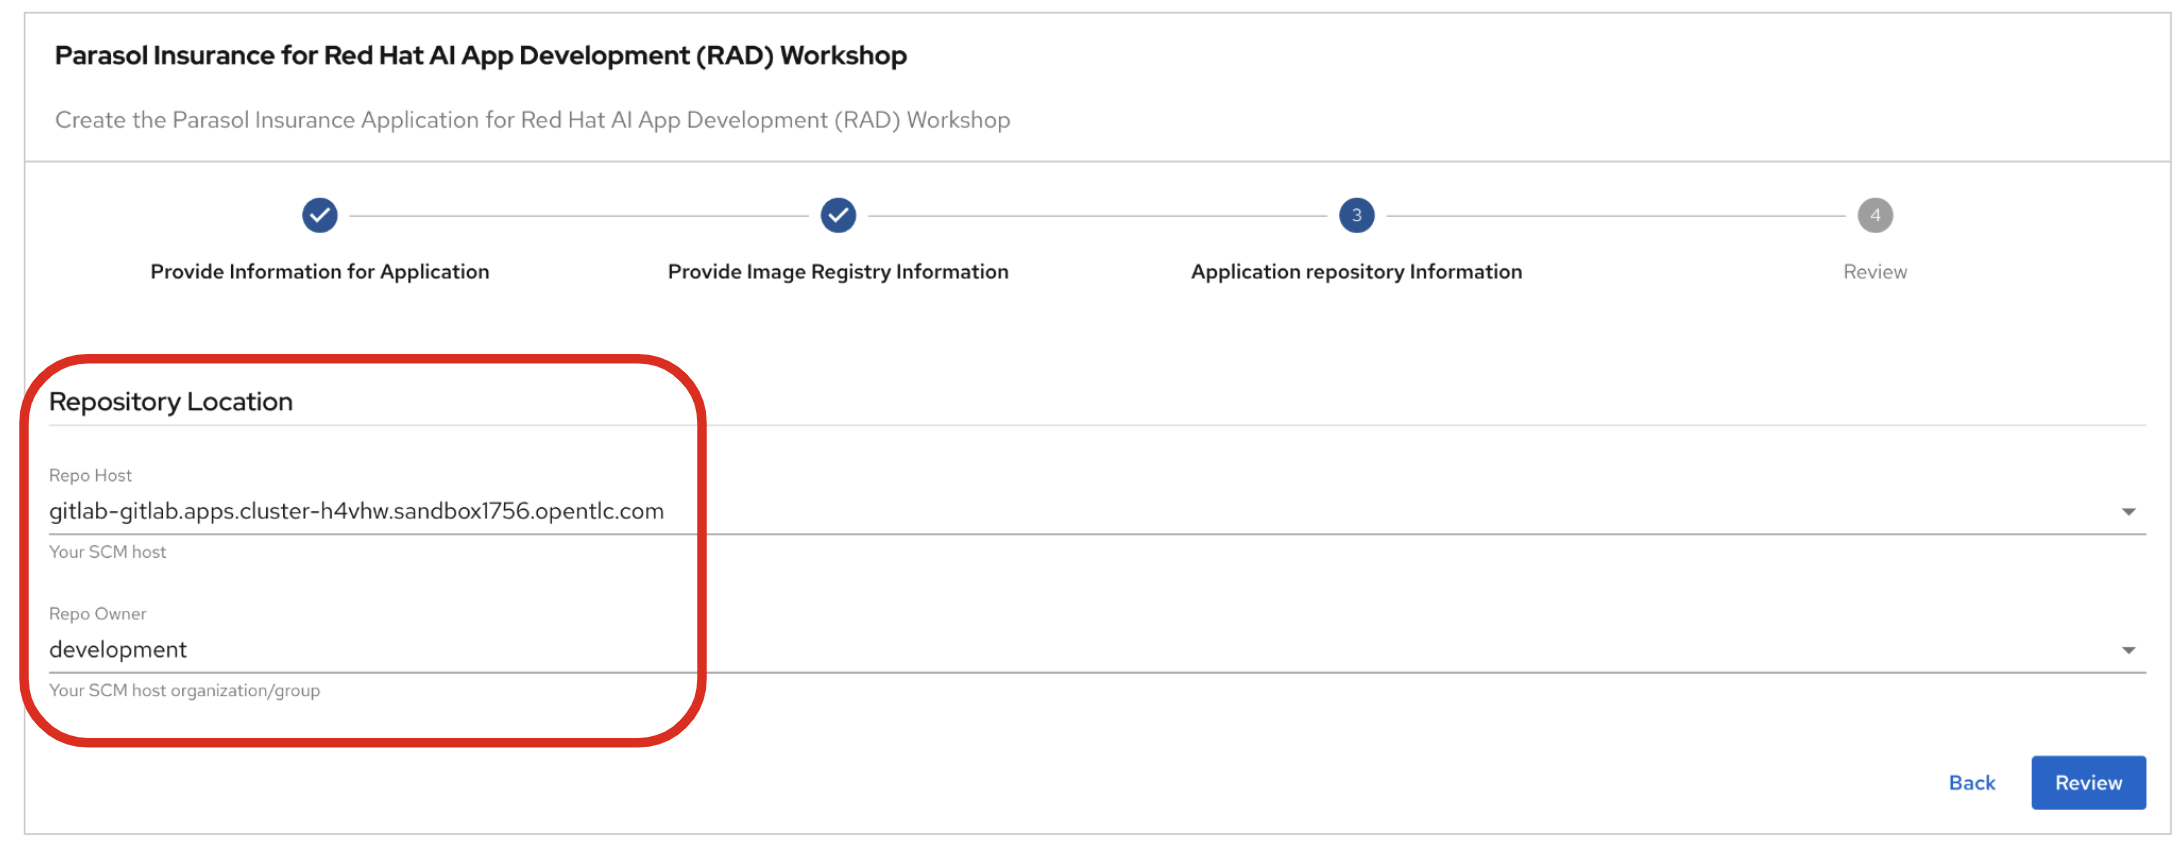
Follow the next steps to create a component based on the pre-defined Software Templates:
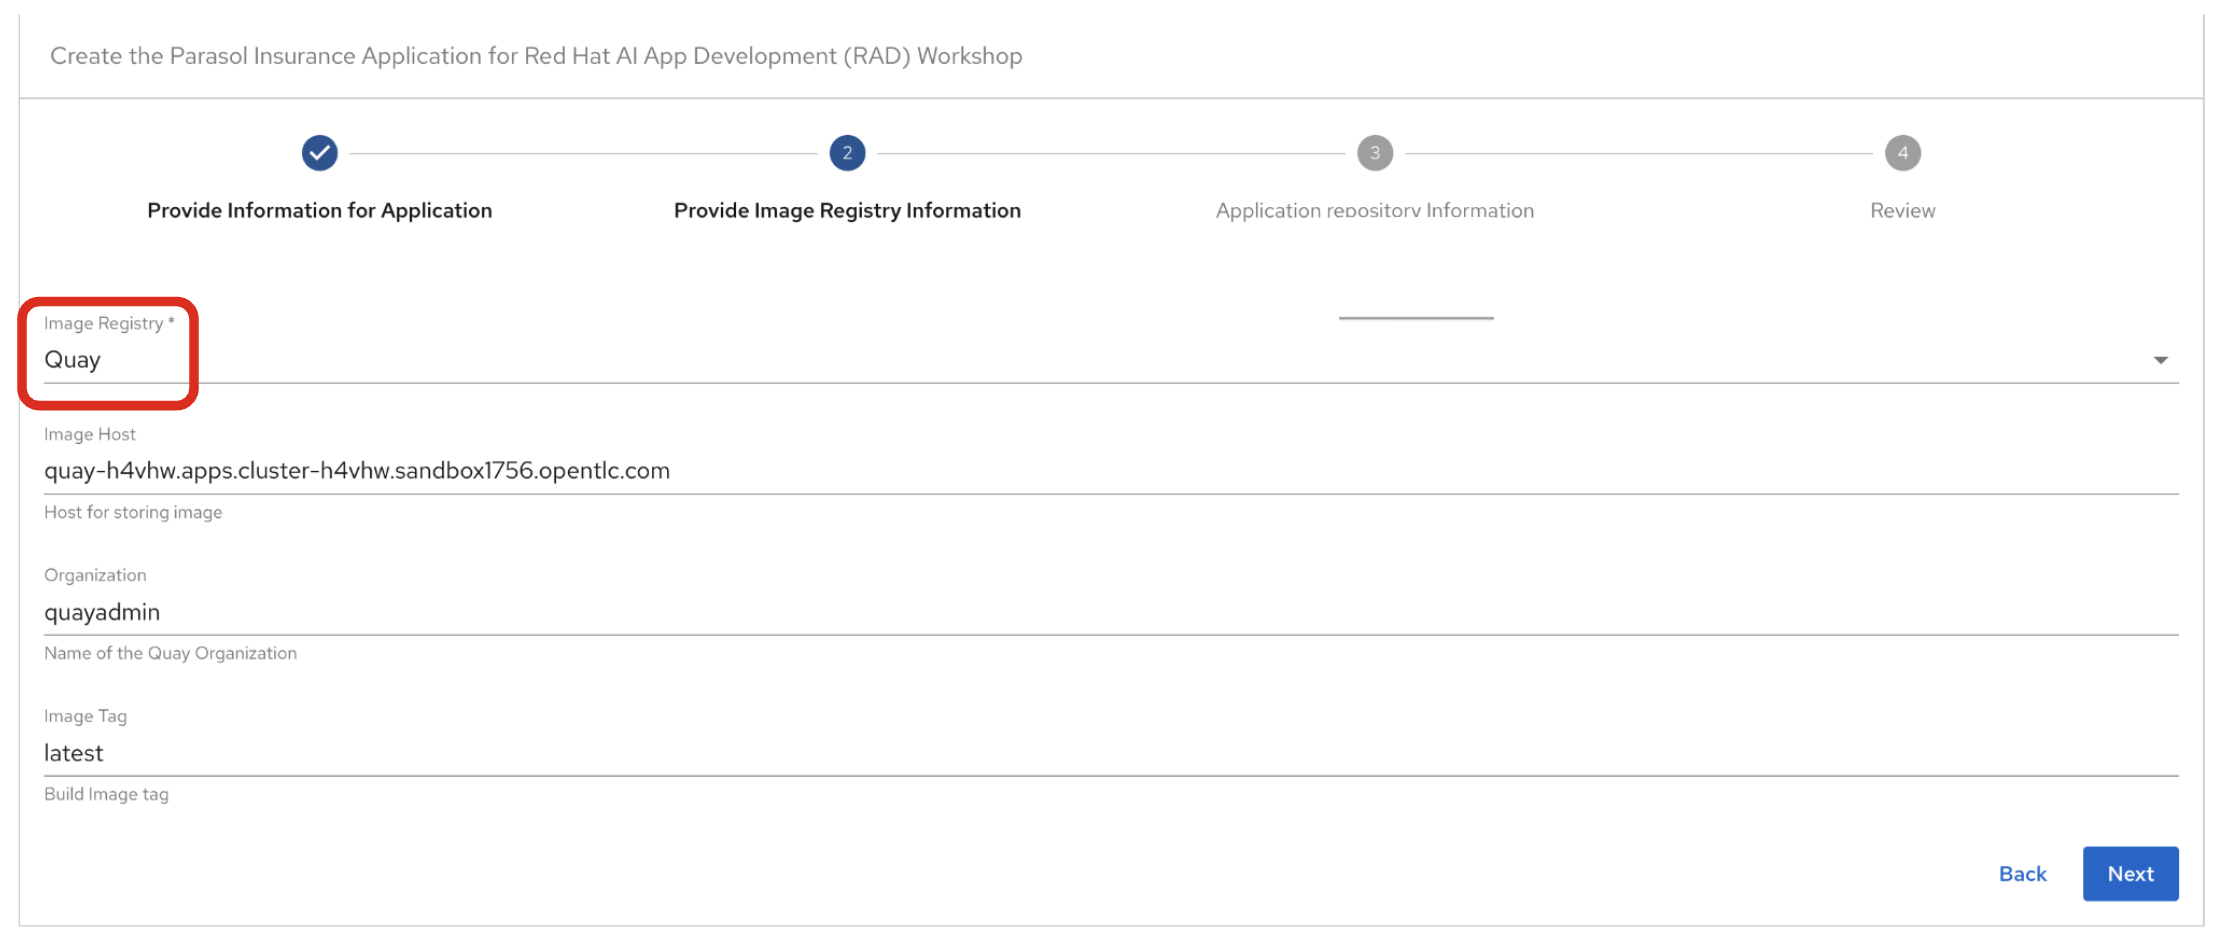
2.2.1. Provide Information for Application
-
Name: The name of the component. Replace the Name with the following domain:
parasol-app-user1-
Group Id: Maven Group Id. (leave this as-is)
-
Artifact Id: Maven Artifact Id. (leave this as-is)
-
Java Package Name: Name for the java package. (e.g.
org.redhat.janus- leave this as-is)
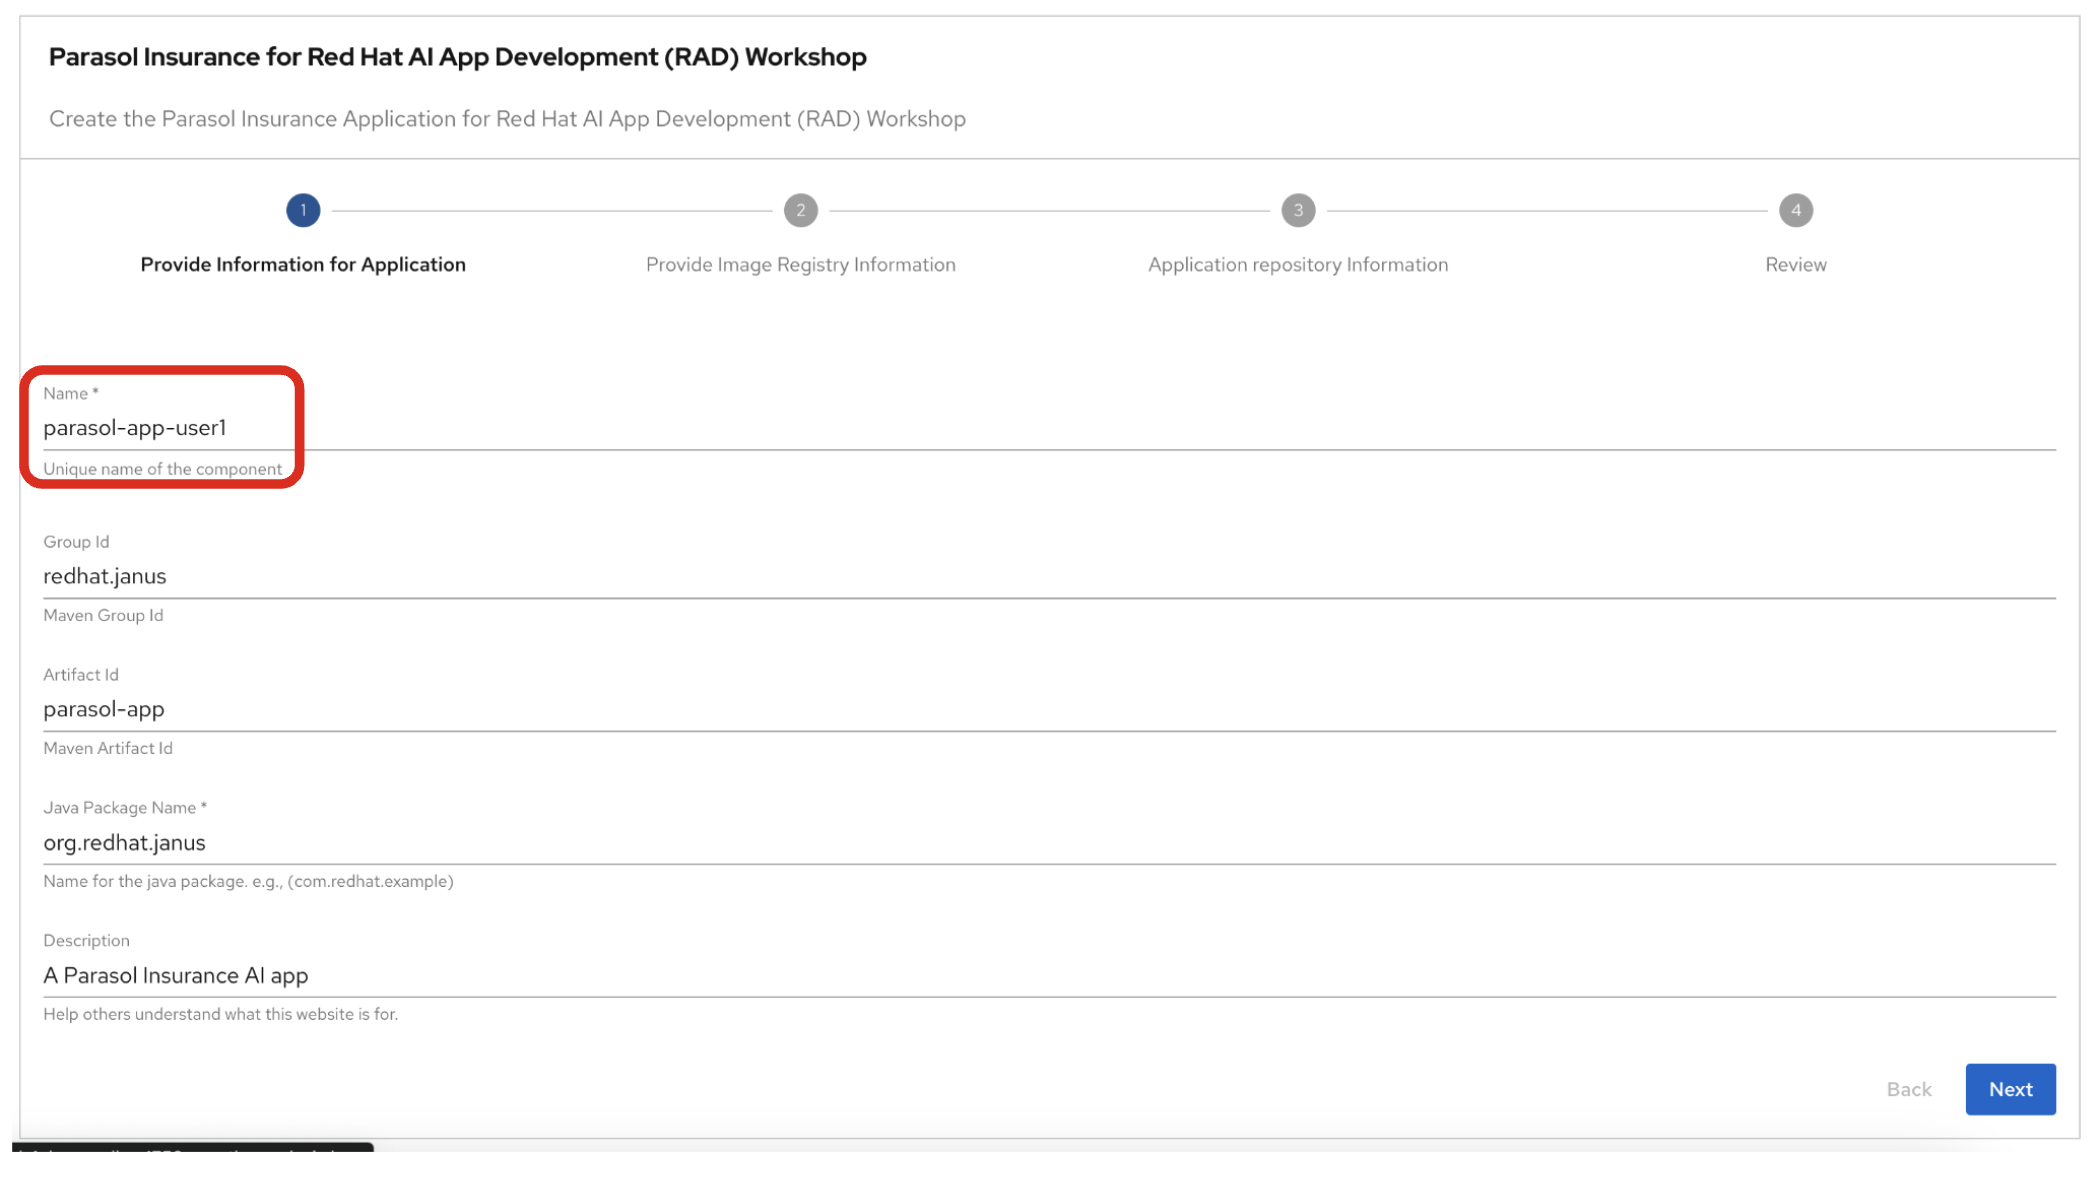
Click on Next.

3. Observe the application overview
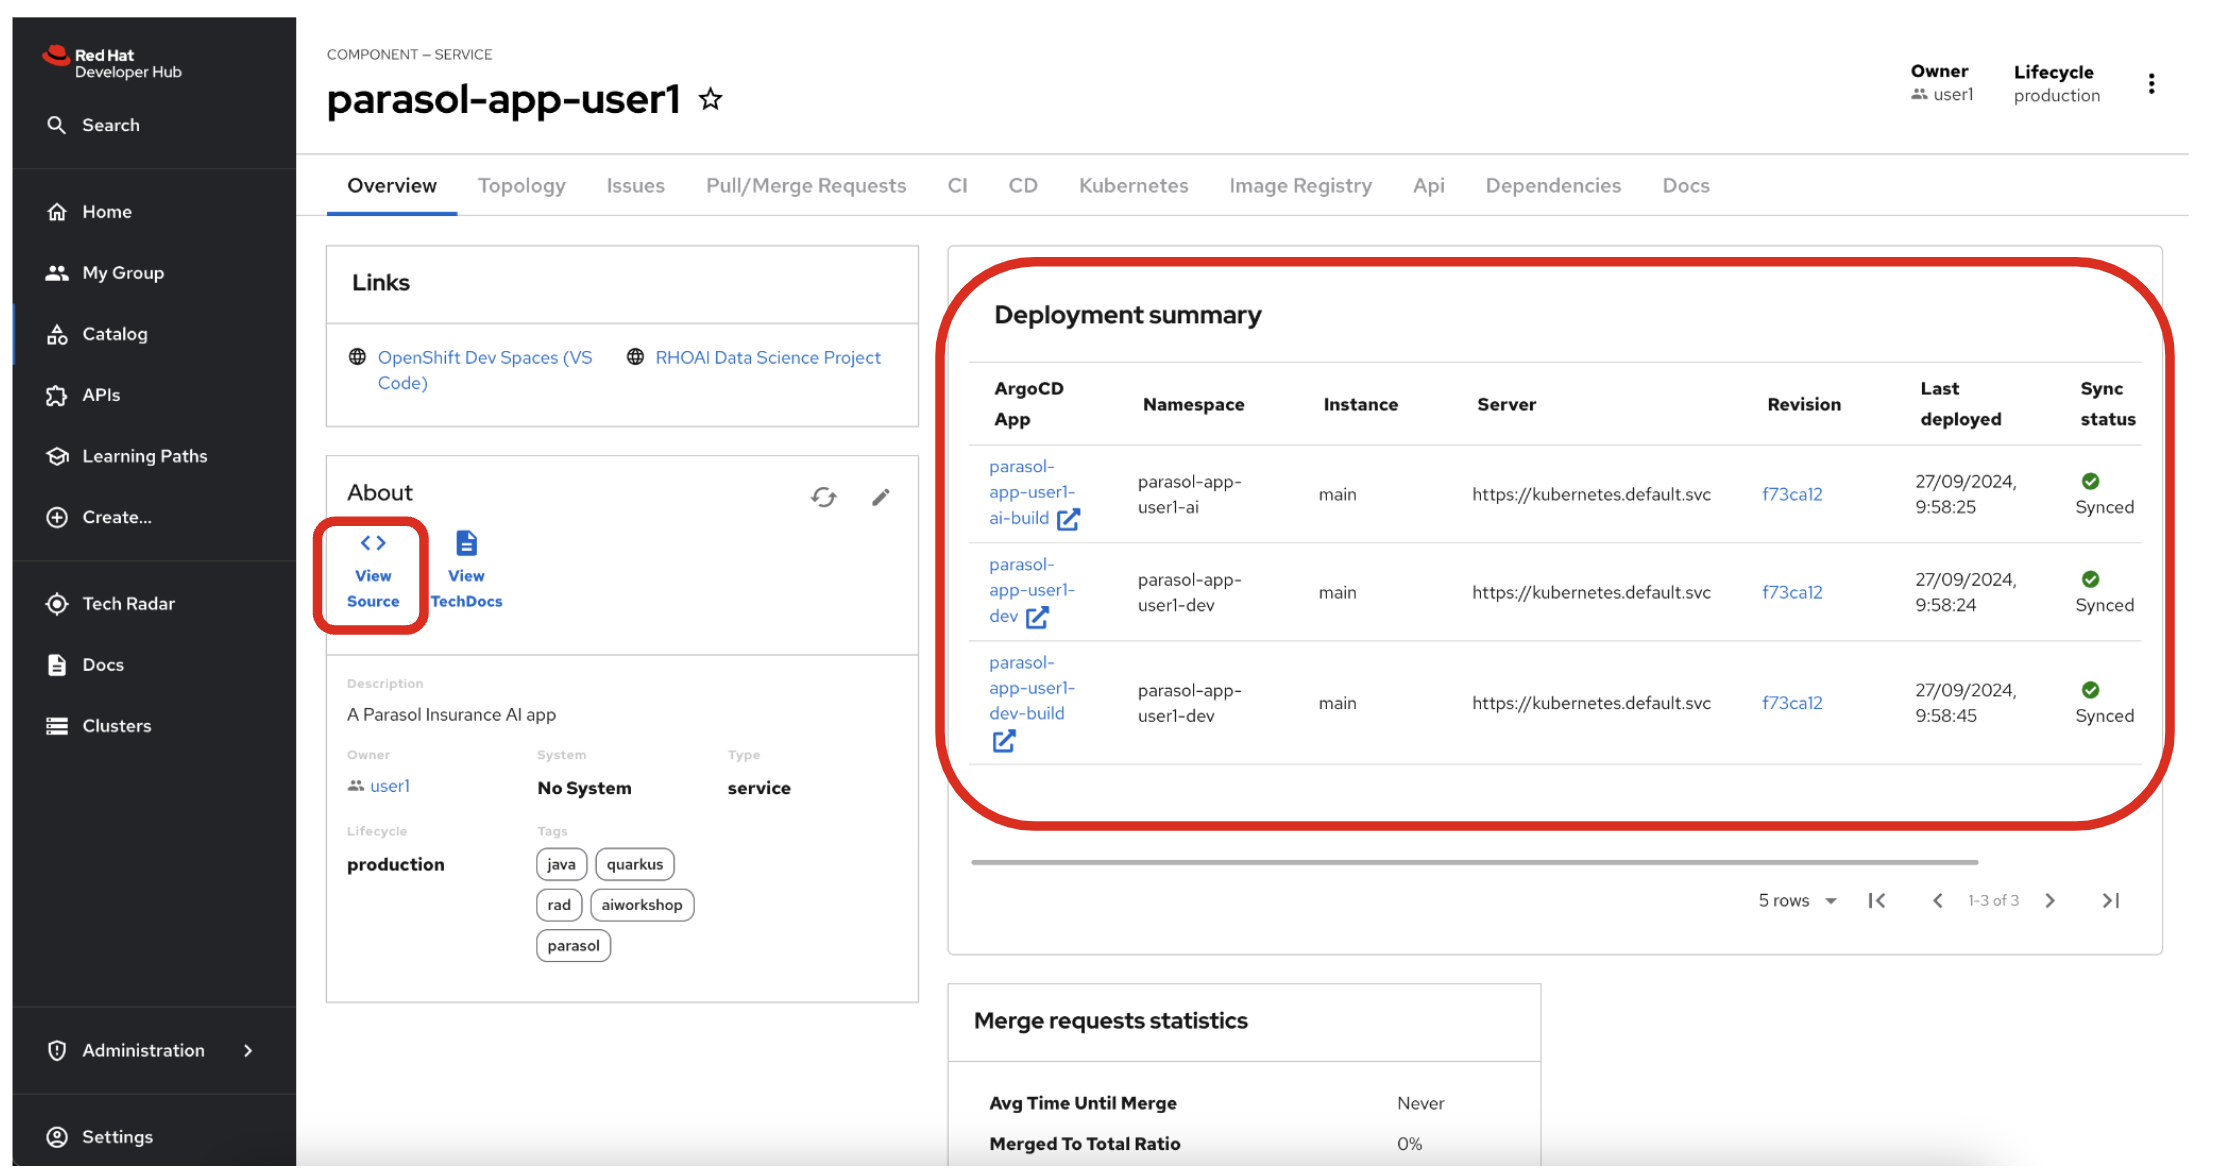
You have just created the Parasol application with Red Hat Developer Hub. This application is used by Parasol Customer Service Representatives to enter, organize, and update existing insurance claims for its customers. An AI-powered chatbot is included for reps to use to answer questions about the claims. This chatbot is driven by an LLM that has been fine-tuned with Parasol Insurance private data, including corporate policies around insurance claims.
3.1. Open component in catalog
When all of the initialization steps are successful (green check mark), click Open Component in catalog.
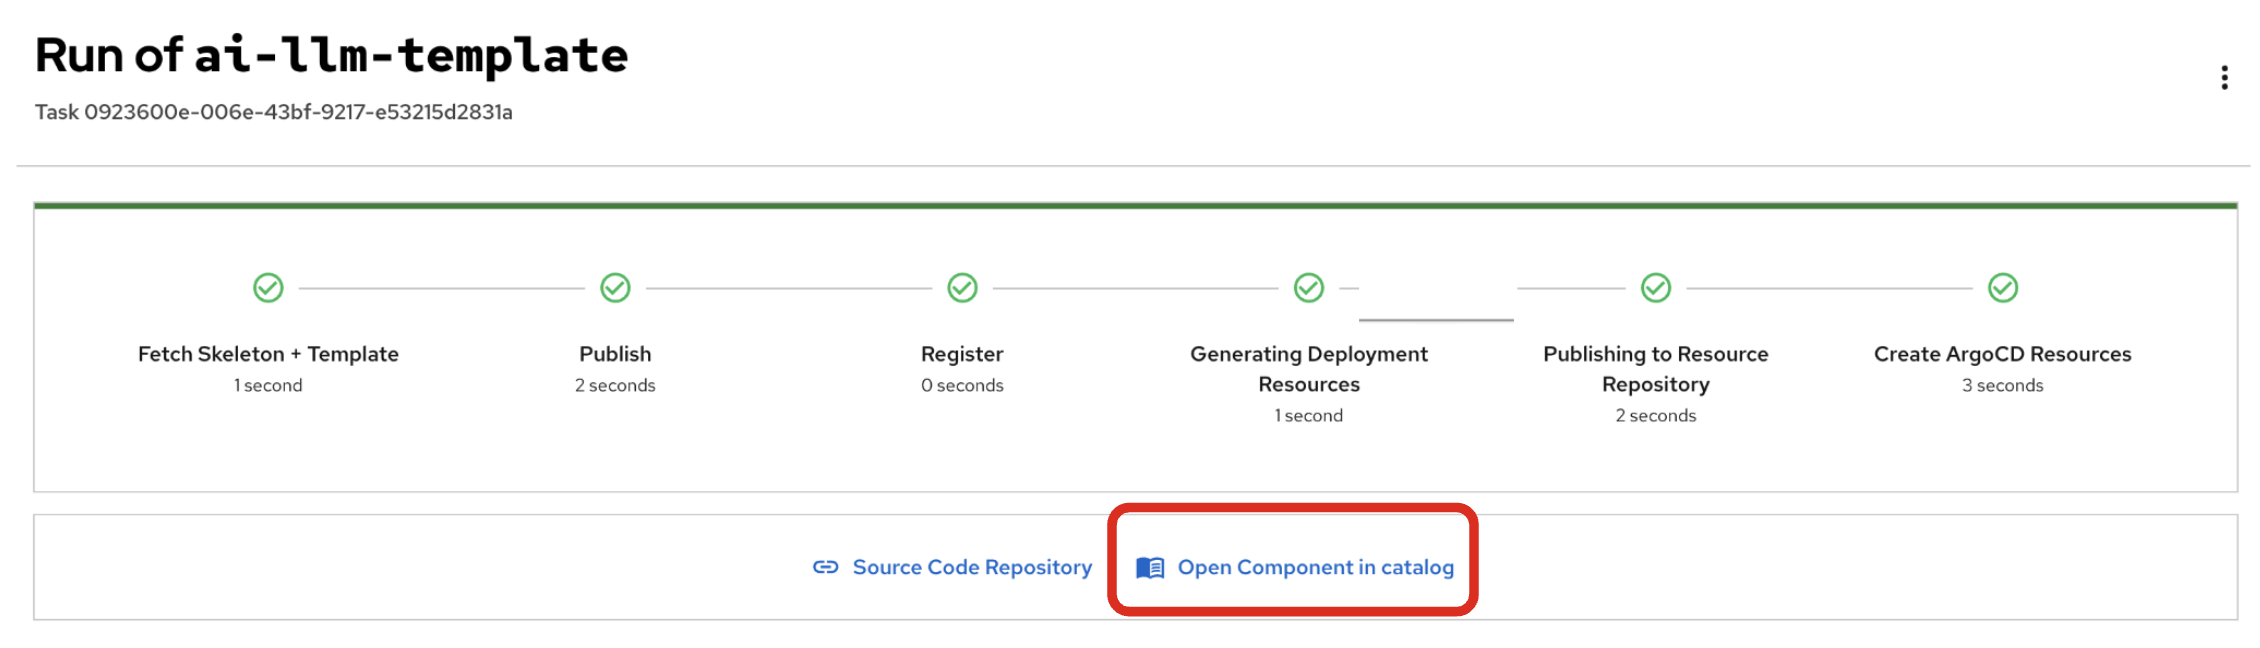
Dev Hub will open a new tab with the component information. Take a few moments to review the Deployment summary on the overview page.
| It may take a minute or two for items to appear in the Deployment summary section. |
3.2. View source
Click on VIEW SOURCE to access the new source code repository created.
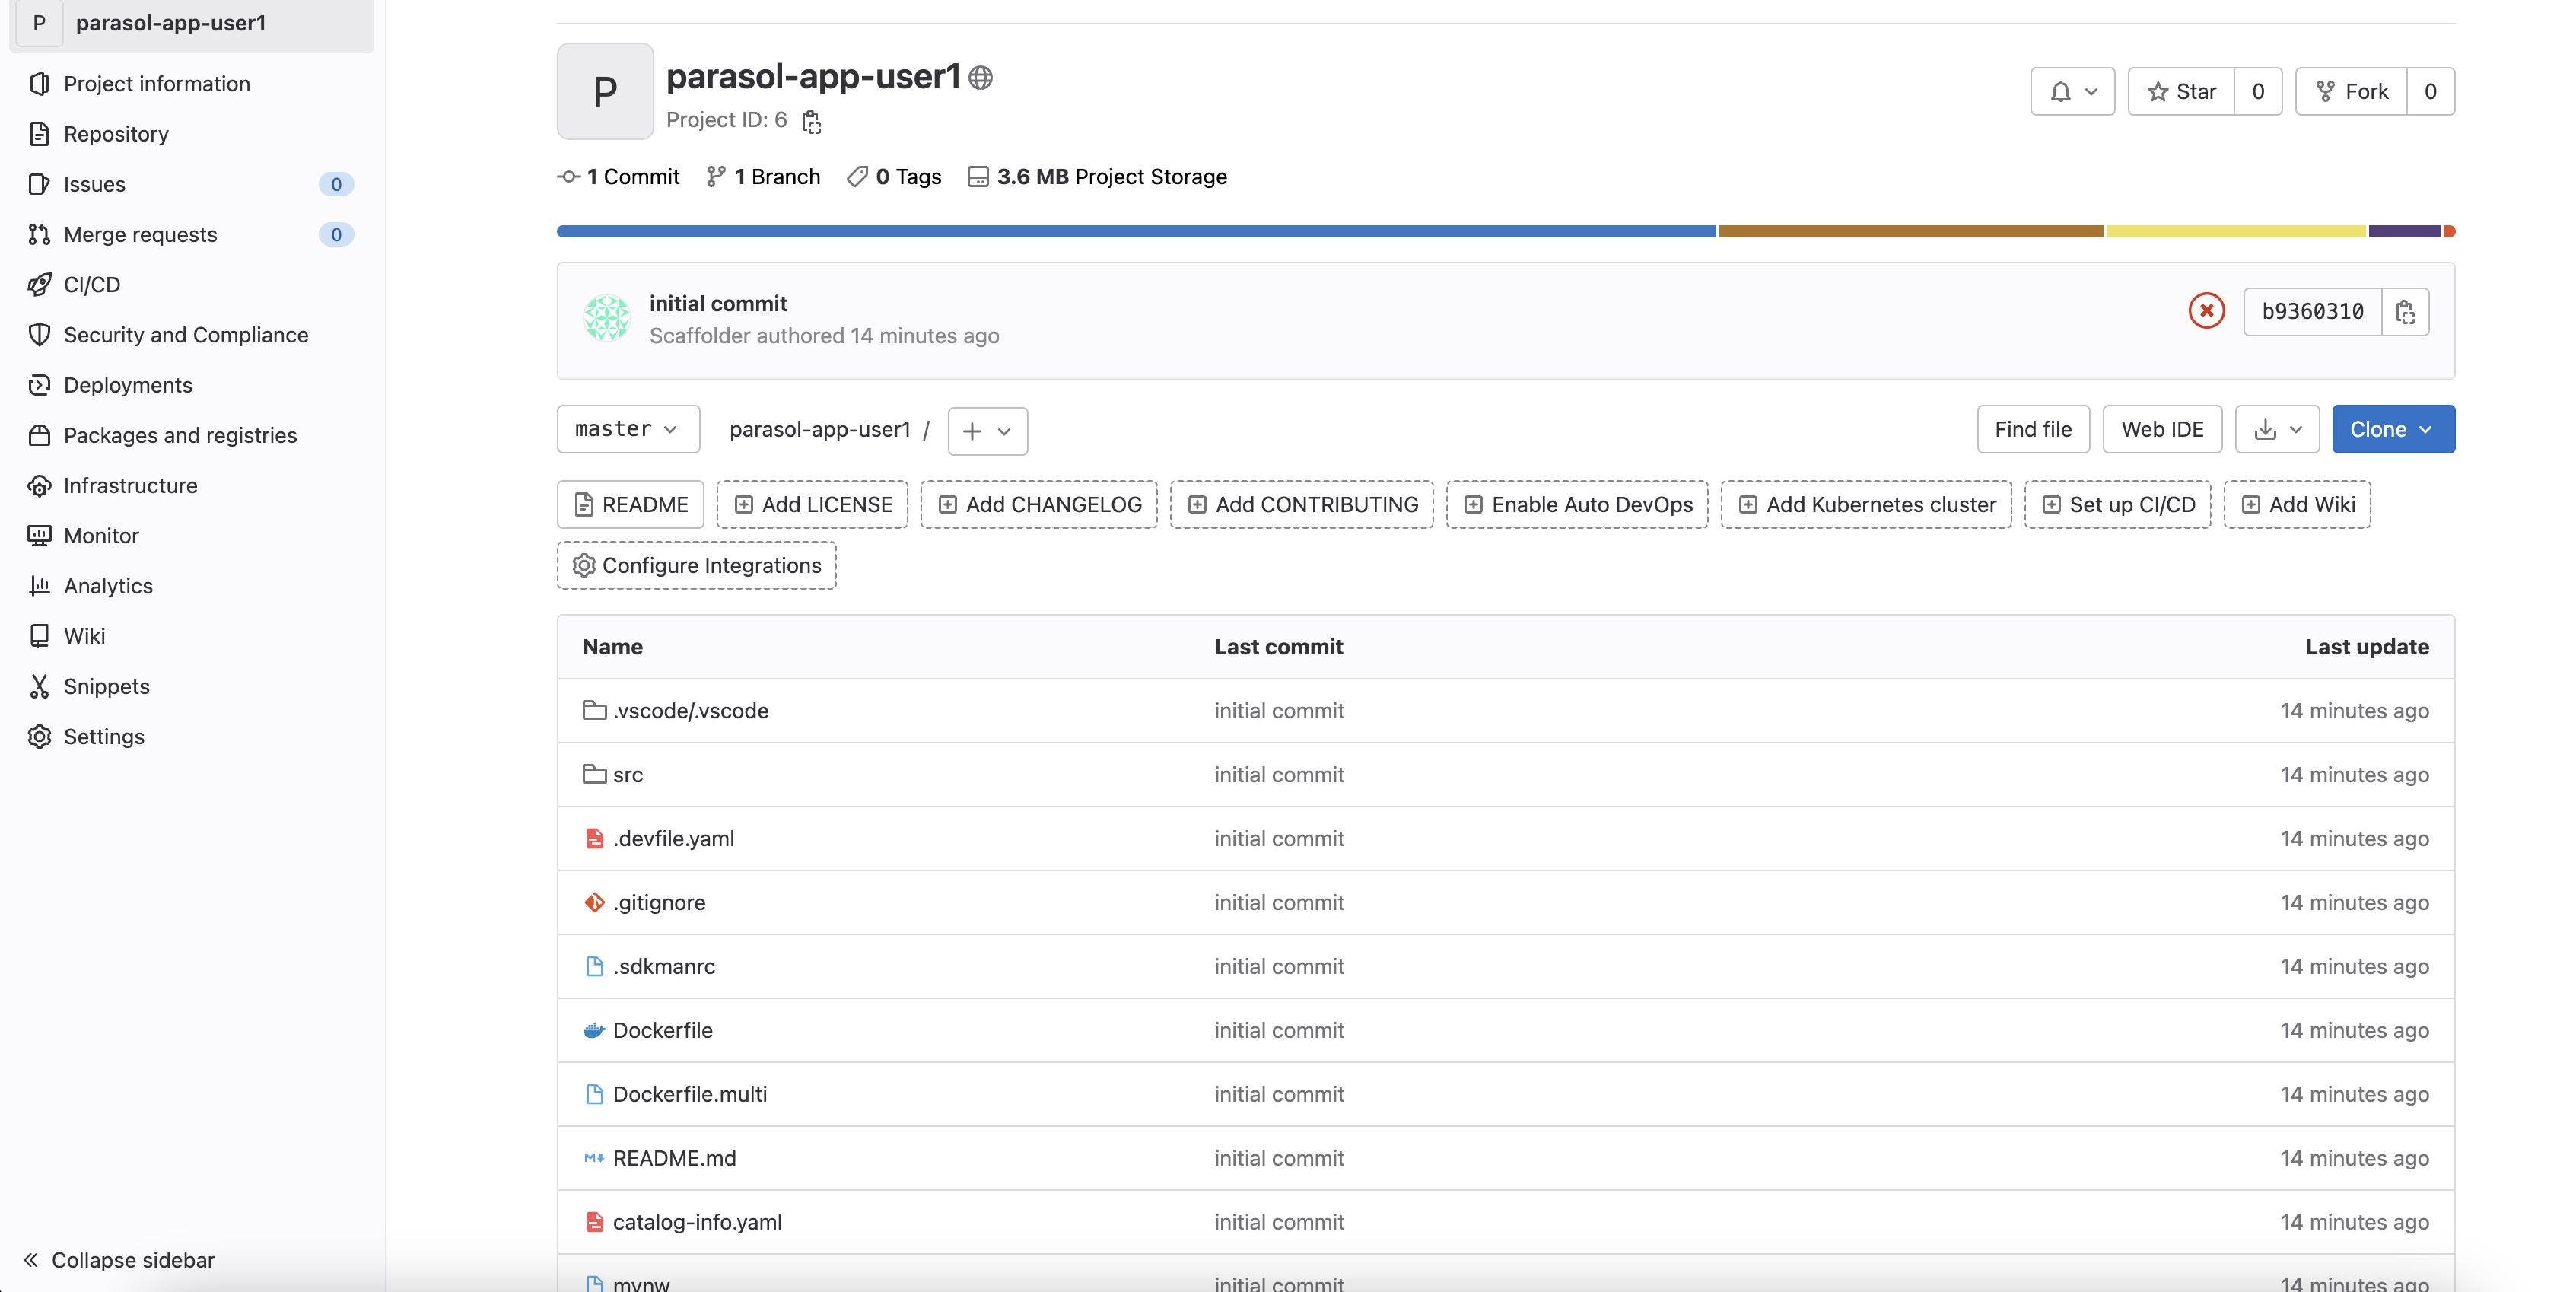
Go back to your Parasol component on Red Hat Developer Hub: Red Hat Developer Hub UI.
4. Log into Red Hat OpenShift Dev Spaces
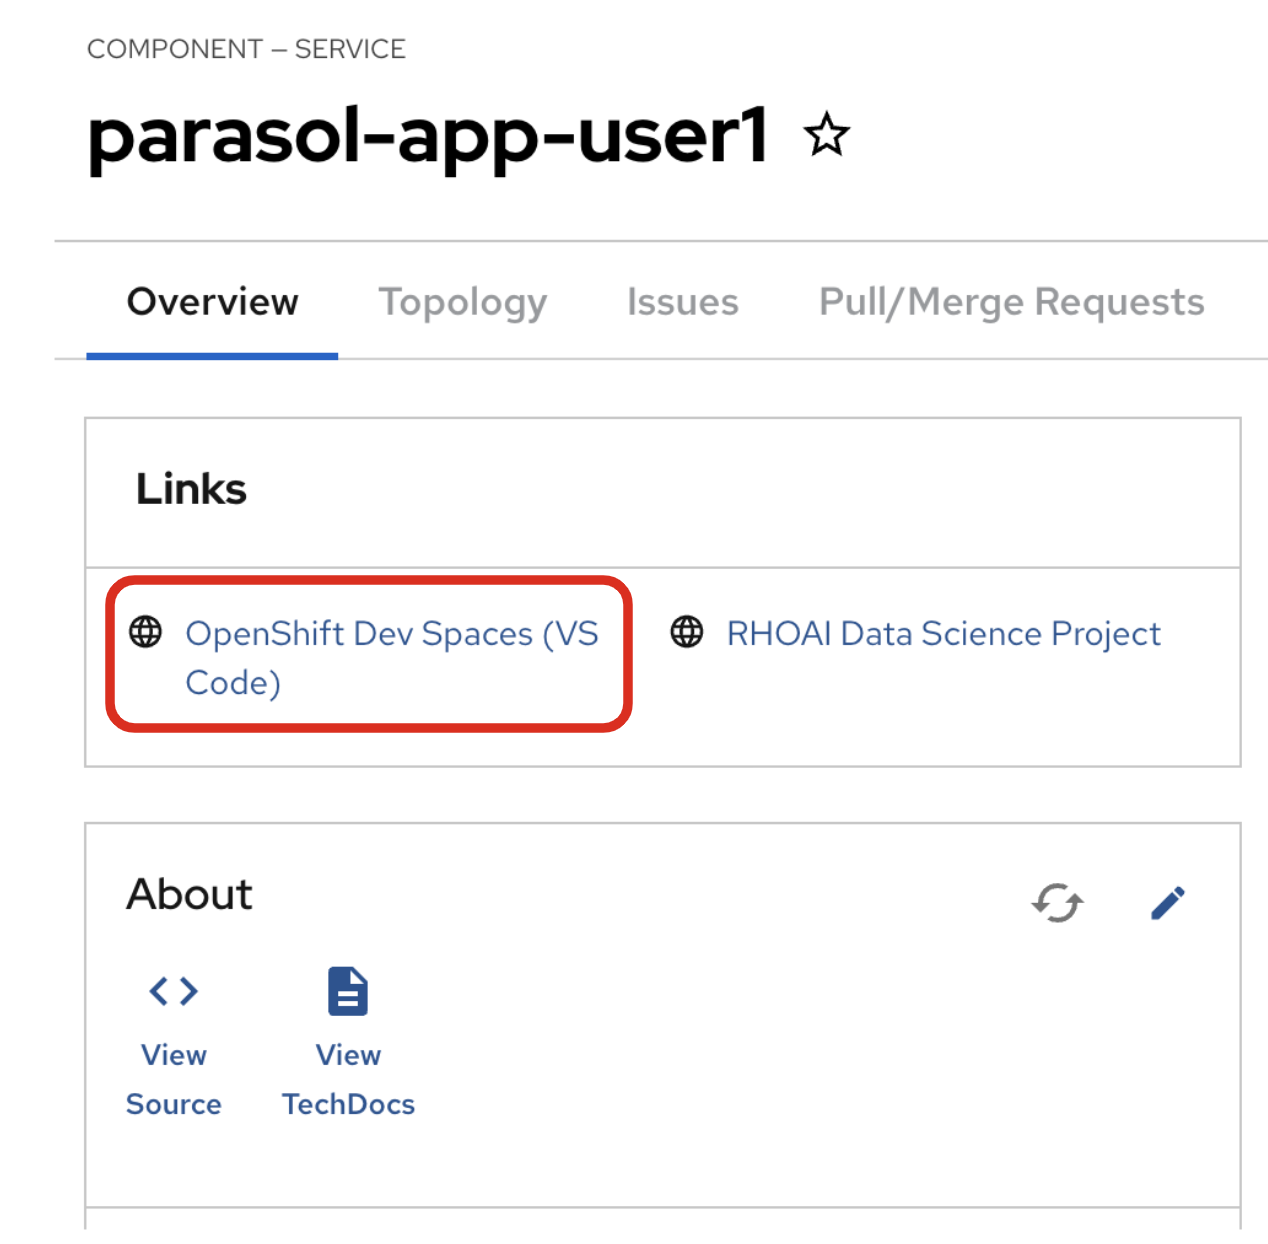
Go back to the Parasol component in Red Hat Developer Hub. From the OVERVIEW tab click on OpenShift Dev Spaces (VS Code) to make the necessary source code changes.
Click on Log into with OpenShift.
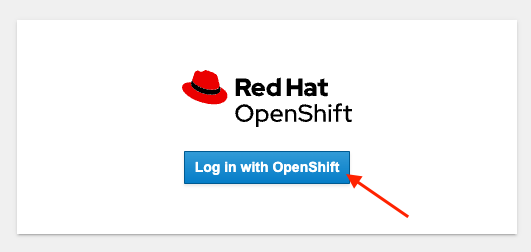
Log into with the following OpenShift credential on the Red Hat Single Sign-On (RH-SSO) page.
-
Username:
user1 -
Password:
openshift
|
You may need to authorize the access to DevSpaces by clicking on Allow selected permissions. If you see the following dialog, click Allow selected permissions. 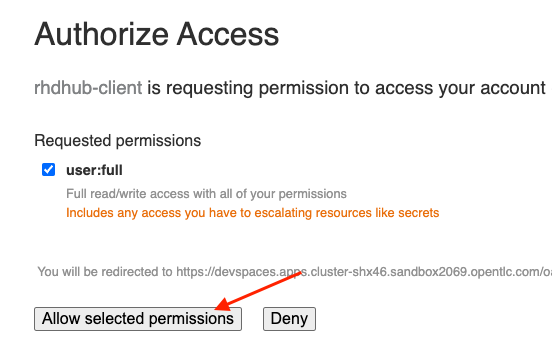
|
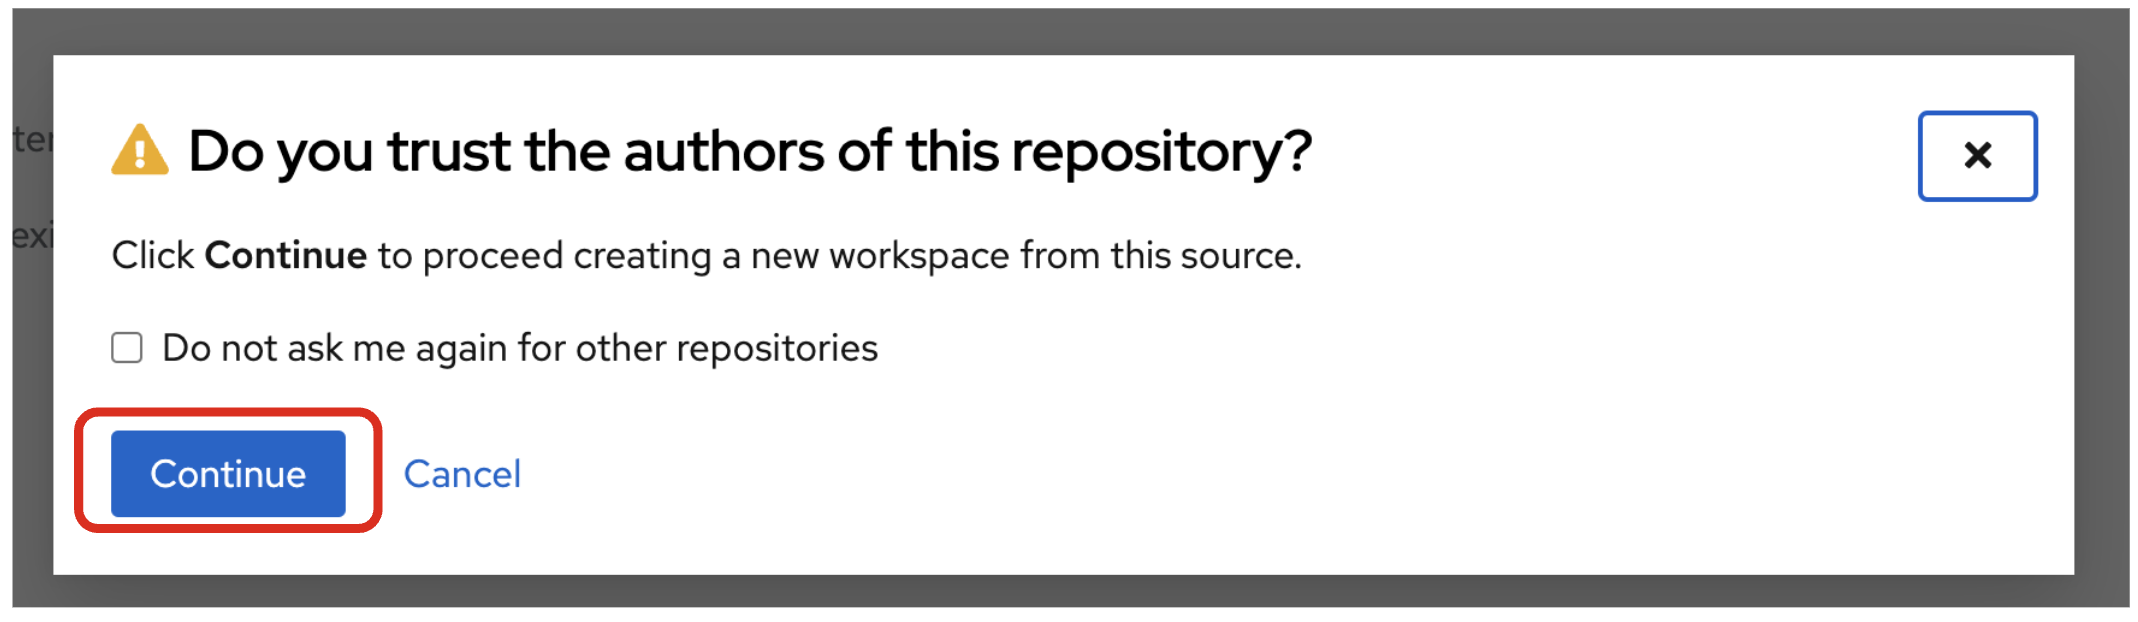
Click Continue to proceed creating a new workspace from this source.
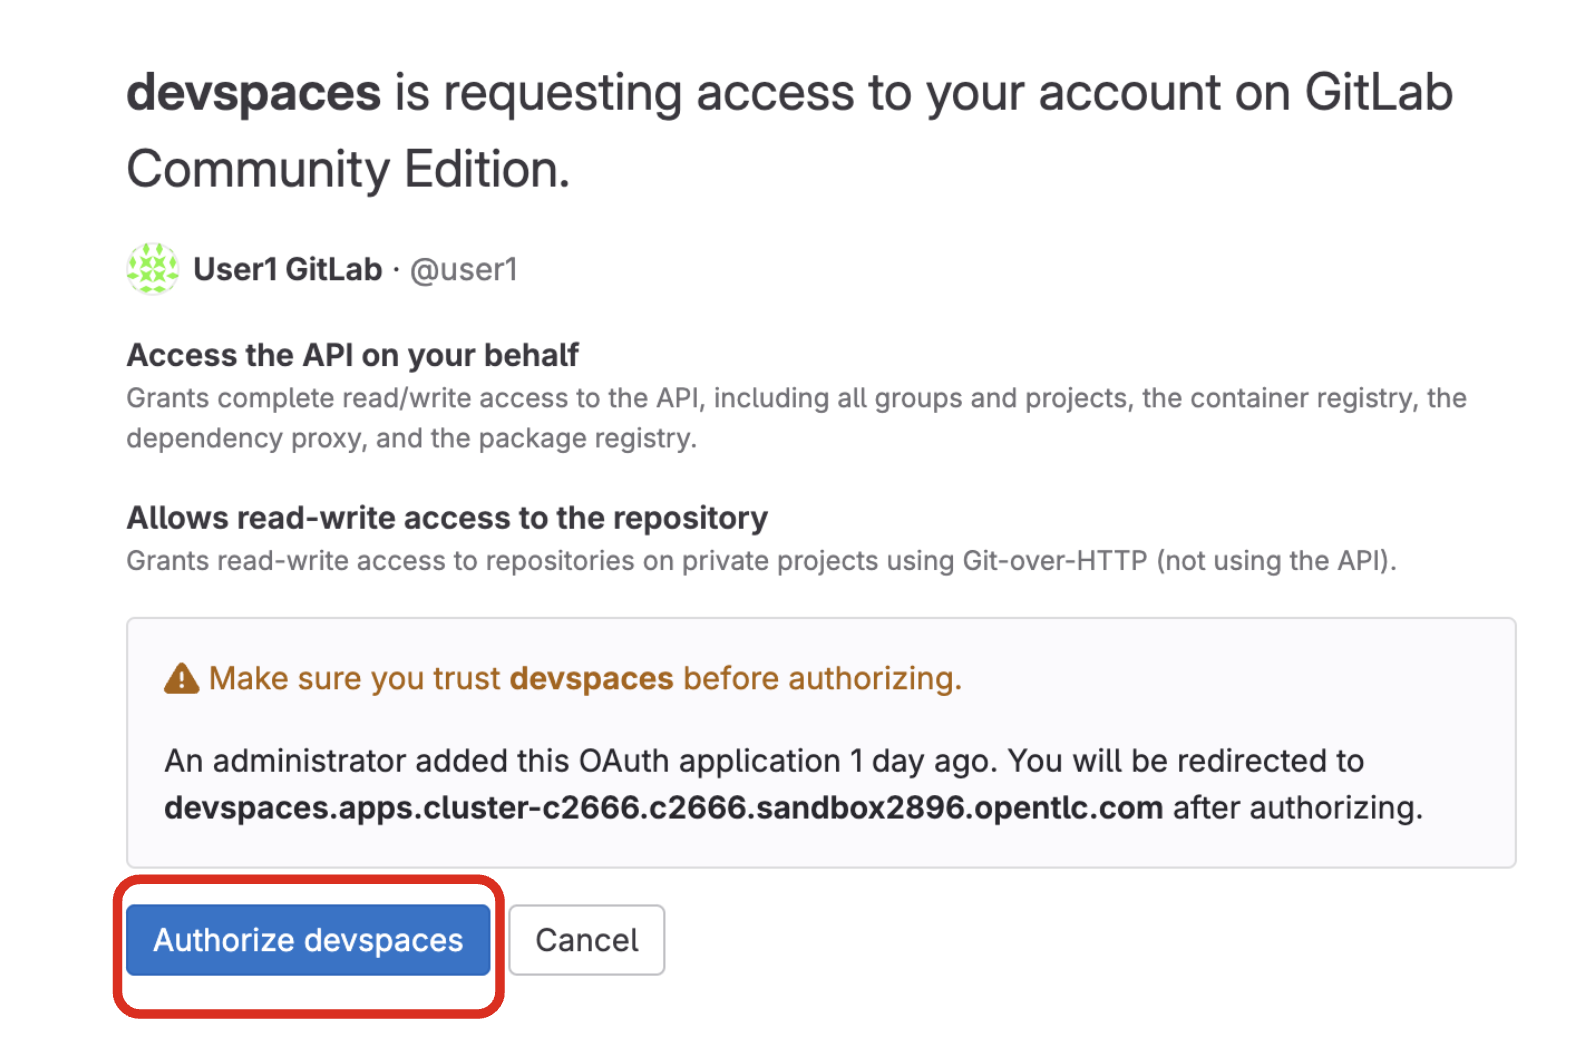
Authorize devspaces to use your account by clicking on the Authorize button.
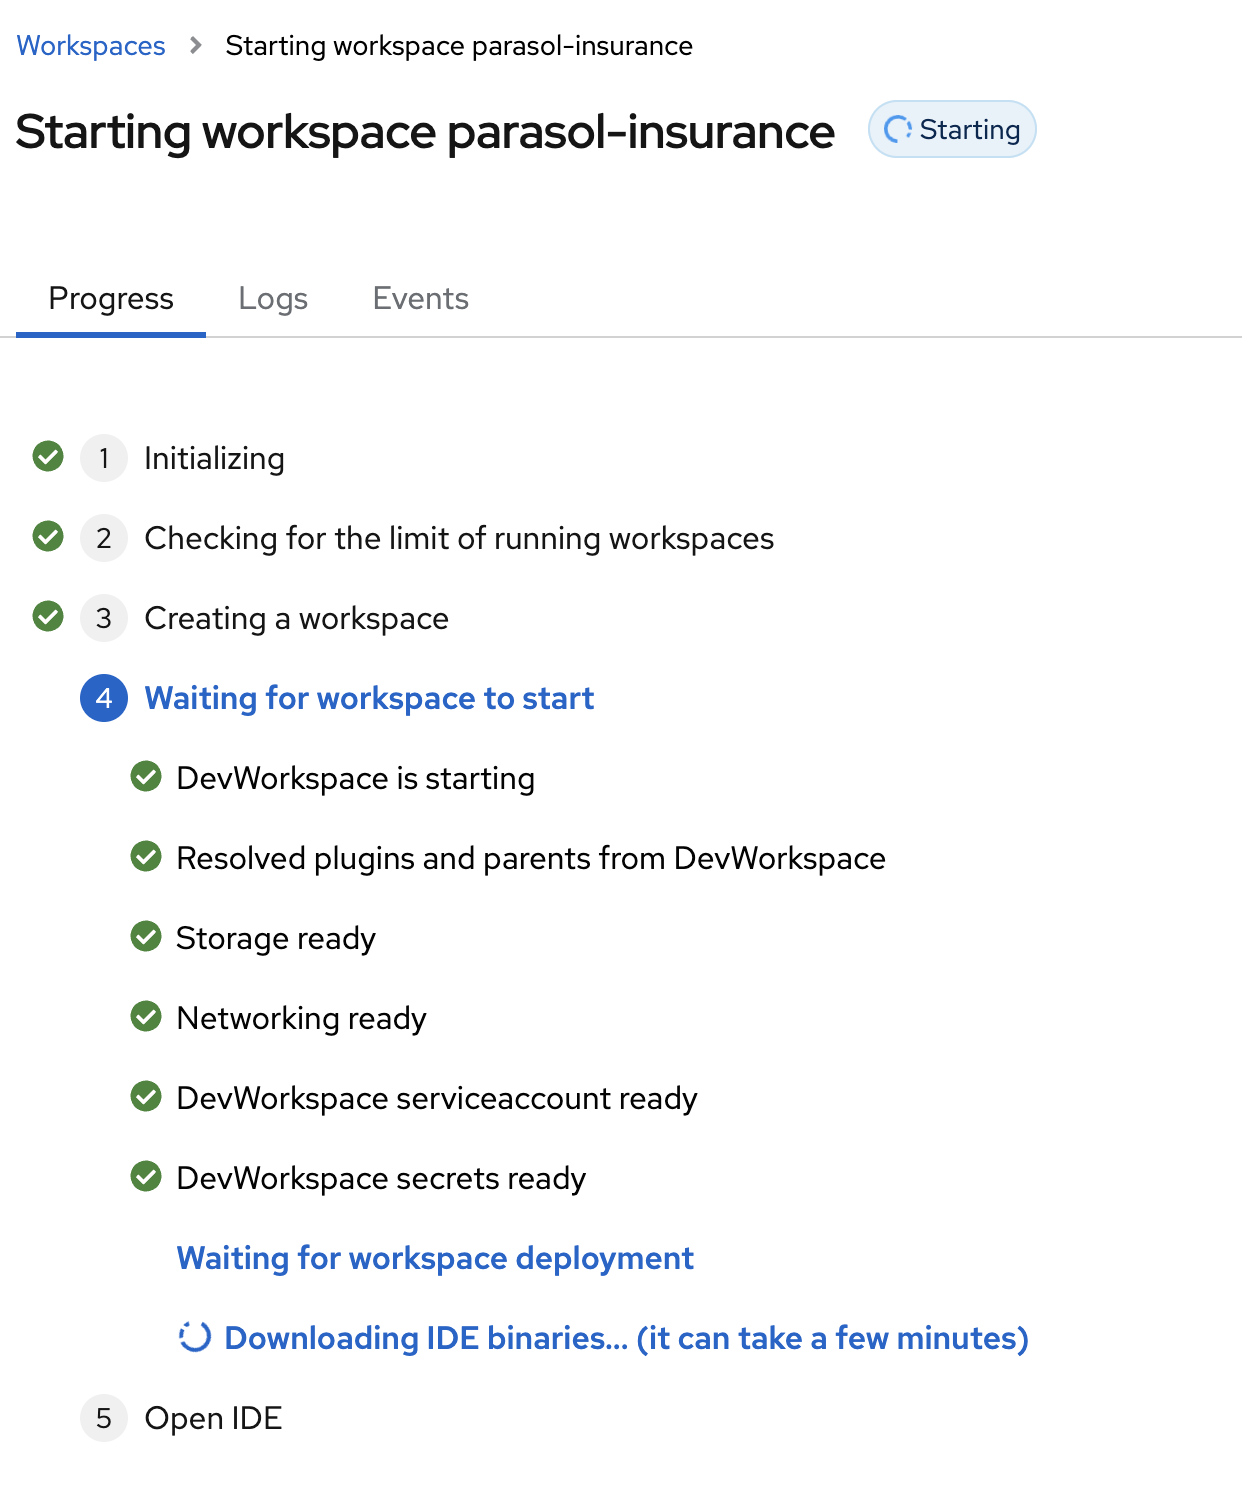
Wait for your Red Hat OpenShift Dev Spaces workspace to be ready. This can take a few minutes.
You will see a loading screen while the workspace is being provisioned, where Dev Spaces is creating a workspace based on a devfile stored in the source code repository, which can be customized to include your tools and configuration.
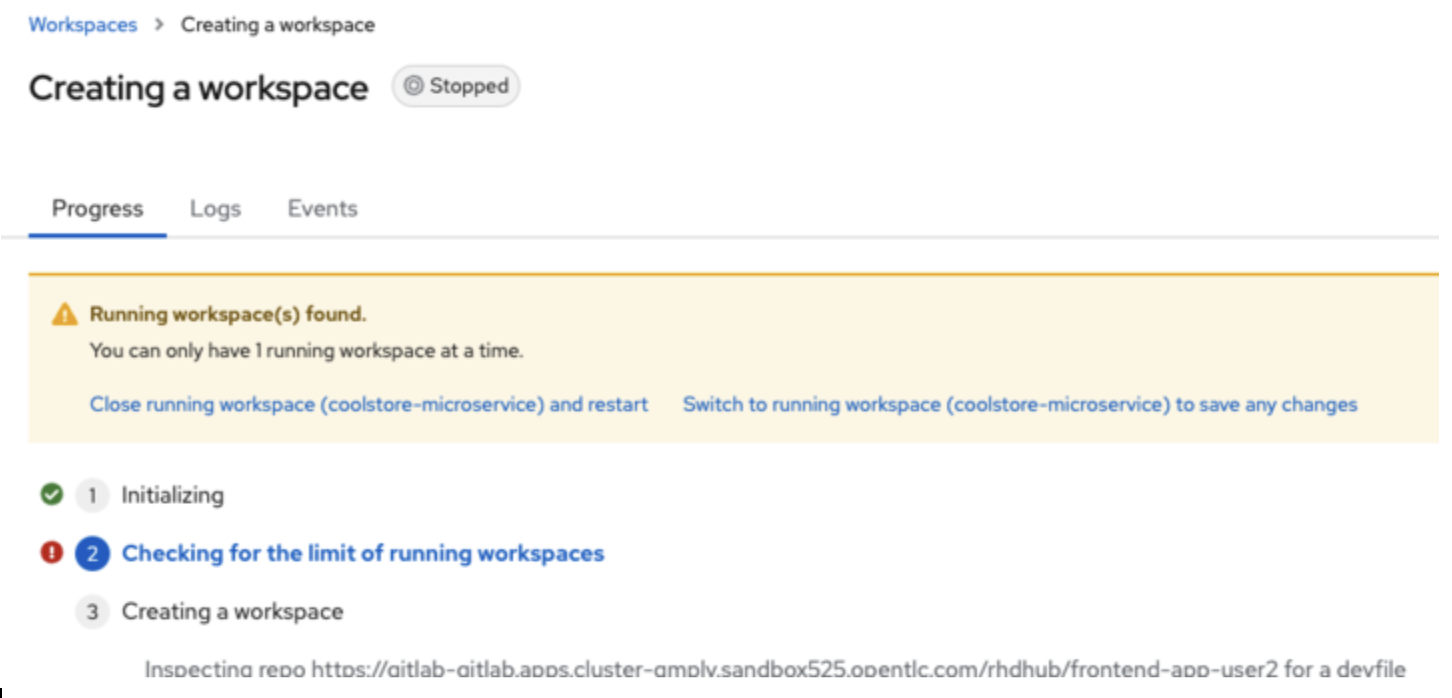
NOTE: In case your workspace fails to start, you can click on close running workspace and restart to try again.
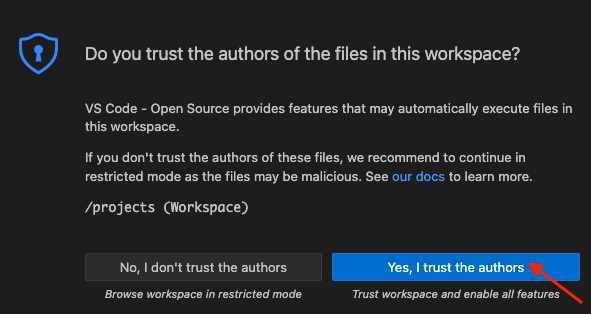
Confirm the access by clicking "Yes, I trust the authors".
Then you should see:
5. Model Testing Overview
As we mentioned in the goals section, we’re going to use two models to perform these tests. The configuration for these models can be found in .vscode/settings.json. Open this file and examine it’s contents, it should look like this:
{
    "jest": {
        "nodeEnv": {
            "PARASOL_MODEL_URL": "http://parasol-chat-predictor.aiworkshop.svc.cluster.local:8080/v1/chat/completions",
            "EMBEDDING_MODEL_URL": "http://parasol-embedding-predictor.aiworkshop.svc.cluster.local:8080/v1",
            "PARASOL_MODEL_NAME": "parasol-chat"
        },
        "rootPath": "prompt-testing"
    }
}
There are a three things to take note of in this JSON file.
-
PARASOL_MODEL_URL: This is the url of the pre-trained model with knowledge of the Parasol inurance company and it’s products. This model is hosted by OpenShift AI. Because we’re accessing the model from an application running on OpenShift Dev Spaces, we are able to use the internal OpenShift route to connect.
-
PARASOL_MODEL_NAME: The name of the model as configured in OpenShift AI
-
EMBEDDING_MODEL_URL: This is the url of the embedding model hosted by OpenShift AI. The embedding model is used by our tests to compare the response from the trained model with a pre-defined example for similarity.
6. The initial set of tests
We have included an initial set of tests which should pass when run against the Parasol Chat model.
For each of these tests we’re provided an expected response, so for example, when we ask the question: "In one sentence, who founded Parasol Insurance?" we should get a response similar to: "Parasol Insurance was founded in 1936 by James Falkner and James Labocki."
This test is described using:
  test('should pass when model is asked who founded Parasol insurance', async () => {
    await expect(await callModel('In one sentence, who founded Parasol Insurance? ')).toMatchSemanticSimilarity(
      "Parasol Insurance was founded in 1936 by James Falkner and James Labocki.",
      0.9
    );
  }, 10000);
If you take a look at the code above, you can see we are calling the model with the Asynchronous function, callModel.
We are then testing the response from the model to ensure it matches semantic similarity a given sample response using toMatchSemanticSimilarity.
The semantic similarity between the response and the example response needs to be above 0.9 (with a similiarity of 1 being an exact match)
7. Install Node modules
Before we get started running these tests, we need to install the required NPM modules, to do this, follow these instructions.
Open a Terminal window in your OpenShift Dev Spaces workspace.
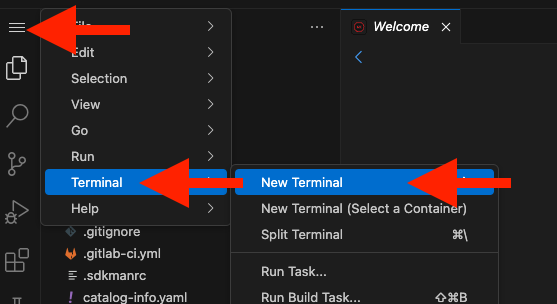
Enter the following commands:
cd prompt-testing
npm install
The output should be similar to the following.
npm WARN skipping integrity check for git dependency ssh://git@github.com/kenlimmj/rouge.git
npm WARN deprecated glob@7.2.3: Glob versions prior to v9 are no longer supported
npm WARN deprecated inflight@1.0.6: This module is not supported, and leaks memory. Do not use it. Check out lru-cache if you want a good and tested way to coalesce async requests by a key value, which is much more comprehensive and powerful.

added 773 packages, and audited 774 packages in 1m

82 packages are looking for funding
  run `npm fund` for details

4 moderate severity vulnerabilities

To address all issues (including breaking changes), run:
  npm audit fix --force

Run `npm audit` for details.
8. Run tests
We can now run the tests to ensure they pass.
Open the prompt-testing/index.test.js file in the VSCode Explorer.
Then, click on the Testing icon On the left hand panel.
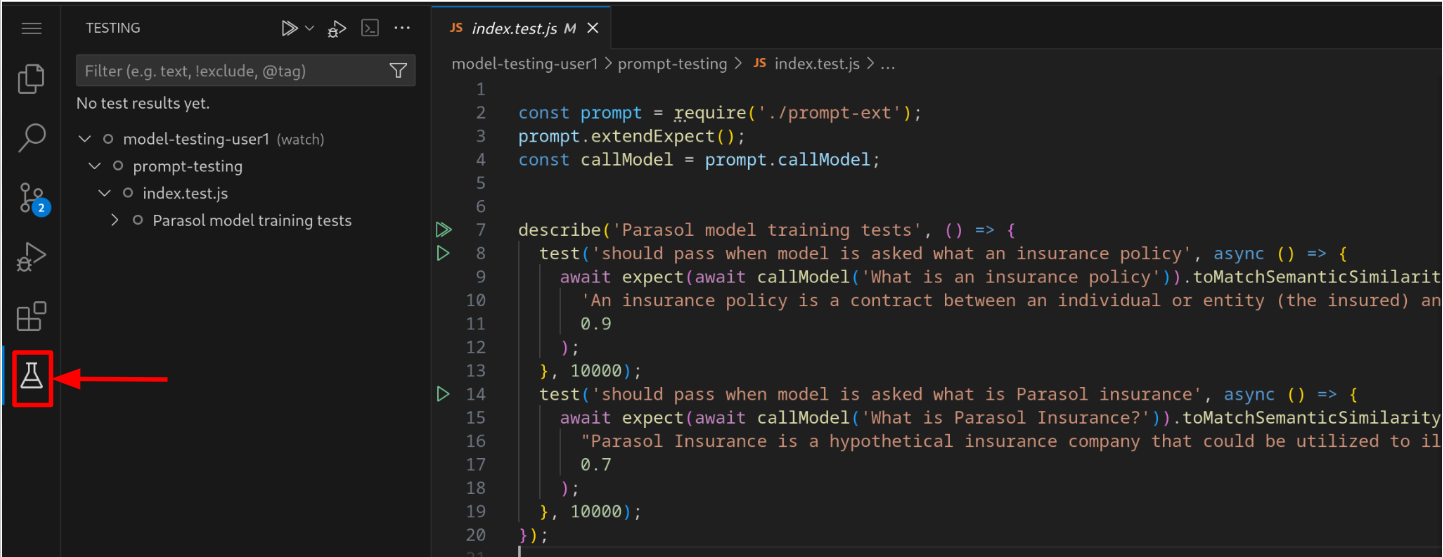
Click on the Run Tests icon at the top as shown below.
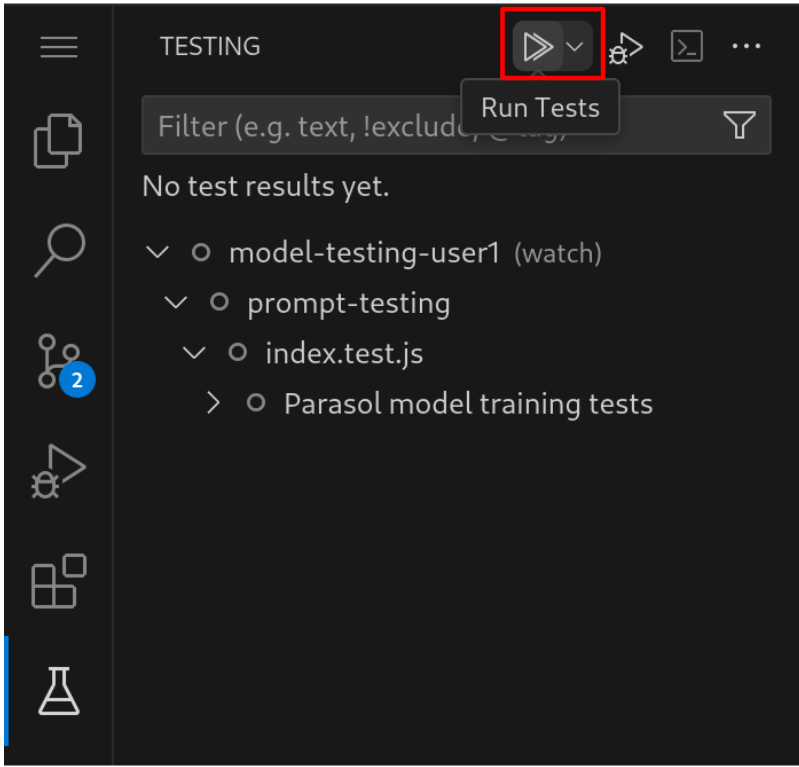
When the test run is complete you should see.
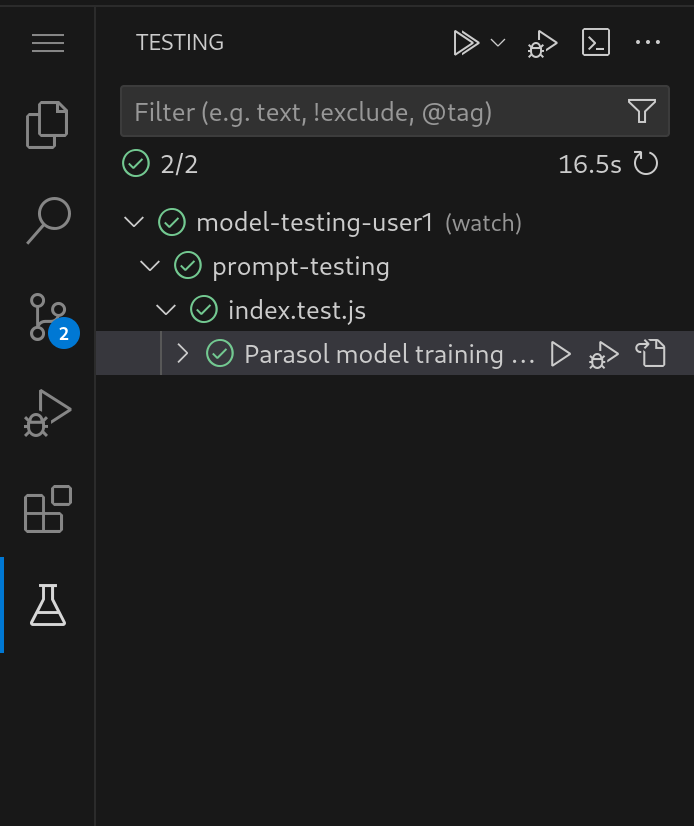
Both of the tests should have passed successfully.
9. Failing the tests
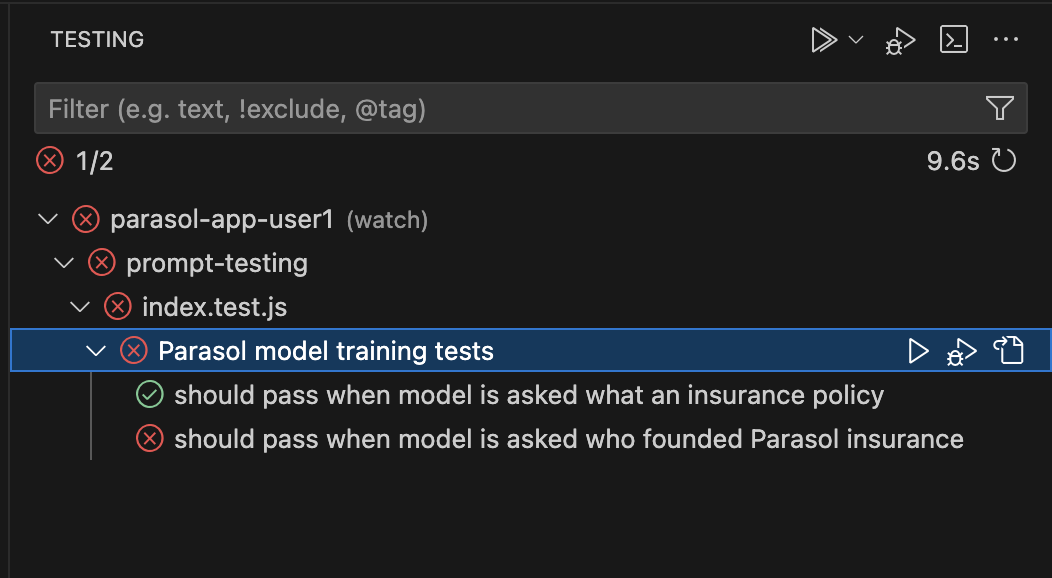
Let’s try a scenario where we’re using a model which has not been trained with Parasol Insurance specific data.
As we discussed above, one of our tests is testing responses to the question: "Who founded Parasol Insurance?".
To answer this question our model has been trained with knowledge about the history of Parasol Insurance.
Let’s change the model our tests are performed against to an untrained model (granite-30-8b-instruct). To do this, open the .vscode/settings.json file to replace the contents with:
{
    "jest": {
        "nodeEnv": {
            "PARASOL_MODEL_URL": "http://granite-30-8b-instruct-predictor.aiworkshop.svc.cluster.local:8080/v1/chat/completions",
            "EMBEDDING_MODEL_URL": "http://parasol-embedding-predictor.aiworkshop.svc.cluster.local:8080/v1",
            "PARASOL_MODEL_NAME": "granite-30-8b-instruct"
        },
        "rootPath": "prompt-testing"
    }
}
Go back to the Testing panel. Then, click on the Run Tests to run the tests again.
You should now see one of the tests failing.
Before we move on, replace the .vscode/settings.json file with the original contents below:
|
{
    "jest": {
        "nodeEnv": {
            "PARASOL_MODEL_URL": "http://parasol-chat-predictor.aiworkshop.svc.cluster.local:8080/v1/chat/completions",
            "EMBEDDING_MODEL_URL": "http://parasol-embedding-predictor.aiworkshop.svc.cluster.local:8080/v1",
            "PARASOL_MODEL_NAME": "parasol-chat"
        },
        "rootPath": "prompt-testing"
    }
}
10. Adding a new test
We’re now going to add a new test to test some new functionality we’ve added to our model.
Our model has recently been trained to understand the Apex plus policy option which will cover drivers for loss of income even if they are at fault.
To test this we’re going to ask our model:
Does Parasol insurance policies include loss of income cover if the insured driver is at fault?We expect the response from this question to be similar to the following, mentioning the Apex plus policy.
No, Parasol insurance policies do not include loss of income cover if the insured driver is at fault. However, Parasol does offer additional coverage options, such as Apex plus package, which provides reimbursement for loss of income if the policyholder is at fault.To create this test, open the index.test.js file. Then, add the following code below this comment, // ADD NEW TEST HERE.
describe('Parasol Claim response test', () => {
  const prompt = 'Does Parasol insurance policies include loss of income cover if the insured driver is at fault?';

  const response = 'No, Parasol insurance policies do not include loss of income cover if the insured driver is at fault. However, Parasol does offer additional coverage options, such as Apex plus package, which provides reimbursement for loss of income if the policyholder is at fault.';

  test('should pass when response to policy question is accurate', async () => {
    await expect(await callModel(prompt)).toMatchSemanticSimilarity(
      response,
      0.8
    );
  }, 20000);
});
Let’s test the model again by clicking on the Run Tests button.
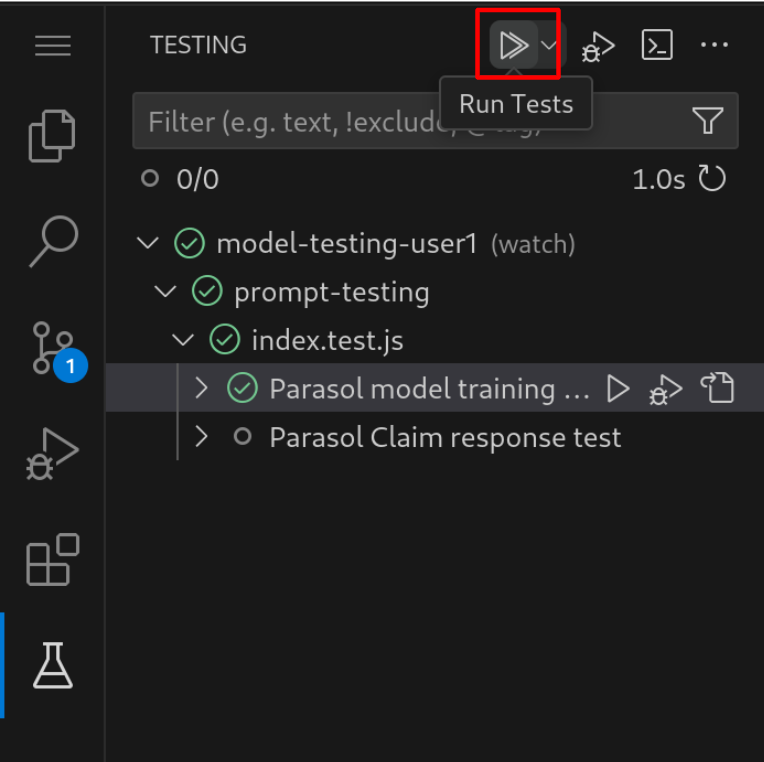
When the test run is complete you should see.

11. Conclusion
We hope you have enjoyed this module!
Here is a quick summary of what we have learned:
-
Responses from LLMs are not deterministic, we need to use different techniques to test LLM integrations. Tools are available to help write this tests for example: Promptfoo.
-
Embedding models can be used to test for the similarity of strings. For LLM testing we can use an embedding model to ensure responses are similar to an expected response within a threshold.
-
How to add a new test to ensure an LLM response from a customer claim query is similar to an expected example.